Table of Contents
Advertisement
Advertisement
Table of Contents

Related Manuals for KegLand X Series


Summary of Contents for KegLand X Series
- Page 1 Series X Kegerator Instruction Manual...
- Page 2 (https://www.youtube.com/kegland). You can find the link on our website www.KegLand.com.au If there is any part of these videos above that you do not understand or you cannot access please call or email www.KegLand.com.au or your nearest KegLand Distributor for more assistance.
-
Page 3: Table Of Contents
Contents Keg Types ............................5 Commercial style kegs ........................5 Keg coupler assembly ........................5 How to use keg couplers......................6 Alternative ways to connect EVABarrier tube to a keg coupler ............ 6 Homebrew style kegs........................6 Attaching EVABarrier tube to a barbed disconnect ..............7 Attaching EVABarrier tube to an MFL disconnect................. - Page 4 Triple Tap Series X Installation Diagram ..................19 Quadruple Tap Series X Installation Diagram ................. 20 Adjusting the temperature of the Series X ..................21 Minimum clearance around the Series X ................... 21 Troubleshooting issues with the Series X ................... 21 Beer is too frothy or no beer pours when the tap is opened ............
-
Page 5: Keg Types
Keg coupler assembly Inside the box of a KegLand keg coupler you will find two types of one-way check valves; gas duck bill valve (left) and a liquid torpedo check piece (right). The duck bill valve is used for the gas inlet and the torpedo check piece or non-return ball is used for the liquid outlet. -
Page 6: How To Use Keg Couplers
Cornelius keg category can be split into two main types; ball-lock and pin-lock. If you have bought a new or second-hand keg from KegLand then it will be a ball-lock type Cornelius keg. However if you have sourced a second-hand keg from elsewhere you will need to determine which type of Cornelius... -
Page 7: Attaching Evabarrier Tube To A Barbed Disconnect
keg you have. This can be determined by investigating the type of posts on the keg. The two different types of Cornelius kegs are shown below: Keg-type Post Disconnects Pin-lock Liquid Ball-lock Liquid Liquid If you are using mini-kegs then you will need a ball-lock tapping head (K06972) to dispense from it, this converts it into a normal ball-lock keg which uses the same fittings as a Cornelius ball-lock keg. -
Page 8: Attaching Evabarrier Tube To An Mfl Disconnect
2 metres – 3 metres 3 metres – 4 metres The KegLand font kits come with pre-cut beer and gas line. Each section of beer line is 4mm ID and 1.5 metres in length. This should not need to be cut down. -
Page 9: Balancing Your Keg System With Co
2.6 volumes of carbonation and the fridge temperature is 2°C then carbonate at approximately 11 PSI and dispense at approximately 12PSI. https://www.kegland.com.au/media/images/KegLand%20Set%20&%20Forget%20CO2%20Carbonati on%20Chart.png NOTE: Do not try to fix a slow or fast pour rate by adjusting the dispensing pressure. This will result in your beer either going flat or over carbonated. -
Page 10: Items Included
(designed to suit 2.6Kg CO cylinder) 1 x Chrome Plated Guard Rail If you have bought a KegLand font kit they should include the following items: Single Tap Font Kit Double Tap Font Kit 1 x single tap – stainless steel font 1 x double tap –... -
Page 11: Triple Tap Font Kit
Quadruple tap font kit Triple tap font kit 1 x quadruple tap – stainless steel font 1 x triple tap – stainless steel font 4 x duotight compatible short shank 3 x duotight compatible short shank 4 x duotight 6.5mm x 8mm reducer 3 x duotight 6.5mm x 8mm reducer 4 x Black plastic tap handle 3 x Black plastic tap handle... -
Page 12: Installation Steps
Installation steps Step 1. Preparation Remove all items from inside the kegerator • Ensure all items have been included • • Remove any protective plastic from the kegerator before first use. Step 2. Install castor wheels • Make sure the kegerator is empty •... -
Page 13: Step 8. Feed The Evabarrier Gas Line Into The Fridge
Push the 5mm EVABarrier gas line over the outlet barb and secure with a stepless clamp • Attaching to a duotight fitting (optional but easier) Unscrew the swivel nut and barb on the regulator outlet • Screw in a duotight 8mm x FFL fitting onto the MFL thread on the regulator outlet •... -
Page 14: Step 9. Setting Up The Evabarrier Gas Line For A Single Tap Font
Step 9. Setting up the EVABarrier gas line for a single tap font. (If using a dual, triple or quadruple font skip to step 10) Attach the gas line onto a keg coupler or grey ball lock disconnect via either the barb or a •... -
Page 15: Step 11. Assembling Single, Double And Triple Tap Fonts
Step 11. Assembling single, double and triple tap fonts (If using a quadruple font skip to step 12) Remove the cap from the top of the font and ensure the font collar is present at the base of • the font prior to attaching any duotight compatible short shanks. Feed the length of beer line through the tap hole on the front of the font and feed the beer •... - Page 16 This can be performed two different ways: Method 1 – Pressure test Step 1. Attach all disconnects to an empty keg. Step 2. Set the pressure on the regulator at 20 PSI. Step 3. Turn the CO cylinder valve handle off Step 4.
-
Page 17: Installation Diagrams
Installation diagrams Single Tap Series X Installation Diagrams... -
Page 18: Double Tap Series X Installation Diagram
Double Tap Series X Installation Diagram... -
Page 19: Triple Tap Series X Installation Diagram
Triple Tap Series X Installation Diagram... -
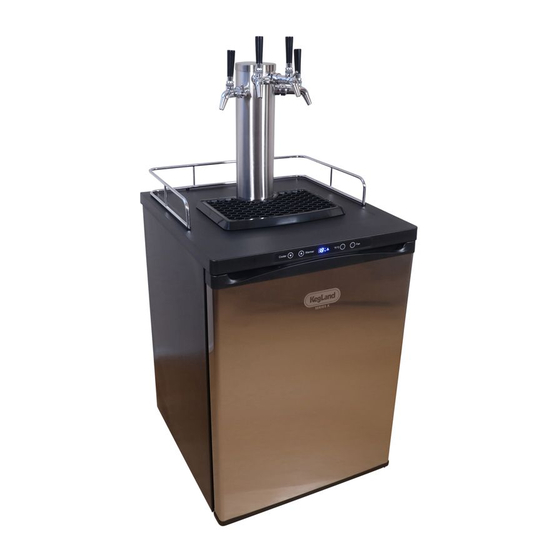
Page 20: Quadruple Tap Series X Installation Diagram
Quadruple Tap Series X Installation Diagram... -
Page 21: Adjusting The Temperature Of The Series X
Adjusting the temperature of the Series X • Hold either the Cooler or Warmer button for atleast 3 seconds. This will cause the temperature displayed to start flashing indicating the set temperature • can now be adjusted • Adjust the set temperature by pressing the cooler or warmer button. •...
Need help?
Do you have a question about the X Series and is the answer not in the manual?
Questions and answers