Advertisement
Quick Links
PATENT
PENDING
Nurture Right 360™ Instructions
CAUTIONS:
Thoroughly clean the incubator after each use. Then fully open the grey air vent and
plug the incubator into power to run dry (with no added water) for 24 hours to ensure
incubator is thoroughly dry before storage.
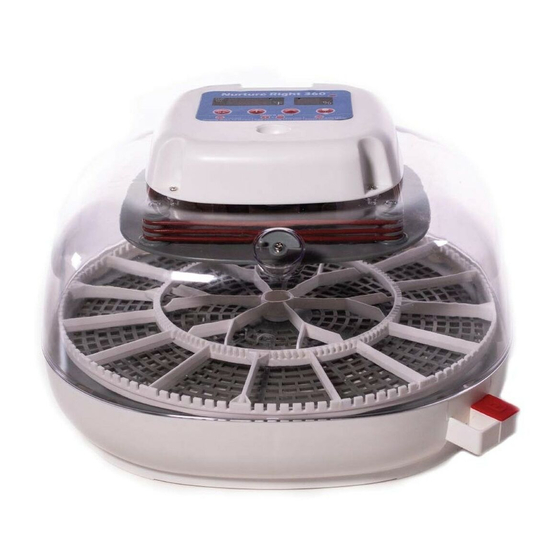
1) Digital Control Function
Blinks during
operation
Press to display
days-to-hatch
2) Choosing the Right Location for Your Incubator
Incubation room environment can have a considerable effect on hatch rate. The
incubator needs to be placed in a room with stable temperature between 74°-80°F.
Pay attention to the room temperature to ensure that it doesn't drop below 72°F
particularly at night. Do not place the incubator near a window to avoid direct
sunlight and drafts. Do not use the incubator on the floor. Not enough fresh air is
available close to the ground due to the CO2 concentration.
3) Assembling the Incubator
a) Place the egg tray onto the base, making sure the tray sits flat and level.
b) Fit the egg turner onto the "D-shaped" shaft of the turner motor located in the
center of the incubator base.
Install the egg turner onto the base
through the hole on egg tray
Egg turner
Egg tray
Base
WARNING:
This incubator is only to be used with the power supply unit provided. • This incubator must be placed in an area where it is out of the reach of animals.
incubator on the floor. Not enough fresh air is available close to the ground due to the CO2 concentration. • This incubator is not a toy. Children should not play with the
incubator and must be supervised by an adult when using it.
ON – auto turner is on
OFF – auto turner stops
3 days prior to hatch
Auto-off after 5 minutes
The screen will display "d-# #", which
refers to the remaining days to hatch day.
Test the egg turner several times after
inserting the eggs to ensure that every
egg can turn smoothly.
The lamp will automatically turn off after
5 minutes.
Refer to the "Adjusting Temperature
and Hatch Days" section.
Reset to factory settings.
c) Plug the egg turner cord (coming out from the base) into the socket
located on the back of the incubator top. Connect the power supply
unit to the incubator top.
d) Place the top onto the incubator base, ensuring the clear
window is completely closed. It's important to align the two notches on
the bottom of the clear window with the two sockets on the base.
Make sure the notches align completely with the two sockets on the base
4) Adjusting Temperature and Hatch Days
This incubator is factory pre-set to 99.5°F and 21 hatch days for chicken eggs.
Upon plugging the incubator into power, the timer will immediately begin
countdown from 21 days and the temperature will gradually increase to 99.5 °F.
During this time, the heater indicator light will blink - this is normal.
To change the temperature, press and hold the "MENU" button for 3 seconds,
and the pre-set "99.5" °F will blink on the screen. Then, use the "+" or "-" buttons
to adjust the temperature.
After completing the temperature adjustment, press the "MENU" button again to
enter hatch days setting mode, and the pre-set "d - 21" will blink on the screen.
Then use "+" and "-" to adjust the hatch days.
When finished, press the "MENU" button once more to exit the setting mode.
The incubator will then start to run using the new settings.
During the initial warm up period, the "Low Temperature" alarm may be
triggered as the unit slowly warms up to 99.5°F. This is normal due to the cooler
starting temperature of the eggs, water, and ambient air inside the incubator. To
disable the alarm, press the "MENU" button once.
5) Controlling Humidity
The humidity in this incubator can be roughly adjusted by adding water to one
or both water pots via the external water filling port and can be further adjusted
via the air vent knob to achieve the required humidity level.
Day 1 until 3 days before hatch day:
To prepare the incubator for the first stage of incubation, fill water pot "A" and
open the grey air vent to halfway. Then wait for 2-3 hours for the humidity to
fully stabilize, to achieve a humidity around 50% (48-55% is acceptable) which
is suitable for most poultry.
Last 3 days before hatch day:
To prepare the incubator for the final stage of incubation, remove the red plug
from water pot "B" and add water to water pot "B" in addition to water pot "A".
Next, open the grey air vent fully. Then wait 2-3 hours for the humidity to fully
stabilize, to achieve a humidity around 70% (65-75% is acceptable) which is
suitable for most poultry.
Ver. 1.0NU
• Do not use this
Advertisement

Related Manuals for Harris Farms Nurture Right 360

Summary of Contents for Harris Farms Nurture Right 360
- Page 1 PATENT Ver. 1.0NU PENDING Nurture Right 360™ Instructions c) Plug the egg turner cord (coming out from the base) into the socket CAUTIONS: located on the back of the incubator top. Connect the power supply unit to the incubator top.
- Page 2 7) Using the Built-In Egg Candler Step 02: IMPORTANT NOTE: Adjust grey air vent knob and wait for Remove the lid and place it next to the incubator base, taking care not to unplug 2-3 hours for the humidity to fully the egg turner cord.
Need help?
Do you have a question about the Nurture Right 360 and is the answer not in the manual?
Questions and answers
how often should the egg turner turn? is it constant motion or just occasionally?
The egg turner on the Harris Farms Nurture Right 360 is not in constant motion; it turns the eggs slowly and occasionally throughout the day.
This answer is automatically generated
Just took incubator out of the box and the egg turner will not work..any suggestions
To fix the egg turner on the Harris Farms Nurture Right 360 incubator, the manufacturer may guide you through steps to reset the turner counter. If that does not resolve the issue and the motor is faulty, replacement parts may not be available, especially for older units. Manna Pro, the company behind the product, does not stock replacement parts for units they consider "old" and does not recommend aftermarket parts. Therefore, if the reset does not work and the motor is the issue, a repair may not be possible due to lack of replacement parts.
This answer is automatically generated
How much water do I add to start. And how much water do I need to add daily? Please help
To start, fill reservoir A about three-quarters full with distilled water. During the first 18 days, check and refill reservoir A daily to maintain 50–55% humidity.
This answer is automatically generated
Which wires hook where
The Harris Farms Nurture Right 360 incubator connects to power by plugging the egg turner cord from the base into the socket on the incubator top. Then, the power supply unit is connected to the incubator top. If adapting it for a 12V battery, the plug end may need to be cut off, and the positive and negative wires should be connected accordingly.
This answer is automatically generated
The light did not come on for the automatic turner, how do I know if the auto turner is working
Check the control panel of the Nurture Right 360 incubator. Above the humidity reading, there should be an LED indicator for the turner. If the LED is off, the turner will not operate automatically unless you press the plus and minus buttons simultaneously. If the turner is not functioning, perform a "reset to factory" procedure to restore its operation.
This answer is automatically generated
I've been using my Nurture Right 360 for over 2 weeks. Today it beeped for the first time. I checked the temperature and humidity. All was good (I checked it with another thermometer and a hygrometer). There is nothing blocking the airflow around the incubator. What would cause it to beep?
The Harris Farms Nurture Right 360 incubator could beep due to issues such as a fan malfunction, incorrect humidity or temperature levels, or the need for a reset. If the incubator is not functioning properly, a reset can be performed by pressing the “MENU” and “-” buttons at the same time for about 5 seconds until a sound feedback is heard and the screen blinks once. Additionally, unplugging the power connector for 2 minutes and then reconnecting it may help resolve certain issues.
This answer is automatically generated
How do you set the egg turner on Nurture Right 360?
To set the egg turner on the Harris Farms Nurture Right 360 incubator:
1. Plug the egg turner cord (coming from the base) into the socket located on the back of the incubator top.
2. Connect the power supply unit to the incubator top.
3. Place the top onto the incubator base, ensuring the clear window is completely closed. Align the two notches on the bottom of the clear window with the two sockets on the base.
4. The digital screen will display “d-# #”, indicating the remaining days to hatch.
5. Test the egg turner several times after inserting the eggs to ensure proper operation.
The auto turner is on by default and stops turning three days before hatching.
This answer is automatically generated
My incubator is missing the cords for the power supply and egg turner. Are those parts that can be purchased separately?
I have an EE code in the humidity window. I tried unplugging and doing the factory reset but it remains.
I cannot get the egg turner out of incubator. It is stuck!