Soloshot 3 Manual
First-time tracking
Hide thumbs
Also See for 3:
- User manual (22 pages) ,
- Quick start manual (10 pages) ,
- User manual (4 pages)
Advertisement
Advertisement
Table of Contents

Related Manuals for Soloshot 3


Summary of Contents for Soloshot 3
- Page 1 First-Time Tracking...
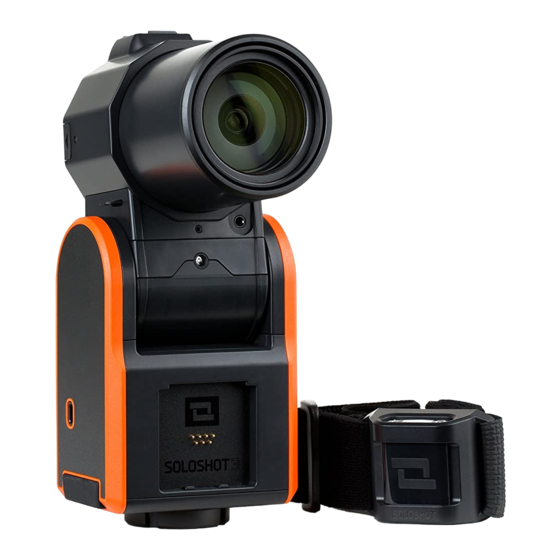
- Page 2 GETTING READY In the Box 1. SOLOSHOT3 1. Sturdy Tripod Camera Lens, Camera Base, Tag and sold separately Armband 1/4” or 3/8” mounting screw 3. Approved Micro SD Card sold separately www.soloshot.com/sdcards MicroSD • FIRST-TIME TRACKING...
- Page 3 GETTING READY Where to Set-Up TRACKING IS FOR OUTDOOR USE ONLY The SOLOSHOT3 Camera and Tag have several setup requirements: OPEN AREA CLEAR VANTAGE POINT Ensure that the Camera has an unobstructed view of the subject who will be wearing the Tag. For Example, ensure that people won’t be consistently standing or passing Choose a park, field or beach, so that...
- Page 4 Do not keep in your hand or put in a pocket or bag. STEP 2 Prepare the Tag Make sure that your Tag is on and has a good GPS signal. Finding a GPS signal can take up to 3 minutes. • FIRST-TIME TRACKING...
- Page 5 From the Home Screen on the back of the Camera, Tap the Track icon to launch the Track App. Tap the Tag icon ( ) to view available Tags. Left number: Right number: Tags being tracked Paired tags in range The name of the Tag will match what’s displayed on the Base.
-
Page 6: Troubleshooting
Tap the back arrow ( ) in the top left to return to the main screen of the Track App. TROUBLESHOOTING If the Tag is not shown in the Tag Manager Dock the Tag to the front of the Camera Base. You will see your Tag appear in the list. -
Page 7: Prepare The Camera
STEP 3 Prepare the Camera Tap the blue Tracking button ( Select TRACK. The default settings will be used: MODE: Video RESOLUTION: 1080p60 FRAMING: Bottom Middle FOV: Medium Select Field Mode. Tap CONTINUE. FIRST-TIME TRACKING •... - Page 8 IMPORTANT! Tag must always be 30 ft. away from the Camera The Camera will not track well when the Tag is less than 30 feet from the Camera. Outside 30 ft. 10-30 ft. 10 ft. 10 ft. 10-30 ft. Outside 30 ft. •...
- Page 9 NOTE: For purposes of this tutorial, we’re using Field Mode. In the future, feel free to try the other Track Modes based on what activity you’ll be filming. Water Field Terrain Flight • Surf • Soccer • Mountain Sports • RC Airplanes •...
-
Page 10: Successful Calibration
STEP 4 Successful Calibration The Camera will point at the Tag after calibration and automatically begin recording. Refer to Step 8 for instructions on recording. If the Camera is not pointing at the Tag after calibration, begin walking back and forth at least 30 feet away (15 paces) from the Camera until the green light can be seen. - Page 11 STEP 6 How To Improve Tracking: Manually Place the Tag down (logo up) at least 30-ft. from the Camera. Access the dropdown menu from the top of the screen on the back of the Camera. Tap the Arrows button. Use the arrows to manually center the Tag in the screen.
- Page 12 STEP 7 Wear the Tag Snap the Tag into the Clip with the button side aligned to the clip window. Wear the Tag with buttons facing upward and logo facing out. IMPORTANT Holding the Tag upside-down, holding it in a closed hand or putting it in a pocket may cause poor tracking.
-
Page 13: Start/Stop Recording
STEP 8 Start/Stop Recording Record starts automatically after calibration by default. You can start and stop recording from either the Tag or the Base. From the Tag Press and hold the ( ) plus button to toggle record on or off From the Base Tap the ( ) record button to start or stop... -
Page 14: Ending Your Session
STEP 9 Ending your Session To end the session, close out of the Track App. Access the dropdown menu. Tap the Home button. You’ll now be in the main menu. • FIRST-TIME TRACKING... -
Page 15: Power Off
You can power off the device at any time, even if you’re actively recording and/or tracking. Powering down the Camera Hold down the power button for 3-seconds, then tap Power Off to confirm your selection. Powering down the Tag Press the power button for 2 seconds.
Need help?
Do you have a question about the 3 and is the answer not in the manual?
Questions and answers