Advertisement
Quick Links
Advertisement

Related Manuals for Bikespeed Real Speed TQ HPR 120S

Summary of Contents for Bikespeed Real Speed TQ HPR 120S
- Page 1 Instructions for the installation and description of the functions for HPR 120S mid-motor design on Flyon bikes from year 2019 to 2020 with Haibike HMI …for further information visit… date: 23.04.2020 current version of this manual at bikespeed.de page 1...
-
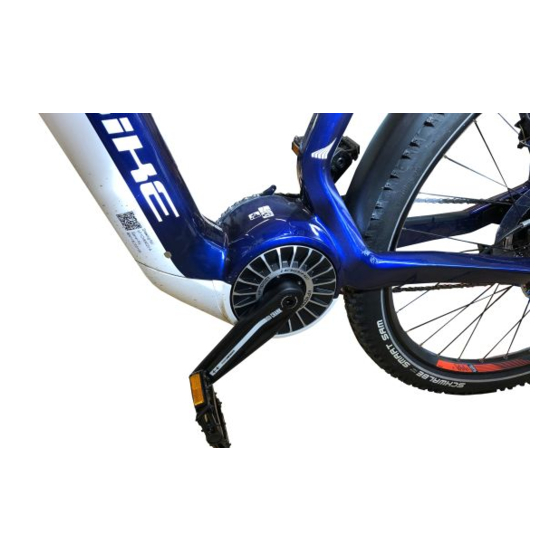
Page 2: Product Description
Product description The bikespeed-RS is a simple and compact kit to bypass the speed limit of 25 km/h of Haibike Flyon bikes with TQ HPR 120S mid-design drives with Haibike HMI display. The installation is completely invisible. In contrast to other commercial tuning kits for pedelecs the bikespeed-RS displays the "real"... -
Page 3: Description Of Functions
Please enter the combination continous with a pause from one to three seconds beetwen two key strokes. Repeat the procedure if necessary in order to obtain the desired setting. Hint: A switched off bikespeed-RS can not be switched on with the combination for service-mode (see on page 5)! page 3... - Page 4 The configuration options can be found in the shop on our website. There all possibilities are described with many tips and videos. If you are interested to upgrade your standard bikespeed RS on a custom version, you can feel free to contact us.
- Page 5 Begin on the highest level. In case of success the entire battery index will blink 3x and meanwhile the software state of the bikespeed-RS will be shown on the speed indicator. Now the tuning is in service mode and maintenance as well as software updating can be executed.
- Page 6 After activating the service mode, we recommend to switch off the bike without moving it again. If a speed is displayed it could change the trip, avg- or max-speed. Hint: A switched off bikespeed-RS can not be switched on again with the combination for service-mode! Hint to Haibike eConnect In The Haibike eConnect app and also in the web portal, not all values of recorded routes are display correctly if a bikespeed-RS is installed.
- Page 7 Please inquire about legal consequences that may result for you from installing and using the tuning before you use it. We expressly point out that using the bikespeed-RS leads to a loss of warranty by the manufacturer. Furthermore there are no claims to product liability for your pedelec/e-bike viable for the manufacturer and bikespeed.
-
Page 8: Help In Case Of Problems
Help in case of problems If your bikespeed-RS doesn’t work correctly at any given time please check the following steps in order to help yourself. Should you still have problems please write an email before sending back the bikespeed-RS. Cause Solution - bicyce doesn’t start or... - Page 9 - bikespeed-RS (c) can not - Keep in mind you have to switch the switched on or off stages to enter the combination. - Please start in a sufficient high or low stage. - Please enter the combination continous with a pause from one to three seconds beetwen two key strokes.
- Page 10 Example installation on a Haibike Flyon ADVENTR 5.0 (2019) In order to access the connectors for connecting the bikespeed RS, the motor must be removed and cables pulled through the frame. Please follow the instructions on the following pages. Required tools:...
- Page 11 For the installation of the bikespeed-RS, it is best to turn the bike upside down. Please place under the handlebar grips spacer blocks before, so that the bike does not rest on the display, the brake or shift levers. In our example we use squared timbers measuring 10 x 10 cm.
- Page 12 Open the lock of the battery, remove the lock cover and pull the battery out of the frame. Remove the cover of the cable inlet cover in front of the frame of the handlebar. Depending on the model, this is fixed with a screw or simply pushed in.
- Page 13 Remove the cover of the cable inlet cover for the cables of the display (1) on the top tube. Then locate the round black 6-pin connector to the display (2) in the top tube and pull it out of the opening.
- Page 14 When the plug connection to the display is pulled out of the front opening, disconnect it and connect the bikespeed RS to the corresponding counterparts. The cable tie can be removed afterwards. Pass the longer cable of the bikespeed-RS through the battery compartment down to the motor.
- Page 15 Loosen the 4 screws of the motor cover with a size 4 Allen key. Then remove the cover and set it aside. Please note that the radio module is installed in the cover and connected to the bike with a cable. Take the chain off the front chainring.
- Page 16 After the connector, these change into a kind of black 2-pin speaker wire and go to the lamps. These two connectors are not required for the installation of bikespeed- The speed sensor connector is usually marked in red and has black and brown colored wires colors.
- Page 17 To do this, press with a thin slotted screwdriver or with your fingernail on the unlocking part marked with the red arrow and pull the connectors apart. Connect the just disconnected connectors to their corresponding counterparts of the long bikespeed RS cable. page 17...
- Page 18 Loosen the two fixing screws of the cable holder (1 + 2) with a size 4 Allen key. Then insert the additional cable of the bikespeed-RS under the cable holder (3) and tighten it again. page 18...
- Page 19 Guide the cable of the bikespeed-RS behind the shielding plate of the battery upwards. Make sure that the cable will not be in the way when inserting the battery. Store the bikespeed RS with all connectors and cables in the opening shown.
- Page 20 To re-assemble the wheel, proceed in the following order: Place the engine vertically. Please be careful and do not use force to avoid bending the pins of the motor connector. Tighten the motor with the two Torx T30 screws. Place the chain on the front chainring. Place the motor cover and screw tighten with the 4 Allen screws.
- Page 21 Hint for water protection The opening in the housing is by design, so that any water can quickly drain and dry. Of course the electronic is protected with a splash proof sealing. For the succes of drying the opening should be placed downwards. If this is not possible, we recommend additional water protection.
- Page 22 Hint for disposal Electric and electronic devices that have become waste are called old devices. Owners of such old devices have to bring these to recycling facilities, where these are handled and recorded separately from urban solid waste. Old devices must not end up in the household refuse. In fact they have to be collected in special collecting and recycling systems.
- Page 23 page 23...
-
Page 24: Eu Declaration Of Conformity
GmbH Huberstr. 17 97084 Wuerzburg hereby declares that the following product: Name of the product: bikespeed-RS Year of construction: 2014-2020 is in accordance with all appropriate regulations of the EMV-guideline (EMC) 2004/108/EU, the disposal-guideline 2012/19/EU as well as the RoHS-guideline 2011/65/EU.
Need help?
Do you have a question about the Real Speed TQ HPR 120S and is the answer not in the manual?
Questions and answers