Table of Contents
Advertisement
MODEL: JKBKUFO-V2
OWNER'S MANUAL
ASSEMBLY, INSTALLATION, CARE, MAINTENANCE AND USER INSTRUCTIONS
FOR RESIDENTIAL USE ONLY
!
WARNING
- This product is designed to be used by children ages 6+.
- Maximum weight is 150 lbs. (68kg). Only one user at a time on the swing.
- Carefully read this entire instruction manual before you start to assemble or use this swing set.
- You must follow all instructions and warnings while using this equipment.
- Do not use this swing on hard packed soil, concrete or any kind of hard surface.
- This equipment must be anchored. You should consult your local contractor regarding the best
way to anchor the product at your location of installation.
- Assembly requires at least two adults.
Save this instruction manual for future reference
For Customer Service, please call 1-877-927-8777 or visit www.jumpking.com
Monday – Friday 9:00 AM – 5:00 PM Central Time
Advertisement
Table of Contents

Related Manuals for Jumpking JKBKUFO-V2

Summary of Contents for Jumpking JKBKUFO-V2
- Page 1 - Assembly requires at least two adults. Save this instruction manual for future reference For Customer Service, please call 1-877-927-8777 or visit www.jumpking.com Monday – Friday 9:00 AM – 5:00 PM Central Time...
- Page 2 INTRODUCTION Dear Valued Customer, Congratulations on your Jumpking Backyard UFO Swing purchase! Please read and completely understand the contents of this owner’s manual. This manual contains specific instructions and warnings that must be followed to prevent injuries. This swing is for residential use only. This swing is NOT intended for public or commercial use. The warranty will be voided if the swing is used in a commercial application.
-
Page 3: Table Of Contents
TABLE OF CONTENTS IMPORTANT INSTRUCTIONS AND WARNINGS ....4 IMPORTANT CONSUMER INFORMATION SHEET ..7 CARE AND MAINTENANCE CHECKLIST . -
Page 4: Important Instructions And Warnings
IMPORTANT INSTRUCTIONS AND WARNINGS WARNING READ ALL INSTRUCTIONS BEFORE ASSEMBLING OR USING THIS EQUIPMENT AGE LIMIT - Maximum user weight is 150 pounds (68kg). - The UFO swing is designed for children over six (6) years of age. Use by younger children can result in injury. - On-site adult supervision is required at all times for children of all ages. - Page 5 Some consumers want an anchoring system that allows the product to be moved to different locations. Other consumers want to keep their swing set in a permanent location. There are different types and different methods of anchoring this product. Jumpking does not make a specific anchoring recommendation as each consumer’s need and conditions can vary.
- Page 6 When conducting inspections, it is recommended that you use the Maintenance Schedule and Outdoor Home Playground Safety Checklist provided by the US Consumer Product Safety Commission in the Outdoor Home Playground Safety Handbook. This is available online at the following link: https://www.cpsc.gov/s3fs-public/324.pdf CARE &...
-
Page 7: Important Consumer Information Sheet
IMPORTANT CONSUMER INFORMATION SHEET The Consumer Product Safety Commission estimates there are about 200,000 playground related injuries involving children each year. Injuries involving this hazard pattern tend to be among the most serious of all playground injuries and have the potential to be fatal, particularly when the injury is to the head. The surface under and around UFO swing can be a major factor in determining the injury-causing potential of a fall. -
Page 8: Care And Maintenance Checklist
ANCHORING There are different ways of anchoring the equipment, depending on the type of ground on which the equipment is to be installed. Make sure that all anchors are below ground level to prevent tripping. You should consult your local contractor to decide the most appropriate way to anchor the equipment in your location. CARE AND MAINTENANCE CHECKLIST AT THE BEGINNING OF EACH PLAY SEASON: - Tighten all hardware. - Page 9 Supervision Be sure to always supervise children on play equipment. Surfacing Install a protective surface under and around play equipment to reduce the likelihood of serious head injuries. • For most play equipment, install protective surfacing 6 feet in all directions beyond the equipment.
-
Page 10: Tools Needed
TOOLS NEEDED Please gather the following tools prior to assembling this equipment. TOOLS INCLUDED: TOOLS NOT INCLUDED: Description: Mallet (May be needed for installing anchor) -
Page 11: Parts List
Description: Description: 1) 55mm x 8mm Screw (A) 1) 45mm x 8mm Screw (B) 2) 18.23mm dia x 8.11mm inner dia Washer 2) 18.23mm dia x 8.11mm inner dia Washer 3) 12.75mm dia x 8.34mm inner dia Spring washer 3) 12.75mm dia x 8.34mm inner dia Spring washer 4) 15.44mm dia x 14.51mm inner dia Nut 4) 15.44mm dia x 14.51mm inner dia Nut Quantity: 4 sets... - Page 12 Spiral peg Carabiner 2 pcs Description: Screw set for Swing seat toprail (E) 1) 55mm x 8mm x 30.75mm dia Screw 2) 18.23mm dia x 8.11mm inner dia Washer 3) 12.75mm dia x 8.34mm inner dia Spring washer 4) 14.24mm dia x 7.94mm inner dia Nut 1 pc 5) 11.1mm dia x 7.55mm inner dia Plastic cap Quantity: 4 sets...
-
Page 13: Assembly And Installation Instructions
ASSEMBLY AND INSTALLATION INSTRUCTIONS Frame assembly Part 1 Part 9 Part 2 Part 9 Part 13 Part 10 Part 3 Part 5 A marking Part 6 B marking Part 8 D marking Part 8 D marking Part 7 C marking Part 7 C marking Part 5 A marking Part 6 B marking... - Page 14 - Lay ceiling frame (Part 1) upside down with the tubes opening facing up. - Using top curve poles (Part 2), connect it into the corresponding holes on ceiling frame (Part 1) by using 55 mm screw (A) (Part 9) with Allen Key. - Once assembled, flip it back over.
-
Page 15: Swing Seat Assembly
Swing Seat assembly Part 15 Part 16 Rope Part 14 Part 22 Part 22 Part 22 Close the cover (part 22) by Insert the screw to the cover (Part 22). velcro tape. Rope Part 14 Part 18 Part 22 Step 5 - Using swing seat rail (Part 15), slowly insert it through any webbing on seat surface (Part 16), being careful to insert it thoroughly through every webbing. -
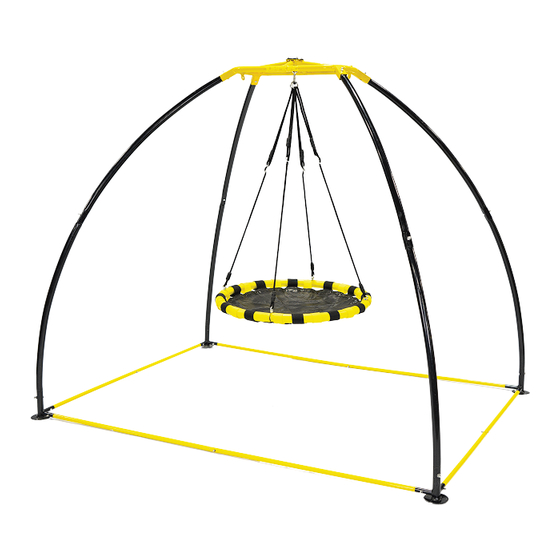
Page 16: Complete Swing Set
Complete Swing Set Step 6 Swivel Motion (360 Degrees) - Connect the 2 carabiners on central hook Part 17 Front & Back Motion - Connect one carabiner to the left hook, and the other to the right hook, to create a "swinging" motion Please note- you must maintain a minimum of 8 inches of ground clearance. -
Page 17: Anchoring
ANCHORING The following anchoring options may be considered: Spiral Peg - If your soil is hard (clay, etc.), the spiral peg may be suitable. - Be sure that the UFO swing is located on level ground. - Twist the spiral peg into the ground until only the end with the hook is above the ground and next to the leg. Insert the hook into the bottom opening of the leg. -
Page 18: Manufacturer's Limited Warranty
UFO swing. MANUFACTURER’S LIMITED WARRANTY Jumpking warrants its products to be free from defects in material and workmanship under normal use and service conditions for ninety (90) days after the date of purchase. The frame is warrantied for 12 months after the date of purchase.
Need help?
Do you have a question about the JKBKUFO-V2 and is the answer not in the manual?
Questions and answers