Table of Contents
Advertisement
Advertisement
Table of Contents

Related Manuals for Sercomm RP052M


Summary of Contents for Sercomm RP052M
- Page 1 RP052M WiFi EasyMesh Router...
-
Page 2: Table Of Contents
User Guide Table of Contents CHAPTER 1 INTRODUCTION....................1 Package Contents ......................1 Features ..........................1 LEDs ........................... 2 CHAPTER 2 INITIAL INSTALLATION ................4 Requirements ........................4 Procedure ........................... 4 CHAPTER 3 EASYMESH CONFIGURATION ..............5 Configuration ........................5 APPENDIX A SPECIFICATIONS.................. -
Page 3: Chapter 1 Introduction
Chapter 1 Introduction This Chapter provides an overview of the WiFi EasyMesh Router features and capabilities. Congratulations on the purchase of your new WiFi EasyMesh Router. The WiFi EasyMesh Router is a consumer electronic device, which is designed to extend WiFi signal and provide seamless WiFi coverage throughout your home. -
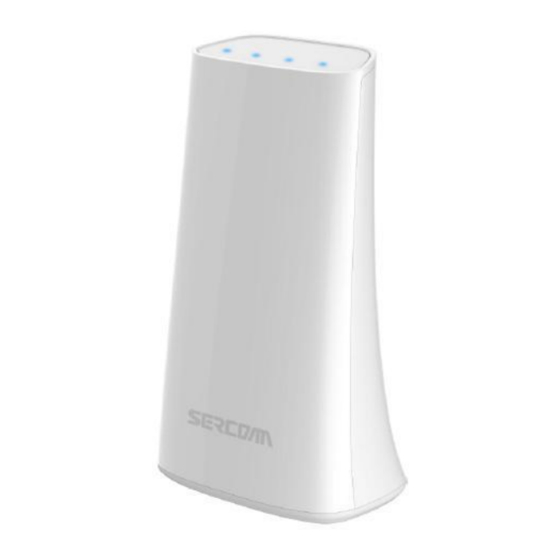
Page 4: Leds
LEDs Front Panel The WiFi EasyMesh Router has 4 LEDs. POWER On - Power On/Normal Operation Off - Power Off (Green) Blinking – Device is performing factory reset On - WiFi function is enabled WiFi (Green) Off –... - Page 5 Rear/Side Panel Power Port Connect the supplied power adapter here. ETHERNET There are two Ethernet ports in the device: WAN and LAN ports. Port WAN Port. It is used to connect to generic homer router or ADSL modem for Internet access. ...
-
Page 6: Chapter 2 Initial Installation
Chapter 2 Initial Installation This Chapter covers the software installation of the WiFi EasyMesh Router. Requirements Use a standard 10/100/1000 BaseT network (UTP) cable with RJ45 connector for Internet connection. Procedure 1. Choose an Installation Site Select a suitable place to install the WiFi EasyMesh Router. 2. -
Page 7: Chapter 3 Easymesh Configuration
Chapter 3 EasyMesh Configuration This Chapter provides Setup details of the WiFi EasyMesh Router. Configuration User can configure WiFi EasyMesh Router through Web GUI on Router via WiFi or Ethernet LAN interface. In following example, we will show you how to configure WiFi EasyMesh function through Ethernet LAN to deploy mesh network. - Page 8 In Home page, go to Sercomm->EasyMesh After entering EasyMesh page, please select device role as “Controller” and then click “Save and Apply” button. The WiFi EasyMesh Router will start applying settings to change device to be Controller.
- Page 9 Appendix B - About Wireless LANs Once finished, you can find the WiFi EasyMesh has been changed to Controller (as below red rectangle). User can also find the WiFi EasyMesh Router has been changed to Controller and User’s PC is connected to Controller in network topology by clicking “Display Runtime Topolo- gy”...
- Page 10 WPS onboarding for deploying mesh network In this section, we will guide user how to perform WPS onboarding to establish connection between Controller and another WiFi EasyMesh Router(we will call this devic “Agent” in later section) to deploy mesh network. Below are steps to deploy mesh network.
- Page 11 Appendix B - About Wireless LANs SSID configurations User can change Mesh Network SSID and password by going to Sercomm->EasyMesh- >Advanced tab and click “Configure BSS” button. Default SSID for 2.4G is “Multi-AP-24G-x” (x:1~4) and password is “12345678” (Defualt SSID naming rule for 5G is similar with 2.4G) .
- Page 12 Once SSID or Password is changed, click “Save and Apply” button.
-
Page 13: Appendix A Specifications
Appendix A Specifications WiFi EasyMesh Router Model WiFi EasyEasy Router Dimensions 89mm(W) * 57mm(D) * 150mm(H) Operating Temperature 0 C to 40 C Buttons Network Protocol: TCP/IP Network Interface: 2 * 10/100/1000BaseT (RJ45) WAN/LAN connection LEDs Power Adapter 12V, 1A... -
Page 14: Appendix Bfcc Statement
Appendix B FCC Statement Federal Communication Commission Interference Statement This equipment has been tested and found to comply with the limits for a Class B digital device, pursuant to Part 15 of the FCC Rules. These limits are designed to provide reasonable protection against harmful interference in a residential installation.
Need help?
Do you have a question about the RP052M and is the answer not in the manual?
Questions and answers