Advertisement
Table of Contents
- 1 Table of Contents
- 2 Package Contents
- 3 Controls & Connections
- 4 First-Time Setup
- 5 Using the Remote
- 6 LED Indicators
- 7 Bluetooth Audio Pairing
- 8 Advanced Setup
- 9 Using Button Combinations
- 10 Wall-Mounting the Sound Bar
- 11 Help & Troubleshooting
- 12 Limited Warranty
- 13 Legal & Compliance
- Download this manual
Advertisement
Table of Contents

Related Manuals for VISIO R-SB3621n-E8


Summary of Contents for VISIO R-SB3621n-E8
- Page 1 QUICK START GUIDE - REFURBISHED SOUND BAR Model: R-SB3621n-E8 VIZIO Sound Bar Please read this guide before using the product.
- Page 2 IMPORTANT SAFETY INSTRUCTIONS Your Unit is designed and manufactured to operate within defined design limits, and misuse may result in electric shock or fire. To prevent your Unit from being damaged, the following rules should be observed for its installation, use, and maintenance. Please read the following safety instructions before operating your Unit.
- Page 3 exposure to loud noises, ears may become accustomed to the sound level, which may result in permanent damage to hearing without any noticeable discomfort. • When connected to a power outlet, power is always flowing into your Unit. To totally disconnect power, unplug the power cord. •...
-
Page 4: Table Of Contents
TABLE OF CONTENTS Package contents .........................5 Controls & Connections .......................6 First-Time Setup..........................9 Using the Remote .........................14 LED Indicators ..........................15 Bluetooth Audio Pairing .......................17 Using Bluetooth mode ......................18 Advanced Setup ..........................19 Connecting a Subwoofer ......................20 Using Button Combinations ......................21 Wall-Mounting the Sound Bar .....................22 Help &... -
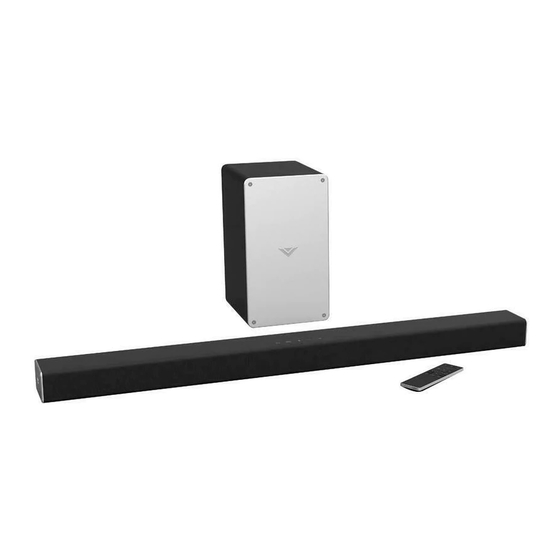
Page 5: Package Contents
PACKAGE CONTENTS Wireless Subwoofer VIZIO Sound Bar Remote Control requires 2x AAA Batteries 2 x Wall QUICK START GUIDE Model: SB3621n-E8 Mount Brackets VIZIO Sound Bar 2 x Wall Please read this guide before using the product. 2 x Power Cables (Sound Bar) Quick Start Guide Mount Screws... -
Page 6: Controls & Connections
CONTROLS & CONNECTIONS 71-S3621N-TYPB3 116.5mm 71-S3621N-TYPB3 条码、内容均为示例,须按实际打印! Back of Sound Bar 116.5mm Part No.: 10612000248 Serial No.: SHCOWGAS0100001 序列号编码规则: 条码、内容均为示例,须按实际打印! USB* USB In Power Port Analog Audio In (Stereo 3.5mm) * Supports .WAV file format playback only. English - 6... - Page 7 71-S3621N-TYPB4 116.5mm 71-S3621N-TYPB4 116.5mm DIGITAL Coaxial In OPTICAL Digital Optical Audio In English - 7...
- Page 8 Back of Subwoofer Top of Sound Barr Power Press to turn soundbar on or off. Input Press to change the audio source. Bluetooth Input Hold to pair. Power Port (See ‘Bluetooth Audio Pairing’ for more information.) Pairing Button Volume Increase or decrease the LED Indicator loudness of the audio.
-
Page 9: First-Time Setup
FIRST-TIME SETUP 71-S3621N-TYPB4 116.5mm CHOOSE ONE CABLE Back of Sound Bar DIGITAL COAXIAL DIGITAL OPTICAL CABLE † CABLE † BETTER BETTER * Not all TVs have the audio outputs shown above. To con- nect the Sound Bar directly to your other devices (Blu-Ray AND CONNECT player, game system, etc.) see your device’s user manual. - Page 10 71-S3621N-TYPB3 116.5mm 条码、内容均为示例,须按实际打印! Part No.: 10612000248 Serial No.: SHCOWGAS0100001 序列号编码规则: Connect the power cable to the sound bar AC IN as shown. Plug the power cable into an electrical outlet. English - 10...
- Page 11 Back of Subwoofer Connect the power cable to the Subwoofer AC IN as shown. Plug the power cable into an electrical outlet and press the power button. The subwoofer should automatically power on when plugged in. English - 11...
- Page 12 For the best surround sound experience, position the Sound Bar as shown. The Sound Bar should be close to ear level. The Subwoofer should be placed in a corner of the room. Wireless Subwoofer Sound Bar is centered below the TV. English - 12 English - 12...
- Page 13 Remove the battery cover by gently Insert batteries and gently slide the sliding it away from the remote. battery cover back into place. When needed, VIZIO recommends Duracell ‘AAA’ alkaline batteries. Turn your TV and sound bar. The sound bar will automatically turn on and begin searching for an active input.* The LED indicators on the front of the sound bar will begin cycling Power...
-
Page 14: Using The Remote
USING THE REMOTE Input Press to change the input source Bluetooth Switches to bluetooth mode. Long Power press puts sound bar in bluetooth Press to turn on or off. pairing mode. Play/Pause Volume +/- Press to increase and decrease Press to play or pause. volume. -
Page 15: Led Indicators
LED INDICATORS The LED Indicators will behave differently with each button on the remote control. LED Indicators are located here. Function LED Behavior Description Press the INPUT button on the remote to cycle through the available inputs: •Analog Audio In - AUX Stereo 3.5mm •Coaxial In - Digital •Digital Optical Audio In - Optical Input... - Page 16 Function LED Behavior Description TruSurround On Press the TSHD button to enable/disable DTS TruSurround. When TruSurround enabled (On), all inputs will produce virtual surround sound. When On/Off disabled (Off), all sources will playback in stereo. TruSurround Off to toggle between two preset equalizer Press the EQ button Movie settings, Music and Movie.
-
Page 17: Bluetooth Audio Pairing
BLUETOOTH AUDIO PAIRING To pair the sound bar with a Bluetooth device: Press and hold the Bluetooth button on the sound bar or on the remote for five (5) seconds. When the sound bar is in Bluetooth Pairing Mode, the LED Indicators on the Display Panel on the front of the Sound Bar will light sequentially from bottom to top and back again. -
Page 18: Using Bluetooth Mode
USING BLUETOOTH MODE Your sound bar supports music streaming from smartphones, tablets, and computers with Bluetooth capability. Device compatibility will vary, see your device’s documentation for more information. Once you have paired your source device to the sound bar, as long as you stay within range of the sound bar, your device should remain paired. -
Page 19: Advanced Setup
ADVANCED SETUP Back of Sound Bar 71-S3621N-TYPB4 71-S3621N-TYPB3 116.5mm 116.5mm 条码、内容均为示例,须按实际打印! Part No.: 10612000248 Serial No.: SHCOWGAS0100001 序列号编码规则: DIGITAL COAXIAL DIGITAL OPTICAL 3.5MM TO CABLE CABLE RCA CABLE USB Thumb Drive* Network Media Player * Supports .WAV file format Tablet/MP3 Player/Laptop playback only. -
Page 20: Connecting A Subwoofer
CONNECTING A SUBWOOFER The Subwoofer has already been paired with the Sound Bar by VIZIO. However, the Subwoofer may need to be re-linked to the Sound Bar if there is no sound coming from the Subwoofer. What does pairing mean? Pairing means to wirelessly connect. -
Page 21: Using Button Combinations
USING BUTTON COMBINATIONS Buttons are located here. There are 3 functions that are triggered by 3 different button combinations on the Sound Bar. Function LED Behavior Description Reset the Sound Bar to the factory default settings. To perform a Factory Reset, Press and Hold the Bluetooth( ) and Factory All 8 LEDs will... -
Page 22: Wall-Mounting The Sound Bar
WALL-MOUNTING THE SOUND BAR Wall-Mount Screw Holes Back of Sound Bar 71-S3621N-TYPB4 71-S3621N-TYPB3 116.5mm 116.5mm 条码、内容均为示例,须按实际打印! Part No.: 10612000248 Serial No.: SHCOWGAS0100001 Insert the two wall-mount screws into the wall-mount screw holes, and then tighten them with a Phillips screwdriver. 序列号编码规则:... - Page 23 Be sure your screws are attached to wood studs, drywall anchors (for drywall), or concrete anchors (for brick/concrete walls). Screws for attaching the brackets to the wall are not included. Choose the screw type and length appropriate to your home’s construction. If in doubt, consult a professional installer. *Bracket Screw NOT INCLUDED WITH SOUND BAR...
- Page 24 Take A Moment To Register Your Product At ARCAUGUSTA.COM/Register-My-Product.htm Why Register? Warranty Support To obtain warranty support, your product must be registered. Safety & Satisfaction Stay up to date with important product updates and notifications. REGISTER YOUR VIZIO PRODUCT NOW English - 24...
- Page 25 Award-Winning Customer Care At Your Convenience. NEED HELP? Go to: support.vizio.com Find help with: New product setup • • Connecting your devices • Technical problems • Product updates and more Live chat support available You can also contact our popular support team at: Phone: (877) 698-4946 (toll-free) Hours of Operation:...
-
Page 26: Help & Troubleshooting
HELP & TROUBLESHOOTING Press the POWER button on the remote control or on the top of your Sound Bar. • There is no power. • Ensure the power cord is securely connected. • Plug a different device into the electrical outlet to verify that the outlet is working correctly. Increase the volume. -
Page 27: Limited Warranty
Specifications Sound Bar: One 2" Full Range Driver for Each Channel (1 for left, 1 for right) subwoofer: One 5.25" Subwoofer Driver Inputs: One 3.5mm Stereo Audio One RCA Coaxial One Optical (Toslink) One USB (Supports .WAV format only) Bluetooth 100 dB Sound Pressure Level (System):... -
Page 28: Legal & Compliance
LEGAL & COMPLIANCE FCC Class B Radio Interference Statement NOTE: This equipment has been tested and found to comply with the limits for a Class B digital device, pursuant to Part 15 of the FCC Rules. These limits are designed to provide reasonable protection against harmful interference in a residential installation. This equipment generates, uses and can radiate radio frequency energy, and if not installed and used in accordance with the instructions, may cause harmful interference to radio communications. - Page 29 Software Licenses All software is provided subject to software license agreements and you agree that you will be bound by such license agreements in addition to other applicable terms of use. By using the VIZIO products, you agree to the VIZIO Terms of Service and Privacy Policy, The VIZIO Terms of Use and Privacy Policy may be updated from time to time and are available to view at http://www.vizio.com/ terms and http://www.vizio.com/privacy, respectively.
- Page 30 Manufactured under license from Dolby Laboratories. Dolby, Dolby Audio, and the double-D symbol are registered trademarks of Dolby Laboratories. For DTS patents, see http://patents.dts.com. Manufactured under license from DTS Licensing Limited. DTS, the Symbol, & DTS and the Symbol together are registered trademarks, and DTS Studio Sound is a trademark of DTS, Inc. © DTS, Inc. All Rights Reserved.
- Page 31 © 2017 VIZIO INC. ALL RIGHTS RESERVED. 170316AD-US...
Need help?
Do you have a question about the R-SB3621n-E8 and is the answer not in the manual?
Questions and answers