Advertisement
AquaSource® is a registered trademark
of LF, LLC. All Rights Reserved.
Questions, problems, missing parts? Before returning to your retailer, call our customer
service department at 1-866-417-7564, 8 a.m. - 8 p.m., EST, Monday - Friday.
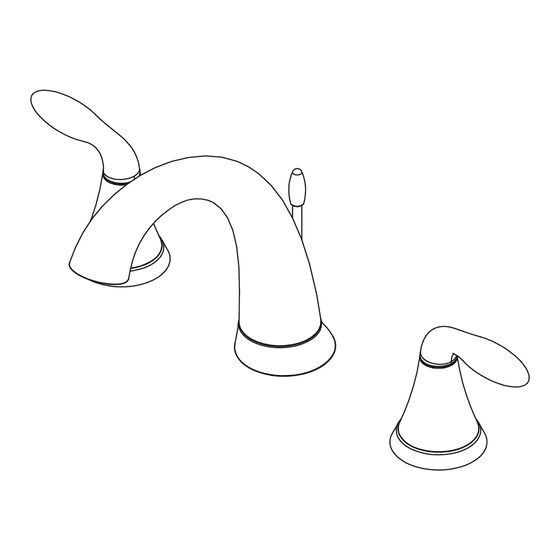
CHROME & BRUSHED NICKEL
WIDESPREAD LAVATORY FAUCET
1
ITEM #0306203
MODEL #FW0B4402BNC
Français p. 1
Español p. 1
Advertisement
Table of Contents

Related Manuals for AquaSource FW0B4402BNC


Summary of Contents for AquaSource FW0B4402BNC
- Page 1 ITEM #0306203 CHROME & BRUSHED NICKEL WIDESPREAD LAVATORY FAUCET AquaSource® is a registered trademark of LF, LLC. All Rights Reserved. MODEL #FW0B4402BNC Français p. 1 Español p. 1 Questions, problems, missing parts? Before returning to your retailer, call our customer...
-
Page 2: Package Contents
PACKAGE CONTENTS QUANTITY QUANTITY PART DESCRIPTION PART DESCRIPTION Hot Handel Cold Handle Aerator Wrench Rubber Washer Rubber Washer Metal Washer Washer Guider Washer Rubber Spacer Pop-Up Body Metal Spacer Main Plunger Lock Nut Lift Rod Faucet Connecting Hose Lift Rod Strap Faucet Body Ball Rod... -
Page 3: Warnings And Cautions
WARNINGS AND CAUTIONS • Follow these installation instructions carefully. Proper installation is the installer’s responsibility. • Failure to follow correct installation procedures can cause the faucet to become loose, which can result in serious injury. • The products should be installed by a locally licensed plumber. •... - Page 4 ASSEMBLY INSTRUCTIONS 2. Remove hardware from faucet body shank. 3. Place the spout (J) in the appropriate faucet hole of the sink. 4. Replace spacers and lock nut.
- Page 5 ASSEMBLY INSTRUCTIONS 5. Remove washers from handle shanks. 6. Back out screws on guide washer (E) until they are flush with the face of the washer. 7. Insert valve body through the appropriate faucet hole.
- Page 6 ASSEMBLY INSTRUCTIONS 8. Slide washers onto handle shanks. Secure with guide washer (E). 9. Install drain assembly. NOTE: Opening for ball rod must face towards rear of sink. 10. Insert plunger (EE). NOTE: Plunger can only be inserted in one direction.
- Page 7 ASSEMBLY INSTRUCTIONS 11. Insert ball rod (HH) into drain assembly (DD). Tighten sleeve. 12. Insert lift rod (FF) through faucet and attach perforated strap (GG) to lift rod. Push button to allow lift rod to slide through. Release to lock. 13.
- Page 8 ASSEMBLY INSTRUCTIONS 14. Attach hose quick connectors. Note: For removal, see “Quick Connector Removal.” 15. Attach water supply lines. 16. Turn on water supply.
- Page 9 ASSEMBLY INSTRUCTIONS 17. Remove aerator (B). 18. Flush out any debris. 19. Replace aerator (B).
-
Page 10: Care And Maintenance
QUICK CONNECTOR REMOVAL 1. Push quick connector (L) housing upward. Hold clip and housing together and pull downward. CAUTION: Be careful in removal of quick connector (L) to not cut hands. CARE AND MAINTENANCE • To protect and maintain the finish of your faucet, clean only with a soft, damp cloth. •... -
Page 11: Warranty
IMPORTANT TIPS / How to remove handle. Don’t pull out the handle directly. Move the handle to off position, unscrew the canopy by turning it counterclockwise. WARRANTY The manufacturer warrants this faucet to be free from defects in workmanship and material present at time of shipment from the factory for a limited lifetime from the date of purchase. -
Page 12: Replacement Parts List
REPLACEMENT PARTS LIST For replacement parts, call our customer service department at 1-866-417-7564, 8 a.m. - 8 p.m., EST, Monday - Friday. 3-a. 3-b. PART # PART DESCRIPTION Metal Handle Assembly A66E141 Handle Trim Ring A667917 Ceramic Disc Cartridge-Cold A507376N Ceramic Disc Cartridge-Hot A507375N Mounting Hardware Assembly...
Need help?
Do you have a question about the FW0B4402BNC and is the answer not in the manual?
Questions and answers