Table of Contents
Advertisement
Available languages
Available languages
Advertisement
Chapters
Table of Contents

Related Manuals for auna CD708


Summary of Contents for auna CD708
-
Page 3: Table Of Contents
Sehr geehrter Kunde, wir gratulieren Ihnen zum Erwerb Ihres Gerätes. Lesen Sie die folgenden Hinweise sorgfältig durch und befolgen Sie diese, um möglichen Schäden vorzubeugen. Für Schäden, die durch Missachtung der Hinweise und unsachgemäßen Gebrauch entstehen, übernehmen wir keine Haftung. Scannen Sie den folgenden QR-Code, um Zugriff auf die aktuellste Bedienungsanleitung und weitere Informationen rund um das Produkt zu erhalten:... -
Page 4: Sicherheitshinweise
SICHERHEITSHINWEISE • Kinder ab 8 Jahren, psychisch, sensorisch und körperlich eingeschränkte Menschen dürfen das Gerät nur benutzen, wenn sie vorher von einer für sie verantwortlichen Aufsichtsperson ausführlich mit den Funktionen und den Sicherheitsvorkehrungen vertraut gemacht wurden und die damit verbundenen Risiken verstehen. •... -
Page 5: Grundfunktionen
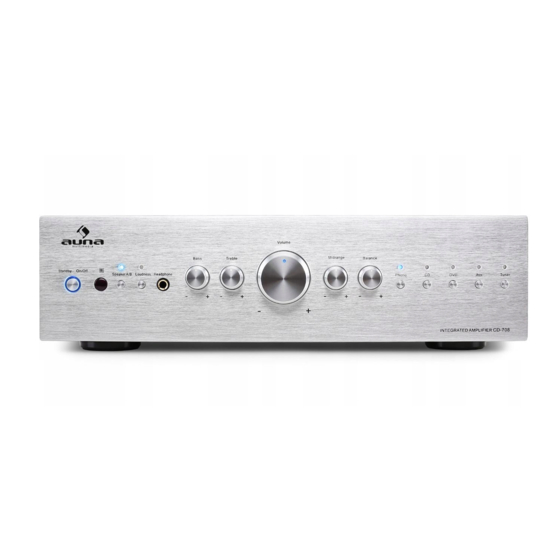
GRUNDFUNKTIONEN Vorderseite EIN/AUS, Standby-Modus 6 Bassregler 11 Phono-Modus Infrarotsender (Fernbedienung) Höhenregler 12 CD-Modus A/B-Lautsprecher-Wahltaste Lautstärkeregler 13 DVD-Modus 4 Lautstärke-Entzerrung (Loudness) 9 Mittenregler 14 AUX-Modus Kopfhörer-Anschluss 10 Balanceregler 15 FM-Modus Rückseite Frontlautsprecher Klemmen (B) 4 FM-Anschluss 9 Masse-Anschluss-Phono Anschlussimpedanz ≥ 8-16 Ω AUX- Anschluss 10 Netzschalter Frontlautsprecher Klemmen (A) -
Page 6: Fernbedienung
FERNBEDIENUNG Standby-Modus Eingangsquelle CD-Lade öffnen/schließen Nummerntasten Stereo/Mono Kanal vor Rücklauf/Frequenz zurück Stop USB-Modus Kanal zurück Vorheriger Titel Lautstärke + Eingang Lautstärke - Ton aus Nächster Titel AUTO Vorlauf/Frequenz vor Speicher Wiederholen Wiedergabe/Pause... -
Page 7: Vorbereitungen
VORBEREITUNGEN Systemanschluss Schließen Sie nur neue Komponenten und die anderen Elemente des Gerätes an, wenn das Gerät ausgeschaltet ist. 2. Die Lautsprecherkabel sollen den Farben entsprechend und fest angeschlossen werden. Anschlussdiagramm für die Eingangsquellen:... -
Page 8: Normal-Funktion
Anschlussdiagramm Lautsprecher: • Stellen Sie sicher, dass die blanken Kabel sich gegenseitig nicht berühren und nicht mit den Metallteilen des Gehäuses in Kontakt kommen. Diese könnte das Gerät oder die Lautsprecher beschädigen. • Beachten Sie die Polarität der Lautsprecherkabel. Schließen sie immer „+“... -
Page 9: Fehlerbehebung
Wählbare Modi: • Lautsprecher A • Lautsprecher B • Lautsprecher A/B 4. Stellen Sie die Lautstärke am Gerät oder über die Fernbedienung ein. 5. Mit den drei EQ-Reglern (Treble/Bass/Midrange) können Sie das Frequenzspektrum entsprechend Ihren Hörgewohnheiten anpassen. 6. „Loudness“-Taste: Mit dieser Funktion wird das Frequenzspektrum so angepasst, dass bei niedrigen Lautstärkepegeln die Musik trotzdem „Gehörrichtig“... -
Page 10: Hinweise Zur Entsorgung
Problem Mögliche Ursache Lösungsvorschlag Die Fernbedienung Die Batterie ist leer. Ersetzen Sie die funktioniert nicht Batterie. richtig. Batterie ist nicht richtig Setzen Sie die Batterie eingesetzt. richtig ein Die Fernbedienung Verringern Sie den ist zu weit vom Gerät Abstand. entfernt. Hindernisse im Weg Entfernen Sie die Hindernisse... - Page 11 Dear Customer, Congratulations on purchasing this device. Please read the following instructions carefully and follow them to prevent possible damages. We assume no liability for damage caused by disregard of the instructions and improper use. Scan the QR code to get access to the latest user manual and more product information.
-
Page 12: Safety Instructions
SAFETY INSTRUCTIONS • This device may be only used by children 8 years old or older and persons with limited physical, sensory and mental capabilities and / or lack of experience and knowledge, provided that they have been instructed in use of the device by a responsible person who understands the associated risks. -
Page 13: Basic Functions
BASIC FUNCTIONS Front Panel ON/OFF, Standby 6 Bass +/- 11 Phone Infrared Transmitter (Remote Control) Treble+/- 12 CD Speaker A/B Selector Volume 13 DVD 4 Loudness Selector 9 Midrange 14 AUX Headphone Jack 10 Balance 15 Tuner Rear Panel Front Speaker (B) Terminal: 4 Tuner Audio Input Jack 9 Ground of PHONO Terminal Impedance ≥... -
Page 14: Remote Control
REMOTE CONTROL STANDBY SOURCE OPEN/CLOSE NUMBER BUTTON STEREO/MONO CHANNEL+ BACKWARD/TUNING- STOP CHANNEL- PREVIOUS VOLUME+ lNPUT VOLUME- MUTE NEXT AUTO FORWARD/TUNING+ MEMORY REPEAT PLAY/PAUSE... -
Page 15: Preparation
PREPARATION System connection Only connect new components and the other elements of the device when the device is switched off. 2. Connect the speaker cables according to the colours and firmly. Scheme of input connection:... -
Page 16: Normal Function
Speaker connection: • Make sure that the bare cables do not touch each other and do not come into contact with the metal parts of the cabinet. This could damage the unit or speakers. • Observe the polarity of the speaker cables. Always connect “+” to “+” and “-”... -
Page 17: Troubleshooting
3. Select the desired speaker combination by pressing the “SPEAKER A/B” button. Selectable modes: • SPEAKER A • SPEAKER B • SPEAKER A/B 4. Adjust the volume on the unit or using the remote control. 5. With the three EQ controls (Treble/Bass/Midrange) you can adjust the frequency spectrum according to your listening habits. -
Page 18: Hints On Disposal
Problem Possible Cause Solution Proposal The remote control The battery is dead. Replace the battery. does not work Battery is not inserted Insert the battery properly. correctly. correctly. The remote control is Decrease the distance. too far away from the unit. - Page 19 Chère cliente, cher client, Toutes nos félicitations pour l’acquisition de ce nouvel appareil. Veuillez lire attentivement et respecter les instructions de ce mode d’emploi afin d’éviter d’éventuels dommages. Le fabricant ne saurait être tenu pour responsable des dommages dus au non- respect des consignes de sécurité...
-
Page 20: Consignes De Sécurité
CONSIGNES DE SÉCURITÉ • Cet appareil peut être utilisé par des enfants de 8 ans ou plus et des personnes ayant des capacités physiques, sensorielles et mentales limitées et / ou dénuées d‘expérience et de connaissances, à condition d‘avoir été instruits au fonctionnement de l‘appareil par une personne responsable et d‘en comprendre les risques associés. -
Page 21: Fonctions De Base
FONCTIONS DE BASE Façade ON/OFF, mode veille 6 Réglage des basses 11 Mode Phono Emetteur infrarouge (commande à distance) Réglage des aigus 12 Mode CD Touche de sélection d‘enceinte A/B Volume 13 Mode DVD 4 Correction de distorsion (Loudness) 9 Volume médium 14 Mode AUX Prise casque 10 Réglage balance... -
Page 22: Télécommande
TÉLÉCOMMANDE Mode veille Source d‘entrée Ouverture / fermeture du tiroir CD Touches numériques Stéréo/Mono Canal suivant Retour / réduire la fréquence Stop Mode USB Canal précédent Titre précédent Volume + Entrée Volume - Couper le son Titre suivant AUTO Avance / augmenter la fréquence Mémoire Répéter... -
Page 23: Préparations
PRÉPARATIONS Connexion du système Ne connectez de nouveaux composants et les autres éléments de l‘appareil que lorsque celui-ci est éteint. 2. Les câbles des haut-parleurs doivent être connectés aux bonnes couleurs et fermement branchés. Schéma de branchement des sources d‘entrée :... -
Page 24: Fonction Normale
Schéma de branchement des enceintes : • Assurez-vous que les fils nus ne se touchent pas et n‘entrent pas en contact avec les parties métalliques du boîtier. Cela pourrait endommager l‘appareil ou les enceintes. • Veuillez noter la polarité des câbles d‘enceinte. Toujours connecter „+“ à... -
Page 25: Résolution Des Problèmes
Modes sélectionnables : • Enceinte A • Enceinte B • Enceinte A/B 4. Réglez le volume sur l’appareil ou avec la télécommande. 5. Avec les trois réglages de l’égaliseur (Treble/Bass/Midrange) vous pouvez ajuster le spectre de fréquence en fonction de vos habitudes d’écoute. -
Page 26: Informations Sur Le Recyclage
Problème Cause possible Solution proposée L‘image stéréo est Polarité Vérifiez si les haut- déformée (inversion parleurs et les gauche / droite, le son canaux d’entrée sont semble provenir de correctement branchés loin.) („+“ sur „+“ et „-“ sur „-“) La télécommande La pile est vide. -
Page 27: Datos Técnicos
Estimado cliente, Le felicitamos por la adquisición de este producto. Lea atentamente el siguiente manual y siga cuidadosamente las instrucciones de uso con el fin de evitar posibles daños. La empresa no se responsabiliza de los daños ocasionados por un uso indebido del producto o por haber desatendido las indicaciones de seguridad. -
Page 28: Instrucciones De Seguridad
INSTRUCCIONES DE SEGURIDAD • Este aparato puede ser utilizado por niños de 8 años o más y por personas con capacidades físicas, sensoriales y mentales limitadas y/o falta de experiencia y conocimientos, siempre que hayan sido instruidos en el manejo del aparato por una persona responsable y comprendan los riesgos asociados. -
Page 29: Funciones Básicas
FUNCIONES BÁSICAS Frontal Modo Standby 6 Bajos 11 Entrada fono Señal de infrarrojos Agudos 12 CD Selector de altavoz A/B Volumen 13 DVD 4 Silenciador 9 Medios 14 AUX Entrada auriculares 10 Balance 15 Radio FM Panel posterior Terminales de altavoz frontal (B) 4 Conector FM 9 Conexión a tierra fono Impedancia terminal... -
Page 30: Mando A Distancia
MANDO A DISTANCIA Modo Standby Fuente Abrir/cerrar Números Estéreo/mono Canal+ Rebobinar/Dial- Stop Canal- Título anterior Volumen + Entrada Volumen - Silenciador Título siguiente AUTO Avanzar / aumentar la frecuencia Memoria Repetir Reproducir / Pausa... -
Page 31: Preparación
PREPARACIÓN Conexión del sistema Conecte los nuevos componentes y los demás elementos del dispositivo sólo cuando esté apagado. 2. Los cables de los altavoces deben estar conectados firmemente y de acuerdo con los colores. Diagrama de conexión para las fuentes de entrada:... -
Page 32: Función Normal
Diagrama de conexión de los altavoces : • Asegúrese de que los cables descubiertos no se toquen y no entren en contacto con las partes metálicas de la carcasa. Esto podría dañar la unidad o los altavoces. • Observe la polaridad de los cables de los altavoces. Siempre conecta el «+»... -
Page 33: Resolución De Problemas
Modos seleccionables: • Altavoz A • Altavoz B • Altavoz A/B 4. Ajuste el volumen en la unidad o con el mando a distancia. 5. Los tres controles de EQ (Treble/Bass/Midrange) le permiten ajustar el espectro de frecuencia de acuerdo a sus hábitos de escucha. 6. -
Page 34: Retirada Del Aparato
Problema Posible causa Solución propuesta El control remoto no La batería está Cambie la batería funciona bien. descargada La batería no Inserte la batería está insertada correctamente correctamente El control remoto está Reduzca la distancia demasiado lejos de la unidad Obstáculos en el Eliminar los obstáculos camino... -
Page 35: Dati Tecnici
Gentile Cliente, La ringraziamo per aver acquistato il dispositivo. La preghiamo di leggere attentamente le seguenti istru- zioni per l’uso e di seguirle per evitare possibili danni tecnici. Non ci assumiamo alcuna responsabilità per danni scaturiti da una mancata osservazione delle av- vertenze di sicurezza e da un uso improprio del dispo- sitivo. -
Page 36: Avvertenze Di Sicurezza
AVVERTENZE DI SICUREZZA • I bambini a partire dagli 8 anni di età e le persone con disabilità mentali, sensoriali e fi siche possono utilizzare l’apparecchio solo se sono stati accuratamente familiarizzati con le funzioni e le precauzioni di sicurezza da un supervisore responsabile e comprendono i rischi associati. -
Page 37: Funzioni Prinicipali
FUNZIONI PRINICIPALI Parte frontale Modalità standby 6 Bassi 11 Entrata fono Trasmettitore a infrarossi Alti 12 CD Tasto di selezione altoparlante A/B Volume 13 DVD 4 Muto 9 Medi 14 AUX Ingresso auriculari 10 Balance 15 Radio FM Pannello posteriore Terminali degli altoparlanti 4 Connettore FM 9 Connessione di massa... -
Page 38: Telecomando
TELECOMANDO Modalità standby FOnte Aprire/chiudere Numeri Stereo/mono Canale + Indietro/Frequenza precedente- Stop Canale - Brano anteriore Volume + Ingresso Volume - Muto Brano seguente AUTO Avanti/Frequenza successiva Memoria Ripetizione Riproduzione / Pausa... -
Page 39: Preparazione
PREPARAZIONE Connessione dell’impianto Collegare solo nuovi componenti e gli altri elementi del dispositivo, quando il dispositivo è spento. 2. I cavi delle casse devono essere collegati saldamente e rispettando il relativo colore. Diagramma di collegamento per le fonti di ingresso:... -
Page 40: Funzione Normale
Diagramma di collegamento per altoparlanti: • Assicurarsi che i cavi scoperti non si tocchino tra loro e che non entrino in contatto con i componenti metallici dell’alloggiamento, altrimenti possono risultare danni a dispositivo o casse. • Assicurarsi di rispettare la polarità dei cavi degli altoparlanti. Collegare sempre “+”... -
Page 41: Correzione Degli Errori
Modalità selezionabili: • Altoparlante A • Altoparlante B • Altoparlanti A/B 4. Impostare il volume sul dispositivo o con il telecomando. 5. Con le tre regolazioni EQ (Treble/Bass/Midrange) è possibile regolare lo spettro delle frequenze in base alle vostre abitudini uditive. 6. -
Page 42: Smaltimento
Problema Possibile causa Soluzione consigliata Il telecomando La batteria è scarica. Sostituire la batteria. non funziona La batteria non è Inserire correttamente correttamente. inserita correttamente. la batteria Il telecomando è Ridurre la distanza. troppo lontano dall‘unità. Ostacoli nel cammino Rimuovere gli ostacoli Si è...
Need help?
Do you have a question about the CD708 and is the answer not in the manual?
Questions and answers