Table of Contents
Advertisement
Quick Links
Advertisement
Table of Contents

Related Manuals for Settop M1-15

Summary of Contents for Settop M1-15
- Page 1 User Guide Settop M1-15 4G FW 3.0.0 (200527rev.2)
-
Page 2: Table Of Contents
Index Index About Settop M1 Features and specifications Settop M1 Communications Multi Band LTE Cat 1 with 3G/2G Fallback Wi-Fi Bluetooth Communication Ports Electrical and operating requirements Size and weight Scheme Settop M1 Front View Back View Upper View Receiver Installation... - Page 3 Logo Menu Data IST Connect Comunication Temperature Power Total Station Device Menu TOTAL STATION Start/Stop Scheduler Laser Mode Chg Face Turn To Level Tracklight Search Ref. Circle Video Webcam COMMUNICATIONS Gateway Modem Wi-Fi Bluetooth Ethernet Radio SETTOPSURVEY, S.L. Bofarull 14, 08027 Barcelona (Spain) Phone: (+34) 93 340 05 73 Fax: (+34) 93 351 95 18 w ww.settopsurvey.com i nfo@settopsurvey.com...
- Page 4 APPENDIX I - Installation Scheme Basic Installation without UPS Basic Installation with UPS Installation with Settop OctoHub and UPS + Optic Fiber APPENDIX II - FAQ (Frequently Asked Questions) What to do if the receiver does not turn on. The total station is not responding APPENDIX III - Accessories and options SETTOPSURVEY, S.L.
-
Page 5: About Settop M1
Thanks to this unique feature, the SETTOP M1-15 can do much more than a traditional GPS modem. In addition, its compact design and anodized aluminum casing make the SETTOP M1-15 both light and robust, and its IP67 certification for resistance to dust and moisture guarantee its functionality in all weather conditions. -
Page 6: Features And Specifications Settop M1
Features and specifications Settop M1 The Receiver Settop M1 has the following features: Communications Multi Band LTE Cat 1 with 3G/2G Fallback ● 3GPP Rel. 9 Compliant Protocol Stack ● Twelve Bands FDD-LTE: 700, 800, 850, 900, 1700/2100(AWS), 1800, 1900, 2100, 2600MHz (bands 1,2,3,4,5,7,8,12,18,19,20,28) ●... -
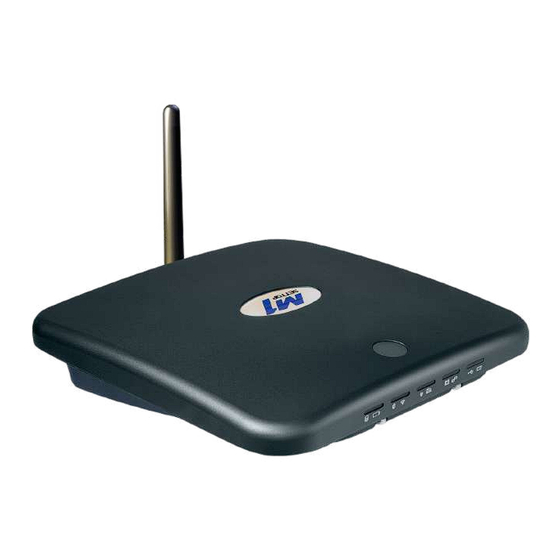
Page 7: Scheme Settop M1
Scheme Settop M1 For a good understanding of the equipment, please study the following diagrams Front View Post-process Post-process ( G reen LED ) Status Action Turned Off Doesn't store data Constant Storing data flashing 1s Fixed Full memory Power (... - Page 8 Bluetooth - Wi-Fi Bluetooth ( G reen LED ) Status Action Turned Off Not linked to any device Flashing light Linking to a device Fixed Device linked Wi-Fi ( R ed LED ) Status Action Turned Off Not linked to any network Modulated light Looking for a network Wi-Fi Constant...
- Page 9 Satellites - External devices Satellites ( G reen LED ) Status Action Turned Off Not receiving Satellites Flashing “n” Receiving “n” Satellites constant flashes Constant rapid Error flashing External devices ( R ed LED ) Status Action Turned Off Device not linked Constant Total Station linked via USB flashing...
-
Page 10: Back View
Constant Device connected via RS232 in LEMO1 flashing and LEMO 2 second) Constant Service mode flashing (1 Hz) Back View Phone GSM Antenna connector COM1 Lemo connector for RS232/ power in COM2 Lemo connector for USB / power in/out Phone GSM Antenna connector Satellites GPS Antenna connector... -
Page 11: Upper View
Turn off the device by pressing the button for a few seconds, until the leds are flashing fast. Reset password access: press the button 3 times when the device is on. The next time the Settop M1 WebUI is accessed ( S hift+F5 ) , a dialogue box appears to create a new password. -
Page 12: Receiver Installation
Powering to other devices Settop M1 can power other devices connected through the COM1 or COM2 slots. To do so, System Settings must indicate on the bridge option the limit of power supply you want, cutting off at the time of peak indicated. -
Page 13: Configuring The Receiver
I MPORTANT : Check the Serial Number before starting to connect. Older Serial Numbers (up to M10000300), please contact to support@settopsurvey.com Default settings The Settop M1 receiver comes with a default configuration to start a job easily. The configuration of SETTOP M1 default state is: ●... -
Page 14: Turn On Settop M1
Turn on Settop M1 When you received SETTOP M1 for the first time, it is necessary to set a minimum setting. You can follow this setting Step by Step: Configuring via Wi-Fi ● Step 1: Connect Power Cable ( P N. 310655-v3 ) in COM1 ○... - Page 15 It is recommended that you use an uninterruptible power supply (UPS) to power the receiver. A UPS protects equipment from surges and spikes, and keeps the receiver operating during power outages of short duration. For more information, contact Settop Survey ( s upport@settopsurvey.com...
-
Page 16: Configuring The Receiver Using Web Interface
Configuring the receiver using web interface The Web UI of the Settop M1 has been designed to be a “responsive” website that adapts to the type of screen depending on the device used. It does not require any software installation, this means that you only need to connect to this website via the Internet or via a local network. -
Page 17: System Status
System Status The top bar in the browser, informs us of the current settings of the receiver SETTOP M1. Logo The first icon of the bar is the device logo. By pressing on it, you can see basic information such... -
Page 18: Comunication
The following logo refers to the way the Settop M1 is connected, automatically detects the mode. The Settop M1 can be connected by Ethernet cable (using the Settop OctoHub accessory), by telephone or by Wi-Fi. In all the options, pressing on the icon the basic information associated to the connection appears. -
Page 19: Temperature
Temperature The thermometer icon indicates the temperature read by the sensor in degrees Centigrade. Pressing on the icon a drop-down appears Power The battery symbol indicates voltage level received for the receiver. Pressing on the icon a drop-down appears. The battery levels are divided into 5 states ranging from 0% to 100% 1-25 25-50... - Page 20 By pressing “Configuration”, the activation of the Total Station Service that allows the Settop M1 to control the Total Station is opened on the main page. It can also be accessed from: Once the status has been modified, press "Save" for the changes to take effect. With the service-disabled, it is an external software that controls the station.
-
Page 21: Device Menu
Device Menu By pressing the following button on the top bar , the left side menu appears for the configuration of the Total Station, Communications and System. TOTAL STATION Station configuration options are shown on the main screen. Start/Stop The S TART button starts the round measurement process according to the stored settings. During measurement, the button becomes ... - Page 22 Order : Decide how a point is to be measured, whether on 2 faces or 1 face and in what ○ order. ■ F1 / F2: Measure Face 1 and Face 2 at the same time ■ F1 ... F2: First, measures all the points in Face 1 and then repeat the procedure with Face 2 ■...
-
Page 23: Laser
■ 1, 2, 3, 4, 6, 8,12 y 24 h. ○ Repeat missing targets: If a prism could not be measured, at the end of the round it will try the measurement again. Days to measure : Activate/deactivate the days of the week that measurement is required. ○... -
Page 24: Level
Level Show the station level. The C alibration button is currently disabled Tracklight Switch on or switch off the lights from the Total Station. Tracklight emits a red, white and green sector of flashing light where the white light coincides with the measuring beam. The button is activated if the TS has this option if not, the button is deactivated automatically Search By pressing this button, Total Station searches a target automatically. -
Page 25: Video
Simply follow the steps indicated.: Select the target, AIM manually towards the target selected, measure and apply Set Offset to Zero resets the disorientation of the equipment and imposes the zero angle of the instrument Video This option active the internal camera and shows the image to control the Total Station. By clicking on the lens, you can do zoom out, zoom in or zoom extension. -
Page 26: Webcam
Webcam It is possible to connect an external webcam and configure it through an IP address, a port and a username and password. SETTOPSURVEY, S.L. Bofarull 14, 08027 Barcelona (Spain) Phone: (+34) 93 340 05 73 Fax: (+34) 93 351 95 18 w ww.settopsurvey.com i nfo@settopsurvey.com... -
Page 27: Communications
COMMUNICATIONS Options communication are shown on the main screen. Gateway Modem The data required to configure internet access via the phone are the APN, username and password. The intensity of the signal from the telephone network data transfer is shown at five levels ranging from 0% (gray) to 100% (blue) regardless of the technology used. -
Page 28: Wi-Fi
Wi-Fi The Settop M1 has an IP assigned 192.168.2.2 and connected device has an IP assigned in the range of 192.168.2.xxx. All this information appears in the Access Point SETTOPSURVEY, S.L. Bofarull 14, 08027 Barcelona (Spain) Phone: (+34) 93 340 05 73 Fax: (+34) 93 351 95 18 w ww.settopsurvey.com ... -
Page 29: Bluetooth
The S can button tracks all available activated networks within reach of the Settop M1. All of these networks appear in a list and you can select one by double clicking on it; it is then pre-set and you only need to introduce the password. -
Page 30: Radio
Radio Not available Is the option to power other devices connected to COM1 or COM2 from Settop M1. Settop M1 detects automatically if a Settop OctoHub device is connected and it allows new ports. Temperature sensor is connected in the COM1 at 9600bps Also, it should indicate the maximum power. - Page 31 With a Settop OctoHub connected: With a Settop OctoHub v2 connected: SETTOPSURVEY, S.L. Bofarull 14, 08027 Barcelona (Spain) Phone: (+34) 93 340 05 73 Fax: (+34) 93 351 95 18 w ww.settopsurvey.com i nfo@settopsurvey.com...
-
Page 32: Istconnect
ISTConnect The first time you access to the unit and you are not registered, a window to register appears. You can create an ISTConnect account to activate the service When the ISTConnect service is active, a green indicator appears that is connected. Pressing the switch to Disabled will disconnect from the service and the indicator will now be red and will be displayed on the top bar of the system status. - Page 33 Once disconnected, we can modify the name of the device and so on the URL, by typing the desired name and pressing S ave or delete the configuration if desired by pressing D elete The ISTConnect service assigns new communication ports that can be consulted by pressing IST Ports . The list shows the service, the type of communication as well as the local port and the IST port SETTOPSURVEY, S.L.
-
Page 34: Devices
Devices The D evices option allows you to access the configuration of other external devices through an IP address You can add different devices by pressing A dd as well as delete them ( T rash button). The list of connected devices will appear in the sidebar menu SETTOPSURVEY, S.L. -
Page 35: System
System configuration is shown on the main screen. Info By pressing the Info button, it shows Settop M1 and the Modem the device information about serial Number, BIOS and FW version, etc. It is possible to select the text and paste in an ASCII file Autopower If ... -
Page 36: Language
Update Used to update the Settop M1 to the latest firmware. By pressing U pdate, i t connects to Settop Upgrade Servers and if there is some new version available it will start to download the latest firmware. -
Page 37: Manage
If there aren’t new versions it appears a message Manage Allows the password management system. User may change the password of the administrator of the Settop M1. Reboot Closes all routines, turns off the receiver and turns it on again. -
Page 38: Project Bar
(*.TS) By pressing the U pload button, a project file can be loaded. The supported formats are * .TS (own Settop M1 format) and * .JXL format (the Trimble Job XML format). If one project already exists, it show a message asking what do you want to do: ... - Page 39 By pressing Log files, a list of all the measurement files corresponding to the current project is opened. 2 types of files are created for each measurement start. ● The * .log file is an ASCII file that has all the information of the connections made ●...
-
Page 40: Targets
Targets Pressing the T argets button, a list appears with all the points incorporated in the current project. This list shows if they are active (checkbox checked). The name of the point and the measurement mode. Horizontal and Vertical angles and Distance, corresponding to face 1 and 2, and the possibility of editing them (using the pencil button) With the selected prism, we can change the name, the height, the constant, the type of observation (Face1, Face2 and Face1 / Face2) and the measurement mode. -
Page 41: Add/ Measure
During the monitoring process, if the T argets button is pressed, the measurement status of the points can be seen: if it has been measured or if it has not been able to read it, the prism that is currently being measured and those that remain to be measured. -
Page 42: Messages
Messages During the processes, explanatory informative messages may appear at the top of the screen, just below the main menu. SETTOPSURVEY, S.L. Bofarull 14, 08027 Barcelona (Spain) Phone: (+34) 93 340 05 73 Fax: (+34) 93 351 95 18 w ww.settopsurvey.com i nfo@settopsurvey.com... -
Page 43: Appendix I - Installation Scheme
The following section is intended to give some basic guidelines and tips on how to assemble and configure the Settop M1 in a few simple steps for the various utilities for which it was designed. These recommendations are only in order to get a basic idea of the potential of Settop M1. -
Page 44: Basic Installation With Ups
Basic Installation with UPS SETTOPSURVEY, S.L. Bofarull 14, 08027 Barcelona (Spain) Phone: (+34) 93 340 05 73 Fax: (+34) 93 351 95 18 w ww.settopsurvey.com i nfo@settopsurvey.com... -
Page 45: Installation With Settop Octohub And Ups + Optic Fiber
Installation with Settop OctoHub and UPS + Optic Fiber SETTOPSURVEY, S.L. Bofarull 14, 08027 Barcelona (Spain) Phone: (+34) 93 340 05 73 Fax: (+34) 93 351 95 18 w ww.settopsurvey.com i nfo@settopsurvey.com... -
Page 46: Appendix Ii - Faq (Frequently Asked Questions)
APPENDIX II - FAQ (Frequently Asked Questions) LED indicators can provide information about possible problems with the Settop M1 receiver. A fast and continuous flashing light indicates an error in the indicated part of the receiver. What to do if the receiver does not turn on. -
Page 47: Appendix Iii - Accessories And Options
APPENDIX III - Accessories and options Code Description Image 310662 Settop Octohub-v1 310595 Security jail 310596 Base security jail 890305 Pilar platform SETTOPSURVEY, S.L. Bofarull 14, 08027 Barcelona (Spain) Phone: (+34) 93 340 05 73 Fax: (+34) 93 351 95 18 w ww.settopsurvey.com ... - Page 48 14-GPF1 Pilar base 310597 Total Station bracket 410159 Monitoring target 46-MP Mini Target Trimble Reference target TPN: 58008040 monitoring SETTOPSURVEY, S.L. Bofarull 14, 08027 Barcelona (Spain) Phone: (+34) 93 340 05 73 Fax: (+34) 93 351 95 18 w ww.settopsurvey.com i nfo@settopsurvey.com...
- Page 49 TPN: 58008030 Trimble monitoring target kit (25 ud) 890314 Prism nail 890314-10 Steel nail for prism 890328 Wall clamp TPN: 410181 Prism adapter SETTOPSURVEY, S.L. Bofarull 14, 08027 Barcelona (Spain) Phone: (+34) 93 340 05 73 Fax: (+34) 93 351 95 18 w ww.settopsurvey.com i nfo@settopsurvey.com...
- Page 50 Monitoring sticker: 20x20mm 25x25mm TARGET 30x30mm 40x40mm 60x60mm SETTOP Customized case CABINET PW KIT MON 12V/100Ah Gel Lead Battery SOLAR SYSTEM Solar panel 300 Wp/24V SETTOPSURVEY, S.L. Bofarull 14, 08027 Barcelona (Spain) Phone: (+34) 93 340 05 73 Fax: (+34) 93 351 95 18 w ww.settopsurvey.com ...
- Page 51 Settop IP Camera 310655 Temperature sensor 310605 Cable Settop M1 to Trimble S Series External battery Settop II SettopbatteryII 11.1V/10.4Ah Li-Ion SETTOPSURVEY, S.L. Bofarull 14, 08027 Barcelona (Spain) Phone: (+34) 93 340 05 73 Fax: (+34) 93 351 95 18 w ww.settopsurvey.com ...
- Page 52 Converter to Fiber UF11 310512-11 Fiber optics cable 2ST/2ST 60200 Antena 4G Mike15 Settop (magnetic) SETTOPSURVEY, S.L. Bofarull 14, 08027 Barcelona (Spain) Phone: (+34) 93 340 05 73 Fax: (+34) 93 351 95 18 w ww.settopsurvey.com i nfo@settopsurvey.com...
Need help?
Do you have a question about the M1-15 and is the answer not in the manual?
Questions and answers