Advertisement
Advertisement
Table of Contents

Related Manuals for Gear4music DigiPad DD90

Summary of Contents for Gear4music DigiPad DD90
- Page 1 DIGIPAD SAMPLER USER MANUAL DD90...
- Page 2 DIGIPAD SAMPLER...
- Page 3 WARNING! Avotulia kuten sytytetty kynttilä ei saa olla tuotteen päällä. Salli riittävä ilmankierto ja vältä tuuletusaukkojen tukkiminen (jos sellaisia on olemassa) estämään sisäisen lämmön muodostuminen. Tuuletusta ei Do not open cover. No user-serviceable parts inside. Refer servicing to saa estää peittämällä laite esineillä, kuten sanomalehdillä, pöytäliinoilla, qualified service personnel Do not place the product in a location near a heat source such as verhoilla jne.
- Page 4 OSTRZEŻENIE! Nie otwierać pokrywy. W środku nie ma części nadających się do naprawy przez użytkownika. Prosimy pozostawić serwis dla wyszkolonego personelu. Nie umieszczać produktu w pobliżu źródła ciepła, np. grzejnika, lub w bezpośrednim świetle słonecznym, kurzu, czy mechanicznym wibracjom. Produkt ten nie może być eksponowany na kapanie lub chlapanie, a przedmioty wypełnione płynami, takie jak wazy, nie powinny być...
-
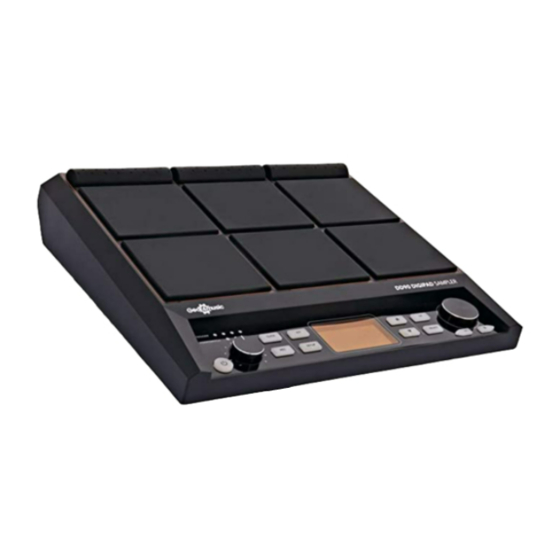
Page 6: Top Panel
TOP PANEL DD90 DIGIPAD SAMPLER TRIGGER Drum Pad... FOOTSWITCH CLICK SETUP SELECT 1. DRUM PADS 6. CLICK BUTTON Percussive pads which trigger sounds or MIDI Pressing the CLICK button activates the when hit with a drumstick. When struck, the metronome and takes you to the CLICK pads corresponding LED will illuminate. -
Page 7: Setup Button
9. SETUP BUTTON Allows you access to the MIDI, PAD, ExtPAD, Display, Version, Reset and Update submenus. More info on page 16. 10. TRIGGER / FOOTSWITCH LED INDICATORS Illuminates when external triggers and footswitches are used, they are connected via the inputs on the rear panel of the DD90. -
Page 8: Rear Panel
2. TRIG 1/2 the importing software see the user guide Used for connecting a dual zone trigger pad or (available on the Gear4music website). More an acoustic drum trigger. A stereo connecting information on using a USB memory stick with the DD90, see page 10. -
Page 9: Bottom Panel
BOTTOM PANEL The DD90 can be played flat on desktop or placed on most common snare drum stands. A clamp and stand made specifically for the DD90 is available to purchase at the Gear4music website. - Page 10 More information is available WAVE in the software user manual also Sound fi les you have saved in the root available on the Gear4music website. directory of your USB stick will appear here. You need to import them before previewing SAVE (explained in the LOAD section).
- Page 11 INFO Displays information relating to the total and remaining storage on your USB stick as well as giving the option to format. USBMem Displays total size of USB memory stick. U Remain Displays remaining storage available on USB memory stick. Format U-Disk Used to format the USB memory stick, press OK and you will be given an...
- Page 12 CLICK BUTTON SUB MENUS KIT BUTTON SUB MENUS TEMPO HOME Use the SCROLL WHEEL or +/- buttons to adjust the tempo (from 20 – 240bpm). SETUP Allows you to adjust the sound and rhythm of A. Shows P1-30, which is one of the 30 the click.
- Page 13 WAVE LOOP Gives you the ability to adjust individual Adjust built-in and user recorded loops samples within a preset. Hit a PAD to select within the DD90. More information about it and begin editing. Press SELECT to scroll recording loops on page 17. through the different submenus and press OK to save.
- Page 14 EFFECT Allows you to have control over the master effects Gives you access to advanced editing features. on the DD90. Use the SELECT button to scroll between EQ, Reverb and Limit. A built-in 3-band EQ, which can shape the overall sound of the DD90. Tuning Tune a sample up or down, the range is +/- 12.
- Page 15 ADV 2 OFF will disable all kitchains and the presets Gives you access to more advanced editing will be in their original order. features. 01-08 Selects which order the preset kit will go in, 01 is fi rst – 08 is last. Once highlighted you can choose which preset you want using the +/- BUTTON or SCROLL wheel.
- Page 16 SETUP BUTTON SUBMENUS MIDI Displays a MIDI number for each pad. Hit a pad and the corresponding MIDI number will be highlighted. Once the desired pad has been hit you can edit the MIDI value using the scroll wheel or +/- Mode buttons.
-
Page 17: Record Mode
DISPLAY RECORD MODE Allows you to set the LCD Contrast and disable the Allows you to record MIDI patterns within LEDs. the DD90. Pressing the REC button once will display the following menu. The metronome will automatically turn on, you can disengage it using the CLICK button. - Page 18 If you have any more questions about this product, please do not hesitate to contact the Gear4music Customer Service Team on: +44 (0) 330 365 4444 or info@gear4music.com...
Need help?
Do you have a question about the DigiPad DD90 and is the answer not in the manual?
Questions and answers