
Subscribe to Our Youtube Channel
Related Manuals for Goodbaby SM35PTZ


Summary of Contents for Goodbaby SM35PTZ
- Page 1 BABY MONITOR SM35PTZ (Digital Wireless Video Baby Monitor With 3.5 inches Color Screen) USER MANUAL BE WITH YOUR BABY FOR EVERY MOMENT...
- Page 2 THANK YOU FOR PURCHASING GOODBABY BABY MONITOR. PLEASE ACTIVE AND EXTEND YOUR WARRANTY NOW. (Register within 7 days after receiving your product) To register your product https://goodbaby.top/warranty Visit Finished the form on the website That is it! Your product is now active and extend warranty! If you are unsatisfied with your product, please contact us via...
- Page 3 Congratulation! Now you can take care of your babies anywhere and anytime! Please read the user manual before use! Please retain your original dated sales receipt for your to records. For warranty service of your baby monitor, you will need to provide a copy of your dated sales receipt to confirm warranty status.
-
Page 4: Safety Instructions
1. SAFETY INSTRUCTIONS : Warning-Strangulation Hazard-Children have STRANGLED in cords. Keep this cord out of children (more than 3 ft/0.9m away). Do not remove this tag that affixed to the cord of the unit. Parent unit and baby unit with power cords should never be hung on or near the crib. - Page 5 flow. Keep away from sources of heat: This unit should not be exposed to direct heat sources such as a candle, replace, radiator, heat register, stove or other appliance that emits heat.
-
Page 6: Product Overview
2. PRODUCT OVERVIEW 2.1 What’s included: 1. Parent unit x 1 4. User manual x 1 2. Baby unit x 1 5. Screw Set x 1 3. Adapter x 2 - 04 -... -
Page 7: Parent Unit
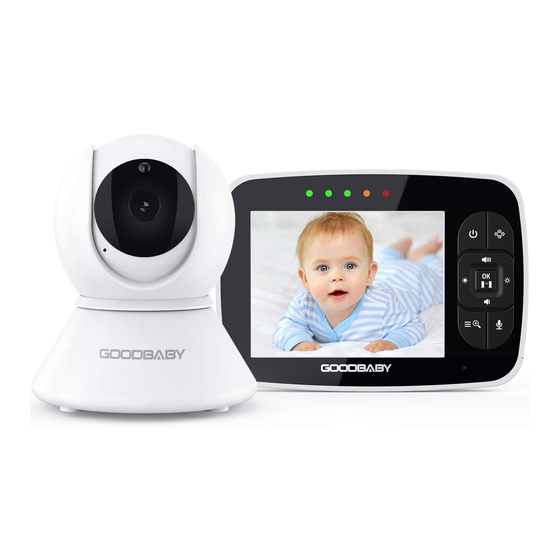
2.2 Parent Unit: LCD screen Power/Charging Indicator Brightness-/Left Volume Indicator Speaker Power on/off Support Volume+/Up Pan/Tilt Menu/Zoom Reset(behind the kickstand) Volume-/Down Talk to Baby DC-Jack Brigthess+/Right 2.3 Baby Unit Light sensor Speaker Infrared LEDs Antenna CMOS senor Temperature sensor... - Page 8 2.2 Icons Overview: Signal Volume Zoom Alarm Brightness Night vision Lullaby Talk to baby Baby Unit Battery Temperature - 06 -...
-
Page 9: Getting Started
3. Getting Started 3.1 Charge the Parent Unit: Step 1: Full charge the Parent Unit before using it. When charging, the charging indicator will turn red. When the unit is turned on, the charging indicator will turn green. 3.2 Turn On the Baby Unit:... - Page 10 3.3 Turn On the Parent Unit: Step 3: Press and hold the power button.The animation ”Waiting for connection” will be displayed on the screen. 3.4 Prepare for Connecting the Baby Unit: Step 4: Press and choose select , the icon will flash, then wait for connect.
- Page 11 3.5 Pair the Parent Unit with the Baby Unit: Step 5: Long press the “Pair” button at the back of the baby unit until the parent unit shows images. If failed, choose another baby unit channel ) and try to pair again.
-
Page 12: Function Operation
4. Function Operation 4.1 Pairing More Than One Baby Unit with Parent Unit 1 . Press the Menu/Exit key , then the menu will display. 2. Press the Left button or RIGHT button until the Baby Unit icon is... - Page 13 4.3 Talk to Baby To talk to your baby, press and hold on the parent unit. Release the button when you have finished talking, listen to the sound from the baby’s room again. Bear in mind that you can’t listen to your baby whilst you’re talking to him/her.
- Page 14 Note: ECO-LOW means Low sensitivity level, requiring higher sound level to reactivate the transmission. ECO-MID means Medium sensitivity level, requiring medium sound level to reactivate the transmission. ECO-HIGH means High sensitivity level, requiring low sound level to reactivate the transmission.
- Page 15 4.7 LULLABY SETTING You can soothe the baby to sleep by playing a gentle lullaby from baby unit 1. Press the Menu/Exit key and the menu will pop up. 2. Press the LEFT key or RIGHT key until the lullaby icon highlighted.
-
Page 16: Technical Data
5. TECHNICAL DATA 5.1 System General Frequency 2.4GHz FHSS Type of Moduiation GFSK Transmittng Power 18dBm Max Operation Environment Indoor use only; Temperature: 0-40 °C ; Humidity: 5% to 90% rh. ( relative humidity) Operating Range Up to 900 feet (straight line and open space) -
Page 17: Troubleshooting
6. TROUBLE SHOOTING 1. The power adapters may not be properly connected. Confirm that the camera and monitor are ON. See item 2 “Getting started”, connect the baby unit in the right way. If it is still unconnected, choose another baby unit to connect. -
Page 18: Maintenance
1. The baby unit and parent unit may be place too close together. Keep the distance between parent unit and the baby unit. A high-pitched 2. The volume on the parent unit may be set too high. Noise is Heard Turn down the volume on the parent unit. - Page 19 All rights reserved The features described in user’s manual are subject to modifications without prior notice. WARNING Keep the small parts away from children Printed in China...
- Page 20 Live Chat Support Learn more about GOODBABY, please visit us at https://goodbaby.top Scan QR Code & Send to us scan support@goodbaby.top www.goodbaby.top Printed in China...
Need help?
Do you have a question about the SM35PTZ and is the answer not in the manual?
Questions and answers
Hello Gentleperson, I bought model SM35PTZ a few years ago (2021). The camera stopped moving today—it still shows the room, but will not move left, right, up, down. I disconnected both it and the monitor. Reset the monitor and reset the camera. Do you know how I can restart the camera so that it will move again? I found the troubleshooting manual on-line, but this is not one of the issues covered. Jane
To restart the Goodbaby SM35PTZ baby monitor's parent unit, locate the small black hole marked "Reset" at the back of the parent unit (under the stand). Use a sharp object to press the reset button for a few seconds. This may help restore the movement functionality of the camera.
This answer is automatically generated
May I use my phone as the parent unit for the sm35ptz?
No, the Goodbaby SM35PTZ requires a dedicated Parent Unit for operation. The provided information does not mention any smartphone compatibility or app-based monitoring.
This answer is automatically generated