ERA E3000 Instruction Manual
Wireless video door intercom
Hide thumbs
Also See for E3000:
- Instruction manual (26 pages) ,
- Installation and operating manual (24 pages)

Related Manuals for ERA E3000


Summary of Contents for ERA E3000
- Page 1 SMART HOME SECURITY Wireless Video Door Intercom E3000 Instruction Manual Customer Helpline 0345 257 2500...
- Page 2 PLEASE READ THIS MANUAL CAREFULLY BEFORE OPERATING THE SYSTEM AND RETAIN FOR FUTURE REFERENCE. Any repairs must be carried out by an ERA Authorised Repair Centre. Misuse or attempted repairs to any component part of this product will invalidate the warranty.
-
Page 3: Table Of Contents
Content Features................1 Kit Contents ..............2 Product Diagrams ............3 Battery Installation & Power ........4 Outdoor Camera Connection Diagrams ....6 Outdoor Camera Installation ........7 Settings ................8 Setup................16 Operation..............18 Technical Specification ..........20 Additional Accessories ..........21 Notes .................22 Disposal & Recycling ..........22 Guarantee ..............23... -
Page 4: Features
Features Up to 215 metre operating range in clear line of sight. Supports up to 2 outdoor cameras and 2 video handsets. Wireless Outdoor Camera/intercom/doorbell Battery operated (requires 2 x C Cell Batteries, not included) Power supply option (requires DC 12V Power Adapter, not included) IP55 rated 8 LEDs for night vision Video resolution: 320 x 240, 15 frames per second... -
Page 5: Kit Contents
Customer Support Helpline, prior to installation and set-up. Outdoor Camera/Intercom/Doorbell Outdoor Camera Cable Cover Battery Cover Bracket SMART HOME SECURITY Wireless Video Door Intercom E3000 Instruction Manual Customer Helpline 0345 257 2500 Instruction Manual Screws Portable Video Handset Lithium Battery Charger Base Power Adapter... -
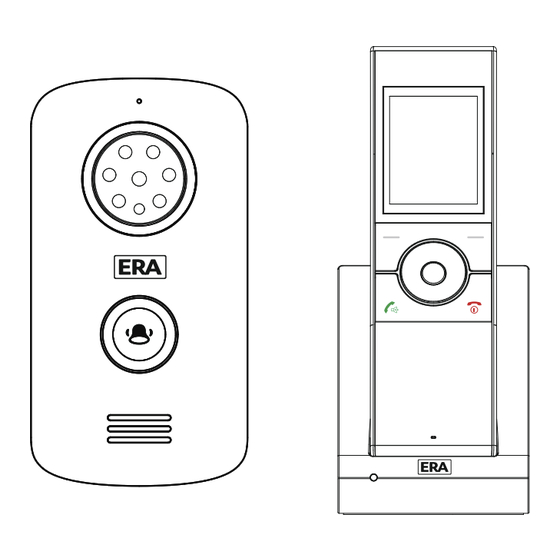
Page 6: Product Diagrams
Product Diagrams Outdoor Camera Microphone LED Lights Camera Sensor Light Call Button Speaker Video Handset LCD Display Speaker Navigation Key Left Soft Key Right Soft Key Monitor/ Snapshot Accept Key Power/ End Key Battery Compartment Unlock Key/ Cover Charger LED Microphone Charging Pins Charger... -
Page 7: Battery Installation & Power
Battery Installation & Power Video Handset Battery Installation: Fit the rechargeable lithium battery (3.7V,1100mA) supplied,as follows: Lithium battery Protective cover Battery case Battery compartment cover 1. Remove the battery compartment cover by pushing down on the raised arrow and sliding the cover in a downward direction. 2. - Page 8 Outdoor Camera Battery Installation: 1. Fit two Size 1.5V batteries (not supplied) into the battery compartment. 2. Fix the battery cover in place using the four screws provided. screw battery cover battery The status of the Outdoor Camera batteries is shown in the top left-hand corner of the screen when in Monitoring Mode and during a call.
-
Page 9: Outdoor Camera Connection Diagrams
Diagram Connecting the Outdoor Camera to a Power Supply and/or Unlock Module (optional accessories) Connection Mode 1 Normally 'Open' EX-BUT Normally open lock DC9-12V Lock DC power for Lock Maximum relay output DC Power Supply current 1A Outdoor Camera Connection Mode 2 Normally 'Closed' EX-BUT Normally... -
Page 10: Outdoor Camera Installation
After wiring a Power Supply and/or Unlock Module (not included) to the connection terminal, tension the cable. Fit the cable cover over the connection terminal with the four screws supplied. Cable cover Cable battery compartment cover Outdoor Camera Installation: When locating the outdoor camera, position the camera lens at an average 'head height' . -
Page 11: Settings
Installation Settings Turning On/ Off To turn on the indoor handset, press and hold To turn off the indoor handset, press and hold When you turn on the video handset, the screen below will be displayed: Note: When the video handset battery is low the low battery icon will be displayed on the screen and a warning... - Page 12 1. Volume (9 Levels) 1. Press Up or Down to choose “Volume” menu, then press beneath Select 2. Press Left or Right to select the volume that you like. 3. Press beneath Select to save the settings and return to the previous menu. Note: Also, you can use Left or Right key to adjust the volume in the...
- Page 13 3. Key Tone Each time you press a key a 'Key Tone' is heard. In certain error conditions, for example when an incorrect key is pressed a warning tone will sound. 1. Press Up or Down to select the 'Key Tone' menu, then press beneath Select .
- Page 14 5. Auto Snap Settings 1. Press Up or Down to select the 'Snap Set' menu, then press beneath Select. 2. Press Up or Down to choose On or Off to enable or disable the function. 3. Press beneath Select to save the setting and return to the previous menu. With 'Auto Snap' On, the camera will take a photo of visitor automatically when the outdoor camera's call button is pressed.
- Page 15 6. Snap Show Stored photos can be viewed or deleted in the 'Snap Show' menu. The snap number is displayed in the upper right corner of the photo. 001/100 2016-05-25 1. Press Up or Down to select the 'Snap Set' menu, then press beneath Select.
- Page 16 1. Press Up or Down to select the 'Date & Time' menu, then press beneath Select. 2. To set the time press Left or Right to choose the Hour or the Minute and press Up or Down to adjust. 3. To set the date press Left or Right to choose the Year or the Month or the Date, then press Up...
- Page 17 3. To save each setting individually press beneath Select with each change as it is made, at each stage you will return to the menu screen from where you can return to the menu to change the remaining settings. To change all settings without returning to the previous menu after each change, make the changes to all functions and then press Select to accept all and return to the previous menu.
- Page 18 11. Register Used To link an outdoor camera to a video handset, as described on page 16. 12. Software Version 1.0.0 20150731 To check the software version Press Up or Down to select the 'Version' menu, then press to Select. Press Back to the previous menu. 13.
-
Page 19: Setup
Setup Register 1. Insert a small screwdriver or similar item into the depression just above the ' symbol inside the outdoor camera battery compartment, and depress the register button with the screwdriver for 3 seconds. The unit will sound an indication tone and the call button backlight will illuminate. - Page 20 √ De-registering To delete the registration press beneath . The display will show ' ?', press beneath '√'to confirm or 'x' to cancel. Press beneath to return to the main interface. Notes: 1. Outdoor camera registration can take up to 60 seconds. 2.
-
Page 21: Operation
Operations Outdoor Camera Operation When the outdoor camera call button is pressed the corresponding video handset will ring, and an image of the visitor will appear on the video handset screen. If the call button is pressed again the conversation will end. 1. - Page 22 Tamper Alarm When the outdoor camera is moved away from its bracket, both the outdoor camera and video handset will sound an alarm tone. The outdoor camera call button will be Inoperable, press to stop the alarm tones. Note: The alarm will sound for up to 5 minutes. Backlight 1.
-
Page 23: Technical Specification
Technical Specification Detail Item Outdoor Camera Transmit Frequency Range 2.4GHz - 2.4835GHz 2.0Mbps Data Rate Transmitting Power 19dBm(TYP) GFSK Modulation Type Outdoor:≥260m Transmitting Distance Color CMOS Image sensor Image Sensor Type Image Processing H.264 640 480 Camera Pixels Auto White Balance Viewing Angle (Diagonal) 120°... -
Page 24: Additional Accessories
Size(W H D) Charger base: 80 x 95.2 x 103.7mm No. of door camera supported Max .2 Additional Accessories Additional Accessories are available for the E3000 Video Door Intercom system. Including: Additional Handset and Charger E3000HSC Additional Outdoor Station E3000-OS... -
Page 25: Notes
Notes Disposal and Recycling Disposal of this product is covered by the Waste Electrical or Electronic Equipment (WEEE) Directive. It should not be disposed of with other household or commercial waste. At the end of its useful life the packaging and product should be disposed of via a suitable recycling centre. -
Page 26: Guarantee
PRODUCT GUARANTEE * We at ERA firmly believe in the quality of our goods. Our technology achieves outstanding performance and durability and we can therefore offer, in addition to your statutory rights, an additional limited guarantee. In the event of any...
Need help?
Do you have a question about the E3000 and is the answer not in the manual?
Questions and answers
Door bell not working with or without batteries it was installed for me through disability
The issue with the ERA E3000 doorbell not working with or without batteries could be due to incorrect or improper use of the supplied batteries, damage caused by using non-ERA batteries, unauthorized modifications, incorrect installation, or neglect.
This answer is automatically generated