Table of Contents
Advertisement
Available languages
Available languages
Quick Links
Advertisement
Chapters
Table of Contents

Related Manuals for koban KMD 01


Summary of Contents for koban KMD 01
-
Page 1: Kmd 01
Multímetro digital KMD 01 Digital multimeter... -
Page 2: Table Of Contents
KMD 01 Multímetro digital Índice Información de seguridad Descripción Especificaciones Instrucciones de funcionamiento Retención de datos Cambio de la escala de medición Modo de mediciones relativas Selección de medición entre ciclo de trabajo y frecuencia Cambio de función (FUNC) Retroiluminación Auto-apagado Detección de tensión sin contacto (NCV) -
Page 3: Multímetro Digital
KMD 01 Multímetro digital Información de seguridad Precaución El uso inapropiado de este multímetro puede causar daños personales o en el aparato. Siga los procedimientos comunes de seguridad y las recomendaciones de este manual. Este multímetro cumple las normas GB/T 13978-92, GB4793.1-1995 (IEC 61010-1, IEC 61010-2-032) relativas a la seguridad de instrumentos de medición electrónicos, clasificación CAT III 1000V y CAT IV 600V y grado de... - Page 4 KMD 01 Multímetro digital más alta. • Antes de girar el selector rotatorio para cambiar de función desconecte las puntas de prueba de cualquier circuito. • No mida elementos con corriente activa. • No mida la capacitancia sin haber descargado los condensadores por completo.
-
Page 5: Descripción
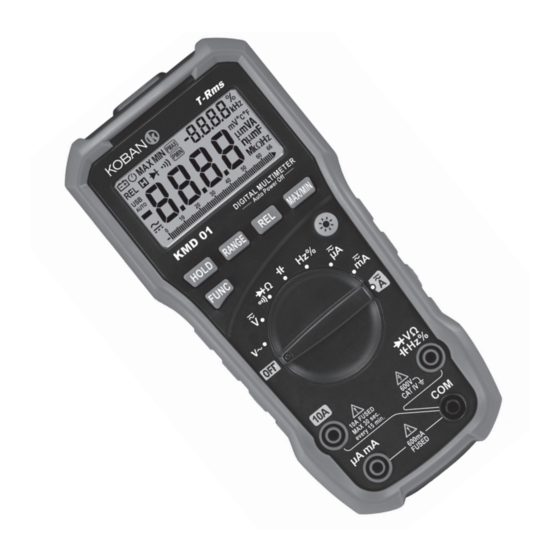
• Si no va a usar el multímetro durante un periodo prolongado, quítele la batería. Descripción • El KMD 01 es un multímetro de pequeñas dimensiones, seguro y fiable con pantalla de 3 ½ dígitos retroiluminada. Posee protección contra sobrecargas e indicador de batería baja. Se trata de un herramienta ideal tanto para uso por parte de profesionales como aficionados. - Page 6 KMD 01 Multímetro digital Panel frontal 1. Puerto USB 2. Indicador de tensión sin contacto 3. Pantalla LCD 4. Teclado 5. Selector rotatorio 6. Toma de entrada 7. Zona de detección de tensión sin contacto Descripción de botones, selector y tomas de entrada Botón HOLD: retención de lecturas.
- Page 7 KMD 01 Multímetro digital Pantalla LCD Diodo Señal audible de continuidad AUTO Modo de medición automático Valor máximo Valor mínimo Indicación de batería baja Porcentaje (ciclo de trabajo) Hz, kHz Herzio, Kiloherzio (frecuencia) mV, V Milivoltio, Voltio (tensión) μA, mA, A Amperio (corriente) nF, μF, mF...
-
Page 8: Especificaciones
KMD 01 Multímetro digital Especificaciones Precisión: ±(% de lectura + digitos) a 18ºC ~ 28ºC; humedad relativa <75%; garantizada durante un año. Especificaciones generales Escala: Manual y automatica Protección contra sobrecarga: Protección para todas las escalas Tensión máx. entre las tomas... - Page 9 KMD 01 Multímetro digital Especificaciones técnicas Temperatura ambiente: 23±5°C, humedad relativa (HR): <75% Tensión CC Escala Resolución Precisión 660mV 0.1mV ±(0.8% de lectura + 3 digitos) 6.6V 0.001V 0.01V ±(0.5% de lectura + 5 digitos) 660V 0.1V 1000V Impedancia de entrada: 10MΩ.
- Page 10 KMD 01 Multímetro digital Resistencia Escala Resolución Precisión 660Ω 0.1Ω 6.6kΩ 0.001kΩ 66kΩ 0.01kΩ ±(0.8% de lectura + 5 digitos) 660kΩ 0.1kΩ 6.6MΩ 0.001MΩ 66MΩ 0.1MΩ ±(1.5% de lectura + 5 digitos) Tensión en circuito abierto: aprox. 1.0V Protección contra sobrecargas: 250V CC o CA (RMS)
- Page 11 KMD 01 Multímetro digital Continuidad Escala Resolución Precisión La señal audible se activará si la 0.1Ω medición es menor de 50Ω Protección contra sobrecargas: 250V CC o CA (RMS) Tensión del circuito abierto: aprox. 1,0V Frecuencia. Posición V o corriente Escala Resolución...
-
Page 12: Instrucciones De Funcionamiento
KMD 01 Multímetro digital Corriente CC Escala Resolución Precisión 660μA 0.1μA 6600μA 1μA ±(1.0% de lectura + 5 digitos) 66mA 10μA 660mA 100μA 10mA ±(2.0% de lectura + 2 digitos) Protección contra sobrecargas: toma μA y mA: fusible F400mA/250V; toma A: fusible F10A/250V. -
Page 13: Modo De Mediciones Relativas
KMD 01 Multímetro digital • Pulse RANGE para cambiar a modo manual. Con cada pulsación la escala aumentará un paso, al llegar a la más alta volverá al principio. • Pulsando RANGE durante más de un segundo volveremos al modo de escala automático. -
Page 14: Detección De Tensión Sin Contacto (Ncv)
KMD 01 Digital multimeter el símbolo , y comenzará a transmitir los datos. • Abra el programa de comunicación para transferir los datos de las lecturas del multímetro al PC. Detección de tensión sin contacto (NCV) • Gire el selector a la posición NCV •... -
Page 15: Prueba De Continuidad
KMD 01 Multímetro digital Para medir la resistencia: • Gire el selector a la posición • Conecte las puntas de prueba negra y roja a las tomas COM y Ω respectivamente. • Conecte el otro extremo de las puntas de prueba al circuito que va a medir y lea los valores registrados en la pantalla. -
Page 16: Medición De Corriente
KMD 01 Multímetro digital Para medir la frecuencia: • Gire el selector a la posición Hz. • Conecte la punta de prueba negra y la roja a las tomas de entrada COM y Hz respectivamente. • Conecte el otro extremo de las puntas de prueba al circuito que va a medir y lea los valores registrados en la pantalla. -
Page 17: Accesorios
KMD 01 Multímetro digital Precaución Para evitar daños personales o al instrumento retire las puntas de prueba antes de abrir la tapa de la pila. • Cambie la pila del multímetro cuando aparezca el símbolo en la pantalla. • Desatornille la tapa y retírela . - Page 18 KMD 01 Digital multimeter Contents Safety information Description Specifications Operating Guidance Reading Hold Measuring Range Switch Relative Measurement Mode Switch Duty Ratio And Frequency Measurement Choice Function Switch Backlight Automatic Power-off NCV (non-contact Voltage Detection) AC Voltage/DC Voltage Measurement Resistance measurement...
-
Page 19: Safety Information
KMD 01 Digital multimeter Safety information Warning Please particularly note that inappropriate use may cause shock or damage to the meter. When using, comply with common safety procedures and completely follow the safety measures stated in the operation manual. In order to make full use of the meter’s functions and ensure safety operation, please carefully read and follow the use methods in the operation manual. - Page 20 KMD 01 Digital multimeter tip (metal part). • When measuring, if the voltage to be measured is more than 60 V DC or 30 V AC (RMS), always keep your fingers always behind finger protection device. • When using the CAT Ⅳ environment, if the measuring voltage between...
-
Page 21: Description
KMD 01 Digital multimeter CAT III According to pulse voltage tolerance protection level provided by IEC 61010-1 standard overvoltage (installation) level III and pollution degree 2. The meter complies with EU standard Grounding Maintenance • Don’t try to open the meter bottom case to adjust or repair. Such operations only can be operated by technicians who fully understand the meter and electrical shock hazard. - Page 22 KMD 01 Digital multimeter Part name 1. USB communication interface (only for MS8250B) 2. Non-contact voltage detection indicator 3. LCD display 4. Key 5. Functional rotary switch 6. Input socket 7. Non-contact voltage induction area Switch, Button and Input Jack Description HOLD key: used for reading hold.
- Page 23 KMD 01 Digital multimeter LCD Display Diode Audible continuity AUTO Automatic measuring range mode Maximum measurement state Minimum measurement state Low battery Percentage (duty ratio) Hz, kHz Hertz, Kilohertz (frequency) mV, V Millivolt, Volt (voltage) μA, mA, A Ampere (current) nF, μF, mF...
-
Page 24: Specifications
KMD 01 Digital multimeter Specifications The meter should be recalibrated annually. When calibrating, temperature should be 18°C~28°C, and relative humidity should be less than 75%. General Range: Manual and automatic Overload protection: Full measuring range overload protection Max. Input between terminals... - Page 25 KMD 01 Digital multimeter Technical specifications Environment temperature: 23±5°C, relative humidity (RH): <75% DC Voltage Range Resolution Accuracy 660mV 0.1mV ±(0.8% of reading + 3 digits) 6.6V 0.001V 0.01V ±(0.5% of reading + 5 digits) 660V 0.1V 1000V Input impedance: 10MΩ...
- Page 26 KMD 01 Digital multimeter Resistance Range Resolution Accuracy 660Ω 0.1Ω 6.6kΩ 0.001kΩ 66kΩ 0.01kΩ ±(0.8% of reading + 5 digits) 660kΩ 0.1kΩ 6.6MΩ 0.001MΩ 66MΩ 0.1MΩ ±(1.5% of reading + 5 digits) Open circuit voltage: about 1.0V Overload protection: 250V DC or AC (RMS)
- Page 27 KMD 01 Digital multimeter Continuity Function Description Description If the resistance of circuit to be 0.1Ω measured is less than 50Ω, the meter’s built-in buzzer will sound. Open circuit voltage is about 1.0V Overload protection: 250V DC or AC (RMS)
-
Page 28: Operating Guidance
KMD 01 Digital multimeter DC Current Range Resolution Accuracy 660μA 0.1μA 6600μA 1μA ±(1.0% of reading + 5 digits) 66mA 10μA 660mA 100μA 10mA ±(2.0% of reading + 2 digits) Overload protection: μA and mA grade: FFuse FF600mA/1000V, A grade: Fuse FF10A/1000V. -
Page 29: Measuring Range Switch
KMD 01 Digital multimeter Measuring Range Switch • When turning the conversion switch to current, voltage, resistance, capacitance, frequency grade, the meter is in automatic measuring range mode. • Press “RANGE” key, the meter will enter the manual range mode. Ppress once, the measuring range will go up with one grade. -
Page 30: Ncv (Non-Contact Voltage Detection)
Digital multimeter USB communication • Install KMD 01 communication software and USB driver in PC (see PC software operation manual in the attached CD for details). • Use USB cable to connect the meter and PC. The meter will display and begin to send data. -
Page 31: Resistance Measurement
KMD 01 Digital multimeter voltage, the display will simultaneously show the voltage polarity which is connected with red test probe. • Press FUNC key to switch AC voltage, DC voltage measurement. Resistance measurement Resistance range of this meter: 660.0Ω, 6.600kΩ, 66.00kΩ, 660.0kΩ, 6.600MΩ, 66.00MΩ. -
Page 32: Frequency And Duty Ratio Measurement
KMD 01 Digital multimeter • Measure the capacitance value of circuit to be tested with other two ends of test probes and read the measuring value from LCD display. Frequency And Duty Ratio Measurement Capacitance range of this meter: 60Hz, 600Hz, 6kHz, 60kHz, 600kHz, 6MHz, 60MHz. -
Page 33: Accesories
KMD 01 Digital multimeter immediately. • Unscrew the fastening screw of the meter battery cover and remove it . • Replace battery. • Install the battery cover. Note: The battery polarity can’t be reversed. Replace Probe Warning When replacing probe, replace with another identical probe or one with the same capacity. - Page 34 KMD 01 Digital multimeter Instructions manual | www.grupotemper.com...
- Page 35 GARANTÍA • WARRANTY años GARANTIE • GARANTIA years années anos TEMPER ENERGY INTERNATIONAL S.L. TEMPER ENERGY INTERNATIONAL garantiza este aparato por 2 años ante S.L. garantit cet apareil pour le durée todo defecto de fabricación. Para hacer de 2 annèes contre tout défault de válida esta garantía, es imprescindible fabrication.
- Page 36 TEMPER ENERGY INTERNATIONAL S.L. Polígono industrial de Granda, nave 18 33199 • Granda - Siero • Asturias Teléfono: (+34) 902 201 292 Fax: (+34) 902 201 303 Email: info@grupotemper.com Una empresa del grupo...
Need help?
Do you have a question about the KMD 01 and is the answer not in the manual?
Questions and answers