Table of Contents
Advertisement
Advertisement
Table of Contents

Related Manuals for Ecosmo Folding bicycle

Summary of Contents for Ecosmo Folding bicycle
- Page 1 Folding bicycle instructin manual стр. 1...
- Page 2 CONGR ATUL ATIONS ON YOUR CHASE BIKE PUR Your bike is designed, assembled and adjusted for safe use meeting the highest standards GB 3565-2005. With proper care your bike will be making you happy over many years. Due t erent models ar erently equipped, present manual provides gener...
-
Page 4: Table Of Contents
CONTENTS _________________________________________________________ 1. SAFETY p. 6 2. ASSEMBLY p. 7 3. ADJUSTMENT 3.1. Diagram of unfold the folding bike p. 8 3.2. Adjustment the height of stem and seat post p. 10 3.3. Handle bar p. 12 3.4. Saddle, seat post p. - Page 5 _________________________________________________________ 6. W ARR ANT Y INF ORMA TION 6.1. Servic e lif e and warr an ty perio d p. 22 6.2. W arr an ty t e rms p. 22 6.3. Buy er’ s r e sponsibilities p. 23 6.4.
-
Page 6: Safety
Present manual covers brand biy cles . 1. SAFET Y _________________________________________________________ 1.1. ATTENTION! Please remember cycling can be a hazardous activity. 1.2. B efore each ride check the bike as described in Section 4. 1.3. W hen riding ,use individual means of pr otection. Wear a helmet to protect your head from injury, glasses will cover your eyes from dust and insects, gloves will save your hands in case of fall. -
Page 7: Assembly
1.8. W atch the road . Though road conditions and tracks design have recently become better you should be always aware. You can meet pits, drains, low edges, etc on your way. Cross the railway cautiously at the angle of 90 degrees. In case you don’t feel ycle and drive it. -
Page 8: Adjustment
2.2 Unfold the handle bar 2.2.1 Pull the handle bar opposite the folding direction,and let the folding device full closed. 2.2.2 Press the folding button ,let the folding button be closed,it need 6-8KGF to close the folding button. 2.2.3 Turn the safe button anticlockwise,let the safe button fully cove the folding handle. -
Page 9: Adjustment The Height Of Stem And Seat Post
3.1.2 Unfold the handle bar 3.1.3 Unfold seat post Adjustmen t the heigh t of stem and seat post 3.2.1 Handle stem Insert the stem should not be less than the position of the safety line. Close the quick release make sure it is safe. stem line 3.2.2... -
Page 10: Saddle, Seat Post
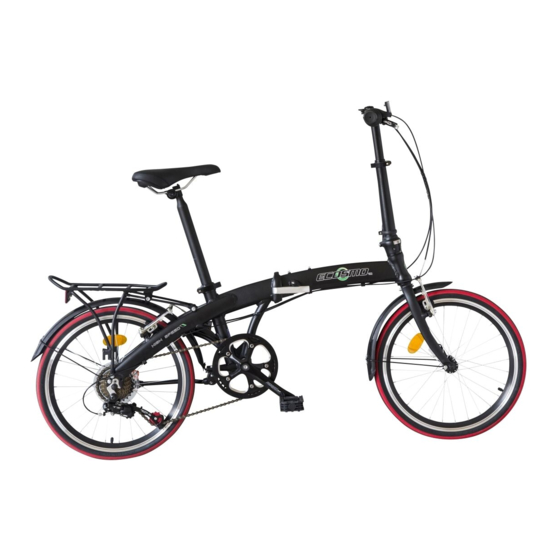
saddle seat post seat post clamp chainwheel set with cranks brake path carrier mudguard cassette chain rear derailleur wheel spoke nipple tyre p.10... - Page 11 shifter grip brake lever stem folding stem quick release front brake brake cable fork wheel hub folding device of the frame quick release of folding Pedal...
- Page 12 3.2. 3.3. Handle bar You can easily define handlebar tilt and bent. Make sure the handlebar tilt is horizontally centred in the stem. Otherwise, you may refer to your own comfort requirements. To adjust/mount the handlebar release/take off Allen bolts, set the bar within the stem centre and keep the necessary tilt direction.
- Page 13 3.6. Fron t der a illeur 3.6.1. Mount the front derailleur on the seat tube so that the guide plate of the derailleur is in parallel with the chainwheels and distance from plate outside till bigger chainwheel is 2-4 mm (pic. 10, 11). T orque is 5-8 N/m.
- Page 14 1-2 mm cable adjusting screw pic. 12 pic. 13 stop screw L (low) front derailleur guide plate biggest rear chainring smallest front chainring left shifter chain sprocket front chainwheels 1-2 mm adjusting screw pic. 14 1-2 mm rear view derailleur hanger sprockets pic.
- Page 15 3.7.4. Using the stop screw H (high) adjust the rear derailleur outermost position so that derailleur roller is situated exactly under the smallest sprocket (pic. 18). 3.7.5. Fix the rear derailleur cable tension so that it couldn’t lengthen (5 N/m) (pic. 19).
-
Page 16: Rim Brakes
3.8. Rim brakes 3.8.1. Mount the brake pads so that the pad braking surface is in parallel with the rim braking surface and it’s set right in the middle (pic. 21). 3.8.2. Tighten the adjusting bolt against the brake lever and unscrew it by two turns (pic. -
Page 17: Mechanical Disc Brakes
3.9. M echanical disc br akes 3.9.1. Before adjusting disc brakes make sure discs are not deformed, pads’ surface is smooth, without any scratches. 3.9.2. With your eye control set the disc brake caliper in such a way that pad braking surface is in parallel with the brake disc. -
Page 18: Tyres
brake support adjusting screw oil path brake lever brake pads brake disc pic. 27 pic. 28 3.11. Tyres 3.11.1. Before riding pump up the wheels till the required pressure. The pressure needed is shown on the tyre sidewall. 3.11.2. Use the pump appropriate for your bicycle nipple. There are two main types of nipples: for bicycle (PRESTA) and car (SCHRADER) (pic. -
Page 19: Once A Week (About 100-200 Km Distance Run)
4.2. O nce a w eek (ab out 100-200 k m distanc e r un) 4.2.1. Clean and oil the chain (choose special silicone or t icants, epending on weather conditions and riding frequency the break between maintenance sessions can vary. 4.3. -
Page 20: Guide To General Rules
5. GUIDE TO GENERAL RULES _________________________________________________________ 5.1. Recommended tools for service and repair: • Torque wrenches with measure range of 3 to 50 N/m; • Allen keys 2, 3, 4, 5, 6, 8 mm; • Spanner keys 9, 10, 13, 15, 17 mm; • Cap keys 15 mm;... -
Page 21: Chain
5.5. Chain To mount – dismount the lock. Oil the chain duly to prevent it from early wear, as well as the chainwheels. A icant on the chain once or twice a week so that oil c ate the links. F xcess lubricant with a rag, thus chain won’t get dusted. -
Page 22: Warranty Information
6. WARRANTY INFORMATION _________________________________________________________ 6.1. Service life and warranty period Before riding, please read the manual carefully and follow all stated requirements. The warranty period for the bicycle (provided that first maintenance is duly held) is 12 months, for equipment is 6 months (from the date of bicycle sale). Suspension guarantee is set by its producer. -
Page 23: Buyer ' S Responsibilities
6.3. Buyer ’ s responsibilities 6.3.1. Show this manual in the authorized service center. 6.3.2. Guarantee bicycle maintenanc ected in the authorised service centre duly cer y the producer. 6.3.3. Use, service, keep and maintain bicycle in accordance with this manual. 6.3.4. -
Page 24: Data Sheet
7. DATA SHEET _________________________________________________________ Model: ___________________________________________________ Serial number: _____________________________________________ Owner: ___________________________________________________ Address, phone: ____________________________________________ Sale date: _________________________________________________ Seller stamp: ______________________________________________ Notes: ___________________________________________________ _________________________________________________________ _________________________________________________________ Producer can change bicycle equipment at its own discretion. Warrantee conditions are agreed and accepted. Have no claims against outside appearance and equipment. Buyer: _____________________________________________ p.
Need help?
Do you have a question about the Folding bicycle and is the answer not in the manual?
Questions and answers