Table of Contents
Advertisement
TouchPoint
SmartControl
Operation, Service and
Maintenance Instructions
www.boumatic.com
BouMatic Global Headquarters
BouMatic Europe
TouchPoint™ and SmartControl™ Meter Operation Instructions
™
PO Box 8050
Rue Jules Melotte 31
4350 Remicourt
and
Meter
™
Madison, WI 53708-8050
Belgium
Tel: +32 19 54 42 66
USA
Tel: 608.222.3484
Fax: +32 19 54 55 44
Fax: 608.222.9314
9E-926-0911
Advertisement
Table of Contents

Related Manuals for Boumatic TouchPoint

Summary of Contents for Boumatic TouchPoint
- Page 1 BouMatic Global Headquarters PO Box 8050 Madison, WI 53708-8050 Tel: 608.222.3484 Fax: 608.222.9314 BouMatic Europe Rue Jules Melotte 31 4350 Remicourt Belgium Tel: +32 19 54 42 66 Fax: +32 19 54 55 44 TouchPoint™ and SmartControl™ Meter Operation Instructions 9E-926-0911...
- Page 2 • Deviation from these instructions could affect product performance or These instructions aim to aid those responsible (outlined under These instructions aim to aid those responsible (outlined under create a hazardous situation. Under no circumstances will BouMatic create a hazardous situation. Under no circumstances will BouMatic ®...
-
Page 3: Table Of Contents
2.1.9.1 End Milking..............2.1.9.2 Wash, Start..............2.1.9.3 Wash, End..............2.1.9.4 ID Verification............... 2.1.9.5 Change Lot..............2.1.9.6 Stimulation with a TouchPoint Control......... 2.1.10 Functions Available Only if a Cow Number is Assigned..... 2.1.10.1 Sort Cow..............2.1.10.2 Recall Cow Data............2.1.10.3 Treat Cow.............. - Page 4 5. Troubleshooting....................6. Maintenance......................59 6.1 Meter Accuracy Test Procedure..............59 6.1.1 Instructions for SmartControl Milk Meters......... 59 6.1.2 Flask Calibration for Non BouMatic Flask.......... 6.1.3 Test Procedure................6.1.4 After Every Milking................ 62 6.2 As Needed....................63 6.3 Avoid Exposure of Plastic Parts..............63 6.4 Yearly Maintenance..................
-
Page 5: Introduction
Introduction The BouMatic TouchPoint milk metering system with BouMat- ic’s patented Smart EID™ software (U.S. patent 5,959,526) will accurately measure the milk production of individual cows. The detacher system can function independently (stand-alone operation) or in conjunction with a SmartDairy Controller, if automatic recording of production and other cow data is de- sired. -
Page 6: Operation
LED Status Indicators The LED Status Indicators will display the color for the mode that the TouchPoint is in, see Tables 1 and 2 for colors used during “Milking” or “Washing” modes. The LEDs are visible from either side of the TouchPoint. - Page 7 Attach/Detach Key the detacher is placed into the attached mode, thus allowing the milker to attach the milking unit to the cow. Pressing the Attach/Detach Key again will detach the milking unit from the cow. SmartControl™ Meter & TouchPoint™ 9E-926 Operation Instructions...
-
Page 8: Rear View Of Touchpoint
With the cover in place and the screws secured, the cover will be sealed to prevent water from entering. Mounting Screws The four screws are used with clips to secure the TouchPoint to the front cover of the enclosure. Dry Air A 5/32 yellow tube is connected to this fitting to supply dry air for the control. -
Page 9: Smartcontrol Meter Overview
The TouchPoint and SmartControl Meter have colored LED indi- cators that are used for indicating the different modes of oper- ation or conditions of each control. The TouchPoint can display the following colors: white, green, yellow, red, dark blue, pink and violet. -
Page 10: Bottom View Of Smartcontrol
There are 12 cable locations that are used for wiring of the SmartControl Meter. When used with the proper size cable (0.210 to 0.250 inches in diameter) they will be sealed and not allow water to enter the enclosure. 9E-926 SmartControl™ Meter & TouchPoint™ Operation Instructions... - Page 11 If there is stall. there cows enter the parlor no cow assigned is no cow as- the TouchPoint V indi- to that stall the signed to that cators turn violet. LED indicator will stall the LED in- not be turned on.
- Page 12 Flashes dark blue Flashes dark Flashes rapidly rapidly three blue rapidly three times with times with a long three times with a long pause in pause in between a long pause in between between 9E-926 SmartControl™ Meter & TouchPoint™ Operation Instructions...
-
Page 13: Milker-Rotary Parlor And Basement
1. Place the milking unit in the jetter and remove the rope if instructed to do so. 2. Enter 9173 on the keypad and place the TouchPoint Milk- ing system into “Wash” mode by selecting “Start Wash” using the Function keys. This can be done at any stall in that zone. -
Page 14: Alternate Operation
When a cow magnet is used it might be necessary to switch the ends of There may be times that the TouchPoint will not be able to the magnet to activate the switch. communicate with the SmartControl Meter and perform the de- sired operation or the SmartControl Meter is not able to com- municate with other SmartControl Meters or the SmartDairy™... -
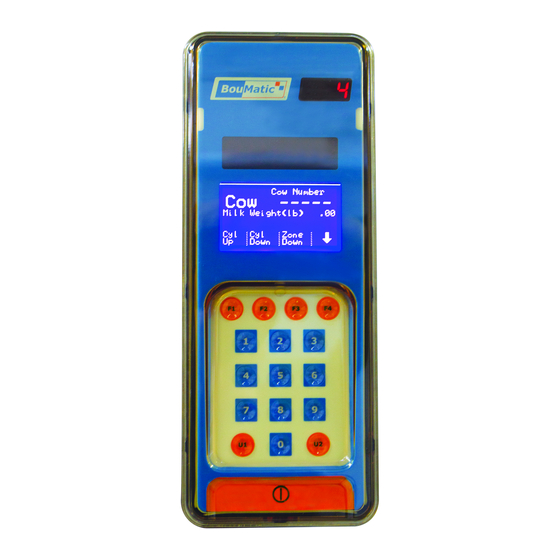
Page 15: Keypad And Display Functions
2. Used on all parlor types Procedure: 1. Enter “9173” to unlock the keypad. 2. Using the [ ] (F4) key scroll through the available Function Keys and select the desired Function Key. SmartControl™ Meter & TouchPoint™ 9E-926 Operation Instructions... -
Page 16: Lock Keys
1. Using the [ ] (F4) key scroll through the available Function Keys until [Lock Keys] is available. 2. Press the appropriate Function Key (F3). L/min Fills Washing Strt Lock Wash Wash Keys Screen 2: Unlocked Keys l926_4 9E-926 SmartControl™ Meter & TouchPoint™ Operation Instructions... -
Page 17: Change The Display Language
[ ] (F4) key to use the cur- rent language. Cow Number 0 : English 1 : Español 2 : Deutsch 3 : Français 4 : Nederlands Prev Next Page Page Screen 4: Language Selection l926_6 SmartControl™ Meter & TouchPoint™ 9E-926 Operation Instructions... -
Page 18: Enter Or Change Cow Number
2.1.8.4 Enter or Change Cow Number To enter or change a cow number simply enter the cow num- ber for the cow in that stall and the TouchPoint will automati- cally show the new cow number and a new set of Function Keys that will be used to enter and confirm the cow number. - Page 19 -Press [Del Cow] (F3) to remove the cow number and move the rest of the cows from the entrance over one stall (see Figure 9). SmartControl™ Meter & TouchPoint™ 9E-926 Operation Instructions...
-
Page 20: Manual Activation Of Cylinder
2.1.8.5.1 Cylinder Up The detach cylinder can be manually controlled without open- ing the shutoff. Pressing the Function key will only activate the cylinder on the stall where the TouchPoint is located. Parameters: 1. SmartDairy™ Controller not required 2. Used on all parlor types Procedure: 1. -
Page 21: Cylinder Down
2.1.8.5.2 Cylinder Down The detach cylinder can be manually controlled without open- ing the shutoff. Pressing the Function key will only activate the cylinder on the stall where the TouchPoint is located. Parameters: 1. SmartDairy™ Controller not required 2. Used on all parlor types Procedure: 1. -
Page 22: Milk And Wash Functions
2.1.9 Milk and Wash Functions 2.1.9.1 End Milking The milking can be ended at any TouchPoint in the parlor. This function will not place the detachers into “Wash Mode”. If wash- ing of the system is desired then “Start Wash” must be selected for each zone (if the parlor has multiple zones). -
Page 23: Wash, Start
2.1.9.2 Wash, Start All TouchPoint & SmartControl Meters in that zone can be placed into the “Wash Mode” by selecting “Start Wash” [Strt Wash] (F1). The Function Key command can be done at any stall in that zone. Parameters: 1. SmartDairy™ Controller not required 2. -
Page 24: Wash, End
2.1.9.3 Wash, End All TouchPoint & SmartControls in that zone can be put into the “Milk Mode” by selecting “End Wash” [End Wash] (F2). The Function Key Command can be done at any stall in that zone and does not have to be done at the stall where the “Start Wash”... -
Page 25: Id Verification
2.1.9.4 ID Verification In a non-rotary parlor if there are cows being milked that are not identified on the TouchPoint display it is possible to have — NOTICE ——————— the SmartDairy Controller verify the cow identification after all cows in the zone are detached but before they are allowed to [ID Chek] is not available on rotary exit. -
Page 26: Change Lot
(This will only work if a cow number is assigned.) -Press [All Cows] (F3) to assign the lot number to all cows that are attached after the change. This function will work even if no cow is currently assigned. 9E-926 SmartControl™ Meter & TouchPoint™ Operation Instructions... - Page 27 Cow Number ----- Milk Weight (lb) Lot Number This Cows Screen 16: Assign New Lot l926_18 SmartControl™ Meter & TouchPoint™ 9E-926 Operation Instructions...
-
Page 28: Stimulation With A Touchpoint Control
2.1.9.6 Stimulation with a TouchPoint Control If stimulation is programmed in both the TouchPoint and SmartControls, the pulsation rate and ratio can be changed automatically to improve milk flow when there is not good let- down. After a cow is attached, at least 500 grams of milk have... -
Page 29: Functions Available Only If A Cow Number Is Assigned
Screen 18: Sort Cow Selection l926_20 3. Confirm or cancel the Sort Cow function. -Press [No] (F1) to cancel the Sort Cow function. -Press [Yes] (F4) to confirm that the Sort Cow is to be done. SmartControl™ Meter & TouchPoint™ 9E-926 Operation Instructions... - Page 30 Cow Number Milk Weight (lb) Lot Number Are You Sure? Screen 19: Confirm Sort Cow l926_21 9E-926 SmartControl™ Meter & TouchPoint™ Operation Instructions...
-
Page 31: Recall Cow Data
-Press one of the other Function keys to display a different set of data. -Do not touch anything. After sixty seconds, the screen will revert to normal. -[ ] (F4) cancel the Recall Cow Data function and return the display to normal. SmartControl™ Meter & TouchPoint™ 9E-926 Operation Instructions... -
Page 32: Treat Cow
0:No Treatment The data to be displayed will be de- 1:Dry this cow off termined by the SmartDairy Control- 2:Mastitis rear ler. 3:Mastitis front 4:BGH Prev Next Pate Page Screen 23: Treatment Codes l926_25 9E-926 SmartControl™ Meter & TouchPoint™ Operation Instructions... -
Page 33: Diagnostic Functions
TouchPoints and turn on the yellow status LED on on the SmartControl Meter. After the LEDs have been turned on for 3/10 of a second the TouchPoint will send a command to turn off the LEDs on all of the controls. This sequence will continue until the function is turned off at any TouchPoint, or if the TouchPoint that was used to start the test gets attached. -
Page 34: Show Smartcontrol Addresses
During installation of the TouchPoint controls and SmartCon- trol Meters it is necessary to assign a unique address to each control. The TouchPoint controls will always display their ad- dresses in the 3 digit LED display at the top of the unit. -
Page 35: Features
TouchPoint milking system. The TouchPoint milking system has over 36 parameters to help provide optimal milking performance. Some of the parameters are: Take Off Flow Rate, Let-Down Delay, Takeoff Delay, Claw Drop, Claw Lift, Claw Lift Time Out, Reattach Delay, Maximum Milking Time, optional pulsation, etc. - Page 36 27a. TouchPoint Connector and Diagnostic LED Locations l926_27a Table 2b: TouchPoint, Diagnostic LED Indicators Item Reference Descrip- Function Designation tion AUX 1 Diagnostic LED, turns on when Aux output is on AUX 2 Diagnostic LED, turns on when Aux output is on...
- Page 37 Table 2a: TouchPoint Connectors Item Reference Description Wire Color Function Designation J1, pin 1 DC Common Black DC Power J1, pin 2 DC Common Black J1, pin 3 +24 VDC J1, pin 4 +24 VDC J2, pin 1 PRISM-Main Shield...
- Page 38 Status LED, the LED is yellow and is used to show the status of the SmartControl (see table for different patterns) Diagnostic LED Diagnostic LED, turns on when Dump Solenoid output is on Diagnostic LED Diagnostic LED, turns on when Shutoff Solenoid output is on 9E-926 SmartControl™ Meter & TouchPoint™ Operation Instructions...
- Page 39 DC Common J8, pin 2 C communication J8, pin 3 C communication J8, pin 4 DC Common J8, pin 5 Analog Input J8, pin 6 +5VC J8, pin 1 Programming Factory Use Only SmartControl™ Meter & TouchPoint™ 9E-926 Operation Instructions...
-
Page 40: Control Parameters
TouchPoint & SmartControl Meter the capability of milking cows. Most of the milking parameters are used by the Smart- Control but some are also used by the TouchPoint. When the parlor type is selected during the configuration the milking parameters are then sent to the correct control. - Page 41 System Adjustment Factor (SmartControl Meter) The System Adjustment Factor is used to compensate for dif- ferences between milking parlors, vacuum levels, hose lengths, claws and other factors. All meters are adjusted to the same value. SmartControl™ Meter & TouchPoint™ 9E-926 Operation Instructions...
- Page 42 Maximum Manual Seconds 0 turns off Time Manual Milk Time Seconds 0 turns off Milk Sweep Delay Seconds Milk Sweep On Time Seconds Pre-Wash 1 turns on System Adjustment Percent -10.0 10.0 Factor 9E-926 SmartControl™ Meter & TouchPoint™ Operation Instructions...
- Page 43 Pulsation (Both) Pulsation can only be used with BouMatic pulsators for parlors that require individual stall pulsation. Pulsation Rate (Both) The Pulsation Rate is the number of times the pulsators will turn on and off per minute. Front Ratio On Time (Both) The Front Ratio On Time is set with the configuration software.
- Page 44 T6 to T8 = fixed time that pulsation stays on after detach T6 to T9 = Milk Sweep Delay T9 to T10 = Milk Sweep On Time T1 to T11 = Maximum Milking Time Typical Milking without Claw Drop and Claw Lift l925_10 9E-926 SmartControl™ Meter & TouchPoint™ Operation Instructions...
-
Page 45: Touch Screen
3.4 Touch Screen - Optional The use of an optional Touch Screen with the TouchPoint Milk- ing System allows additional information to be displayed and/ or recalled in the milking parlor. When the Touch Screen is placed at the parlor entrance it can be seen by the milkers to help identify problems in the parlor. -
Page 46: Operation
The measuring chamber contains a seat, a plunger with rubber sealing surface and a sealed float with a magnet inside. This chamber is transparent and cylindrical. 9E-926 SmartControl™ Meter & TouchPoint™ Operation Instructions... -
Page 47: Principle Of Operation
The rate at which the milk cycles through the meter is monitored and this information is used as part of the detach logic. SmartControl™ Meter & TouchPoint™ 9E-926 Operation Instructions... -
Page 48: Electronic Control
LED Status Indicators will be flashing green or yellow (corresponding to the above mentioned modes). The TouchPoint keypad can be used any time to enter com- mands for setting values, performing actions, or recalling cer- tain data. (See Section 3 for more details on setting and re- calling data and the System manual for information on other available commands). - Page 49 When the target flow rate is reached it signals the detach solenoid to shut off vacuum to the cluster and retract the detach mechanism to remove the cluster. The probe assembly is not a repairable item. SmartControl™ Meter & TouchPoint™ 9E-926 Operation Instructions...
-
Page 50: Understanding The Automatic/Manual Modes
As a result, the milking unit must be de- tached manually by pressing the corresponding control key. 9E-926 SmartControl™ Meter & TouchPoint™ Operation Instructions... -
Page 51: Automatic Mode-Let-Down Delay
Detach. When a below-minimum milk flow is sensed, the takeoff delay will start. The LED Status Indicators on the TouchPoint will flash green constantly for the duration of the delay period or until the level sensing probe is activated. If by the end of the delay the cow does not resume a minimum flow rate, the claw will detach. -
Page 52: Manual Mode
Detach the milking unit and restores Au- tomatic mode. The LED Status Indicators will be white until the exit gate opens. The LED Status Indicators will turn violet when a cow is identi- fied and assigned to that stall. 9E-926 SmartControl™ Meter & TouchPoint™ Operation Instructions... -
Page 53: Using The Milking System
The initial time delay for milk letdown can also be changed. Use the following procedure to operate the TouchPoint & Smart- Control milk metering system. The owner/manager should use the Herd Management software on a daily basis to monitor the performance of the milkers to insure that they are following the desired routine. -
Page 54: Wash
Milk mode. Place the milking units in the jetter cups. After washing has finished, the Milk switch can be pressed for a minimum of two and a half seconds to place the detacher into milking position. 9E-926 SmartControl™ Meter & TouchPoint™ Operation Instructions... -
Page 55: Using The Milk Sampler
Refer to literature 9E-713 for installation and operation instructions. After the milking, the sampler must be hand washed. It is not designed to be cleaned in place on the meter. SmartControl™ Meter & TouchPoint™ 9E-926 Operation Instructions... -
Page 56: Troubleshooting
Troubleshooting should be done only by an authorized BouMatic dealer or technician. Use Table 7 to troubleshoot PRISM communication wiring us- ing a digital meter. The digital meter will be used to check the termination resistors and wire. - Page 57 +24 VDC for what the power nected to earth ground. output of the power sup- supply is adjusted for. plies. All communication wires need to be discon- nected from all controls. SmartControl™ Meter & TouchPoint™ 9E-926 Operation Instructions...
- Page 58 0.40 volts DC there is a control that is trying communicate cable? continuously. 7) Has the addresses been set ___ Yes for both the TouchPoint and ___ No SmartControl? 8) Are there controls of the ___ Yes If an address query comes back with a missing address it could mean...
-
Page 59: Maintenance
(such as the Erlen- Class ‘’A’’ (TD) volumetric flask meyer flask, available from BouMatic) must be used. If a flask to perform the flask calibration. of any other type will be used, recalibrate it according to the... - Page 60 0.2 lb. (0.1 Kg) of each other. The average of these must be compatible with the above value. Replace the plunger seal and repeat the test procedure if no proper reading is attained. 9E-926 SmartControl™ Meter & TouchPoint™ Operation Instructions...
- Page 61 12.78 26.96 28.16 5.0% 12.30 12.90 27.23 28.43 6.0% 12.42 13.02 27.49 28.69 7.0% 12.54 13.14 27.76 28.96 8.0% 12.66 13.26 28.02 29.22 9.0% 12.78 13.38 28.28 29.48 10.0% 12.90 13.50 28.55 29.75 SmartControl™ Meter & TouchPoint™ 9E-926 Operation Instructions...
-
Page 62: After Every Milking
“9173” to unlock the keypad. b.Press the appropriate key below [End Wash] to place the controls in that zone into “Milk mode”. 9E-926 SmartControl™ Meter & TouchPoint™ Operation Instructions... -
Page 63: As Needed
As needed, clean non-milk-contact (outside) surfaces of con- trols, hoses, and plastic housings using a sponge and mild detergent, followed by a clear water rinse. Take full advantage of new features of the TouchPoint & Smart- Control Milking System by updating the software on a regular basis. -
Page 64: Service
If either a TouchPoint or SmartControl circuit board is to be replaced during a milking and the software on the rest of the controls does not need to be upgraded use the following pro- cedure: See Figure 32 for power and communication connections. -
Page 65: Replace The Touchpoint
See Figure 1a for a detailed view of the back of the TouchPoint Control. 1. Record the stall address of the TouchPoint that is being re- placed as this will be needed later. 2. Remove the replacement TouchPoint from the shipping container and remove the back cover. -
Page 66: Replace The Control Circuit Board In The Smartcontrol
17. Turn power back on. 18. Address the SmartControl using the configuration program. 19. Verify the operation of the SmartControl by observing the milking of a minimum of three cows. 9E-926 SmartControl™ Meter & TouchPoint™ Operation Instructions... -
Page 67: Meter Maintenance
7. Always change the plunger O-ring when replacing the dia- phragm assembly. 8. Reassemble in meter by dropping into opening in the top and replacing the cap and tightening the lock ring. 9. Reattach the vacuum hose if it came loose. SmartControl™ Meter & TouchPoint™ 9E-926 Operation Instructions... -
Page 68: To Replace The O-Ring Seal
6. Install the new gasket, checking that it is properly seated in the groove. 7. Reinstall the outlet on the housing, twisting until the stop is contacted. 8. Reinstall the milk outlet hose. 9E-926 SmartControl™ Meter & TouchPoint™ Operation Instructions... -
Page 69: Upgrade Software On All Controls In Parlor
The TouchPoint will require three to five minutes and the Smart- Control Meter will require two to four minutes. The software for either control cannot be upgraded during a milking or when washing the pipeline. -
Page 70: Replacing The Meter Outlet
If an outlet that has two sensors is used not all features will be available in the SmartControl Me- ter. 9E-926 SmartControl™ Meter & TouchPoint™ Operation Instructions... -
Page 71: Meter Outlet, One Sensor
7. Turn power back on. 8. Verify the operation of the SmartControl Meter by observ- ing the milking of a minimum of three cows. White Black Orange Yellow Meter Outlet, One Sensor l925_15 SmartControl™ Meter & TouchPoint™ 9E-926 Operation Instructions... -
Page 72: Meter Outlet, Two Sensors
8. Turn power back on. 9. Verify the operation of the SmartControl Meter by observ- ing the milking of a minimum of three cows. Orange Black White Blue PWB ASSY Power Adapter Meter Outlet, Two Sensors l925_14 9E-926 SmartControl™ Meter & TouchPoint™ Operation Instructions...
Need help?
Do you have a question about the TouchPoint and is the answer not in the manual?
Questions and answers