
Subscribe to Our Youtube Channel
Related Manuals for barebones Safari STR-501


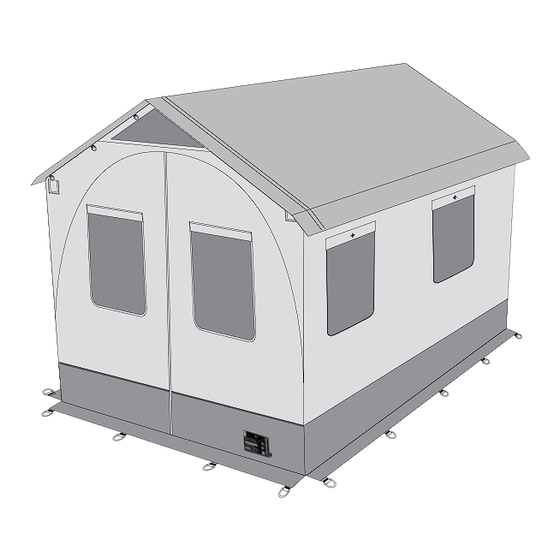
Summary of Contents for barebones Safari STR-501
- Page 1 Safari Tent Manual #STR-501 14513 South, Center Point Way, Suite 100 Bluffdale, UT 84065 1-855-895-7040 info@barebonesliving.com...
- Page 2 SET UP CARE AND INSTRUCTIONS Understanding the Barebones System • The Barebones pole and joint system was designed with strength and durability in mind, and allows for a very sturdy connection between poles and joints. • When assembling the Barebones frame, always wear protective gloves to prevent injury.
- Page 3 BEFORE YOU BEGIN, SEPARATE AND COUNT PARTS 3-Point 90º Angle Joint T Joint 3-Point 120º Angle Joint QTY: 4 QTY: 8 QTY: 6 4-Point 120º Angle Joint Connector Swivel Joint QTY: 9 QTY: 26 QTY: 10 Extension Poles 34.5 Inch Poles 34.5 Inch Poles Tent Floor QTY: 6...
- Page 4 SET UP OVERVIEW Step 1: Put On Gloves Step 7: Drape Center Panels Step 2: Assemble Base Step 8: Zip On Doors ¾ Way Step 3: Attach Tent Floor Step 9: Add Poles To Raise Tent Step 4: Assemble Roof Step 10: Connect To Base Cross Beam Assembly Step 11: Assemble Door Frame...
- Page 5 STEP 2 CONTINUED: ASSEMBLE BASE Setup Tip: Place exactly as shown; arc sits on the ground. Layout Joints Inside of tent • Lay out (A) joints on each of the four corners. • Lay out three (B) joints on each wall &...
- Page 6 STEP 3: ATTACH TENT FLOOR Set Tent Floor Inside Base Helpful Tip For Floor • Tent floor has a top and bottom. • Buckles and velcro are attached • Unfold (I) tent floor inside base. to the bottom. • Line up corners with port holes. Attach To Base •...
- Page 7 STEP 4: ASSEMBLE ROOF Parts needed: QTY: 6 QTY: 9 QTY: 12 QTY: 24 QTY: 8 Cross Beam Assembly Clamp 1” • Disassemble swivel joint. TIP! Attach swivel joint clamp onto second pole. • Set wing-nut/screws, and Swivel Base joint base aside for now. Build Truss 1 and 5 Arc goes between poles.
- Page 8 STEP 4: ASSEMBLE ROOF Tip! Slide (F) joint on poles before connecting poppels. Assemble Beam • Build the following. Connect • Then, reattach to (FA) clip on Truss 1. and 5. Wing-nut on inside. Building Center Trusses 2-4 Arc goes between poles. •...
- Page 9 STEP 4 CONTINUED: ASSEMBLE ROOF • Starting with Truss 1, insert three (H) poles and connect Truss 2. • Repeat with Truss 2-3, 3-4, and 4-5. Completed Roof...
- Page 10 STEP 5: ASSEMBLE HALF WALL Parts needed: QTY: 10 QTY: 10 Build 10 • Insert (H) Pole into (E) joint. IMPORTANT! For All Corner Poles • Insert poppel exactly as shown. Insert In Order • Insert pole 1 into corner. •...
- Page 11 STEP 6: MOVE ASSEMBLED ROOF/HALF WALL • Rest assembled portion of frame onto tent base as shown. STEP 7: DRAPING CENTER PANEL ACROSS FRAME Drape Folded Center Panel • Drape panel across frame as shown. Unfold Back Front...
- Page 12 STEP 7: ATTACH DOORS Identifying Your Doors Back Door Front Door Back Door Front Door Helpful Tip For Doors per B • Attach doors with two people. • Back Door can be snug when trying to get it past the last joint. Pull fabric up away from joint, zip down, then with your partner pull over joint.
- Page 13 STEP 8: ADD POLES TO RAISE TENT Parts Needed: QTY: 10 Insert In Order • Insert pole 1 into corner. • On the same side, continue down the line 2, 3, 4 and 5. • Then, insert poles 6, 7, 8, 9, and 10. STEP 9: CONNECT STRUCTURE TO BASE Set Poles First •...
- Page 14 STEP 10: ASSEMBLE FRONT DOOR FRAME TIP! If ground is uneven you may need to adjust where poppel is released, check to see that no poles are being bent. Parts needed: QTY: 2 QTY: 2 QTY: 2 Front Door Frame •...
- Page 15 STEP 11: ASSEMBLE BACK DOOR FRAME TIP! If ground is uneven you may need to adjust where poppel is released, check to see that no poles are being bent. Parts needed: QTY: 2 QTY: 4 QTY: 2 Back Door Frame •...
-
Page 16: Step 12: Final Steps
STEP 12: FINAL STEPS Tent Doors and Center Panel • Velcro and buckles connect around poles. • DO NOT cinch straps too tightly. • Finish Zipping Doors Attach Tent Floor To Wall • Start at the opening of Front Door. •...
Need help?
Do you have a question about the Safari STR-501 and is the answer not in the manual?
Questions and answers