
Related Manuals for HPC Tiger SHARK


Summary of Contents for HPC Tiger SHARK
- Page 1 Touch Screen-Controlled Computerized Code Machine No. 123TSHARK 091416 36123_100_00...
- Page 3 Index Introduction Accessories Checklist Parts Designation Preparing to use the Tiger SHARK ™ Touch Screen Cutter Wheel Descriptions Replacing Cutters Changing Cutters Loading Key Blanks Gauging Methods 4-Way Jaws Cutting by DSD Cutting by Code Cutting Specialty Keys Edit DSD Presets DSD Specific Adjustments 5.2.1 Cut Styles...
- Page 4 Find out more about the entire line of HPC Key Machines, Software, Key Cabinets, Lock Picks, Car Opening Kits, Locksmithing Tools, and much more at: www.hpcworld.com...
- Page 5 Tiger SHARK ™ INTRODUCTION & FEATURES 1.1 Introduction 1.2 Accessories Checklist 1.3 Parts Designations ™ 1.4 Preparing to use the Tiger SHARK 1.5 Touch Screen...
- Page 6 HPC, a Hudson Lock Company, Hudson, MA 01749 USA The internal software and data is a work fully protected by the United States Copyright Laws. Federal Law: This manual or the internal software of the Tiger SHARK may not be copied, ™...
- Page 7 1.2 Accessories Checklist HPC Cutter Wheel HPC Cutter Wheel HPC Cutter Wheel (CW-14MC) (CW-1011) (CW-20FM) HPC Cutter Wheel HPC Cutter Wheel HPC Cutter Wheel Calibration Key No. SHARK-21 Decoder Plate No. SHARK-18 Stylus Bolt Down Brackets (set of 4) No. SHARK-14 No.
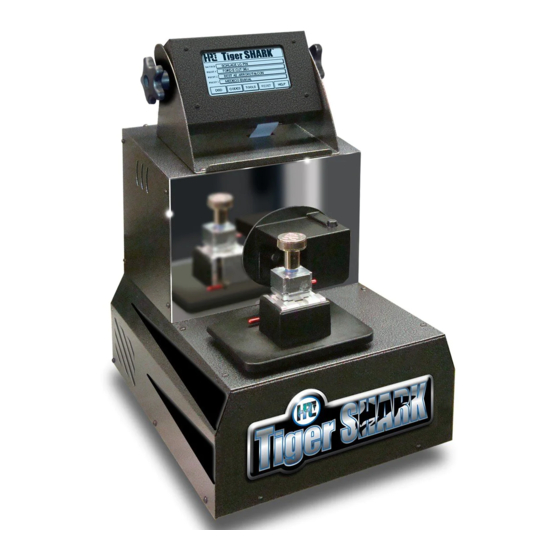
- Page 8 1.3 Parts Designation Stylus Touch Screen Touch Screen Angle Stylus Holder Adjustment Knob Shaft-Lock Button Deburring Brush Wing Nut Shoulder Gauge Shoulder Gauge Handle Top Jaw Bottom Jaw Quick Nut Cutter Tip Gauge Tip Gauge Handle Platform SD Card Decoder Plate Serial Port Fuse FUSE...
- Page 9 ™ ™ protector, it is recommended that you use a surge/brownout protector when operating the Tiger SHARK ™ Power Requirements: 120 VAC, 60 hz, 4 amps OR 240 VAC, 50hz, 4 amps 1. Place the Calibration Key in Jaw A and align with the shoulder gauge (Fig. 1). After aligning the Calibration Key, lower the shoulder gauge to the rest position.
- Page 10 3 minutes. Do not switch off the machine during this procedure. When the machine beeps and the main screen is restored, the Tiger SHARK™ is ready for use. Securing The Tiger SHARK To Your Work Bench ™ The Tiger SHARK is supplied with Bolt Down Brackets.
- Page 11 1.5 Touch Screen The Tiger SHARK is equipped with a state of the art touch-sensitive display screen. Use the stylus provided in ™ much the same way as you would use a mouse to navigate and select objects on your PC. You can also use your fingertip.
- Page 13 Tiger SHARK ™ CUTTER WHEELS 2.1 Cutter Wheel Descriptions 2.2 Replacing Cutter Wheels 2.3 Changing Cutter Wheels...
- Page 14 CW-1012: for Medeco® keys Flat Steel cutters, the Emhart cutter (CW-1013), the ASSA Cutter (CW-32MC), as well as others, are optional cutter wheels that are available for use with the Tiger SHARK ™ Refer to the HPC website, www.hpcworld.com for a complete list of cutters and applications.
- Page 15 2.3 Changing Cutter Wheels The Tiger SHARK is equipped with the HPC Quick Nut; tools are not required to change ™ cutters. The following procedure is recommended when changing cutter wheels: Turn the Tiger SHARK off. Hold the cutter head assembly and press down the shaft-lock button.
- Page 17 Tiger SHARK ™ LOADING / GAUGING KEYS 3.1 Loading Key Blanks 3.2 Gauging Methods 3.3 4-Way jaws...
- Page 18 3.1 Loading Key Blanks The Tiger SHARK is equipped with 4-way jaws and integral shoulder and tip gauges. The choice of using the ™ shoulder or tip gauge is mandated by the type of key being cut. If in doubt of the gauge point, refer to the informa- tion on the CUT SCREEN for the key to be cut (see 4.1 “Cutting by DSD”, step 6 in this manual for information on...
- Page 19 Special Best style tip gauging. 3.3 4-Way Jaws The Tiger SHARK is equipped with state of the art 4-way jaws. These jaws are expertly machined to insure ™ secure holding of virtually all keys. The 4 sides are marked as follows: The A-side is for most standard size keys.
- Page 21 Tiger SHARK ™ KEY CUTTING 4.1 Cutting by DSD 4.2 Cutting by Code 4.3 Cutting Specialty Keys...
- Page 22 4.1 Cutting by DSD 1. DSD stands for Depth & Space Data. This is HPC’s reference number for the key cutting information for a specific lock. If you know the bitting for the key you are cutting, press DSD on the touch screen.
- Page 23 Cut Key 7. Load key blank, and press CUT KEY to start cutting process. Activate De-Burring Brush Go back to the Adjust DSD main Tiger SHARK ™ screen To cut another key Go back to To select in this DSD...
- Page 24 4.2 Cutting by Code To cut by Code, select CODES from the main Menu Screen. Next, select the type of Codes you wish to search. For example: Vehicle Codes. If for some reason the type of key is not known, it is also possible to search the entire database by using the SEARCH ALL CODES button.
- Page 25 4. The screen will display all code series that match the search criteria entered. Select the appropriate series. Use LINE UP/DOWN to scroll through the current page. Use PAGE UP/DOWN to scroll through the pages, if there are more than 5 results from the search. 5.
- Page 26 Choosing DE-BURR from the CUT SCREEN will activate the Deburring Softie Brush on the right side of ™ the machine. Press the DE-BURR button twice and hold; the deburring brush will continue to turn for as long as it is depressed. Hold the newly cut key firmly, and position key to deburr using the Softie Deburring Brush.
- Page 27 10. When cutting double-sided different keys, choosing OTHER SIDE will display the code for the other side of the key. It will also display the code for a Valet Key, where applicable. To cut the second side of a double-sided same key, simply reverse the key blank and press CUT KEY again. 11.
- Page 28 Biaxial keys use a combination of the depth of the cut, angle, and position of angle for ® ® each chamber of the cylinder. The cutter head on the Tiger SHARK automatically pivots to cut the ™ appropriate angle. Medeco uses the following letters to identify the angles and position: ®...
- Page 29 If it is necessary to decode a Medeco key, HPC offers ® MEDECO the HKD-75 Pocket-Sized Decoder. The Tiger SHARK ™ cannot decode angle cuts. This tool will decode the depths and angles of Medeco keys, as well as the ®...
- Page 31 Tiger SHARK ™ TOOLS 5.1 Edit DSD Presets 5.2 DSD Specific Adjustments 5.2.1 Cut Styles 5.3 Custom DSDs 5.4 Machine Adjustments 5.5 Decode a Key 5.6 Special Functions 5.7 Security...
- Page 32 Tiger SHARK Machine. Select TOOLS to display the Tools Menu. Choosing MAIN SCREEN at any ™ time will return you to the Tiger SHARK™ Main Menu. Moves the carriage to allow The other buttons are explained in these sections: more room for easier access.
- Page 33 3. If the DSD is not known, you may search by manufacturer by typing in a manufacturer name, selecting ENTER, and choosing from the Search List. 4. This will bring you back to the Main Menu. Preset 1 is now set to the DSD which you have selected. This can be changed at any time by going to the TOOLS Menu and selecting EDIT DSD PRESETS.
- Page 34 5.2 DSD Specific Adjustments Part of the versatility of the Tiger SHARK is the ability to make adjustments to a specific DSD. This feature can ™ be beneficial when cutting a key for a lock with worn pins or wafers (by cutting the key shallower you can compen- sate for the decreased height of the worn pins) or if using a particular cutter wheel that has been sharpened (by cutting a little deeper you can compensate for the decreased diameter of the cutter).
- Page 35 To edit or delete the permanent adjustments made to a DSD: 1. Select TOOLS from the Main Menu, then select DSD SPECIFIC ADJUSTMENTS. 2. The first screen displays a list of all the DSDs that have been "permanently" adjusted. Use the Up and Down arrows to scroll through the list.
- Page 36 5.2.1 Cut Styles 1. The Plunge Cut (PLUNGE) is the standard cut style. It is made when the cutter comes straight down into the blank, backs off, and moves in again to make the CUTTER next cut after the carriage has moved to the next cut 4 7 2 5 9 5 MOTION position.
- Page 37 4. From this screen you can now type in a description to give your new DSD a name. By pressing the SHIFT key, you can insert a period(.), dash(—), plus sign(+) or ampersand(&) into the description. In this example, we have used the name HPC. Press ENTER to record the description for your new DSD.
- Page 38 CUTTER, UNITS OF MEASURE (inch/metric), WIDENING (.020" widening means .065" flat; .020" plus .045", standard cutter flat), CONTOUR, and SPEED. 6. Adjusting the CONTOUR setting determines the type of cut your machine will execute. The Tiger SHARK ™ defaults to a Plunge cut when the CONTOUR displays OFF. When CONTOUR is ON, your machine will execute a CONTOUR cut.
- Page 39 7. After all pertinent information has been entered to your desired specifications, select ENTER. The screen will then display the Space Value Settings Screen. 8. At this screen, enter Space Values one at a time by typing in a number in thousandths of an inch or hundredths of a millimeter (depending on which unit of measure was selected).
- Page 40 9. At this screen, enter Depth Values one at a time by typing in a number in thousandths of an inch or hundredths of a millimeter (depending on which unit of measure was selected). Use the up and down arrows to edit the values of the depths.
- Page 41 5.4 Machine Adjustments The Tiger SHARK is calibrated and tested prior to shipment. Adjustments should not be required to cut keys to ™ any of the DSDs. However, over time, re-sharpened cutter wheels and other factors may cause the machine to cut out of calibra- tion.
- Page 42 Fig. 6 8. The Tiger SHARK™ will continue to self-calibrate by repeating the touch off routines it did for the shoulder gauge. This phase will take about 30 seconds. After it finishes the machine will beep 4 times to tell you it has completed the self-calibration.
- Page 43 12. If the cuts are not within the .002-inch tolerance, then run the Auto Calibration again, cut 5-depths on a new key blank, and measure them. If, after the 2nd calibration, the machine is still off by more than .002-inch (or you need even tighter tolerances), then use the Machine Adjustments function to make small adjustments in the depths (Fig.
- Page 44 5.5 Decode a Key The Tiger SHARK is equipped with a feature to decode cut keys. Using the Decoder Plate, it will ™ touch off on each cut 3 times to determine the depth. The machine is programmed to account for worn keys.
- Page 45 3. Remove the Decoder Plate from the storage Fig. 2 Fig. 1 pocket on the back of the machine (Fig. 1). Loosen the Quick Nut (Fig. 2). Place the Decoder Plate on the Cutter Shaft, at the outside of the cutter (to the left) and tighten the Quick Nut (Fig.
- Page 46 9. A confirmation screen will appear displaying the DSD and Manufacturer. If the original key has been properly loaded and gauged, select CONFIRM to decode the key. 10. The Tiger SHARK will now begin to decode the key. The Decoder Plate will touch off on each ™...
- Page 47 11. After the key has been decoded, the CUT SCREEN will be displayed with the bitting that was decoded. 12. Once the machine has stopped and the key has been decoded, remove the Decoder Plate from the cutter shaft and return to the storage compartment. NOTE: The Decoder Plate must be seated correctly in the storage compartment for the cutter motor to switch on.
- Page 48 5.6 Special Function The SPECIAL FUNCTION button accesses several operations and displays the version number of your machine From the Main Menu, select TOOLS. From the TOOLS Screen select SPECIAL FUNCTION. 1. Selecting SCREEN CALIBRATION will display the Screen Calibration window. The screen has been calibrated during production of the machine.
- Page 49 5.7 Security The DSD Adjustment and the Tools Screens can be password protected so only authorized personnel can access these screens. Code retrieval and key cutting are not affected by this security feature. 1. To use the Security function, from the Main Menu, select TOOLS and then SECURITY. 2.
- Page 51 Tiger SHARK ™ MAINTENANCE 6.1 Replacement of Deburring Brush 6.2 Replacement of Cutter Belt 6.3 Replacement of Drive Belt 7. Troubleshooting 8. Parts Listing 9. Warranty / Repair Information...
- Page 52 6.1 Replacement of Deburring Brush BEFORE PERFORMING ANY MECHANICAL MAINTENANCE ON REMOVAL: Using Adjustment Wrench THE TIGER SHARK , UNPLUG ™ provided, locate the wrench slot on back POWER SUPPLY! of machine. Insert Adjustment Wrench into slot, and align onto flat section of cutter shaft.
- Page 53 6.2 Replacement of Cutter Belt BEFORE PERFORMING ANY PREPARATION: To replace the Cutter MECHANICAL MAINTENANCE ON Belt, you must first remove the Deburring THE TIGER SHARK , UNPLUG ™ POWER SUPPLY! Brush, the lower chassis cover, the Cutter Head Housing and the Shaft Lock Button Assembly.
- Page 54 3. DETACH POWER SWITCH WIRES: Pulling right side panel slightly outward, you will see the power switch connectors on rear of power switch. (CAUTION! Please be sure you have unplugged the machine from any power source) Disconnect the two (2) wire tabs from the power switch as shown.
- Page 55 Fig. 1 5. REMOVE CUTTER HEAD HOUSING: Using the Allen Wrench provided, remove the two Allen Screws located underneath the Cutter Head Housing (Fig. 1). Fig. 2 6 . Depress the Shaft-Lock Button (Fig. 2). Fig. 3 7. You can now remove the Cutter Head Housing (Fig.
- Page 56 Rotate the front Cutter Pulley, by turning the Cutter Wheel from right to left. At the same time, push the belt off of the rear pulley with your thumb. The belt will slide off the rear pulley and go limp (Fig. 1). Fig.
- Page 57 13. Rotate the front Cutter Pulley, by turning the Cutter Wheel from right to left. At the same time, pull the belt onto the rear pulley with your fingers. The belt will slide onto the rear pulley and tighten (Fig. 1). Fig.
- Page 58 6.3 Replacement of Drive Belt BEFORE PERFORMING ANY PREPARATION: To replace the Drive Belt MECHANICAL MAINTENANCE ON in the Tiger SHARK you must remove THE TIGER SHARK , UNPLUG ™ ™ POWER SUPPLY! both the Deburring Brush, the Lower Chassis Cover and the Back Cover.
- Page 59 4. REMOVE LOWER CHASSIS COVER: You can now remove the lower chassis cover. Grasping the cover by the top side panels, spread the panels slightly and move cover carefully away from the machine. NOTE: The top right panel, (the side with the power switch) will DEBURRING BRUSH RECESS need to be spread away from the machine a little more, to clear the...
- Page 60 7. Troubleshooting Problem: The machine does not switch on / power up. Check cord at machine inlet and at power outlet. Solution: Check fuse (located in the power inlet on the back of the machine) Problem: Display on screen is garbled or is all white (no characters shown) . Turn machine off.
- Page 61 11 10 12 13 20. Shoulder Gauge ....(No. SHARK-4) 1. Wing Nut ......(No. EGN-1) 21. Jaw Pedestal Shroud ..(No. SHARK-13) 2. Ball Bearing Washer ..(No. BBW-2) 22. Quick Nut ........ (No. QN-100B) 3. Top Jaw ......(No.
- Page 62 Do not spray the screen directly. Factory Repairs The HPC Key Machine Service Department is available to offer prompt service on your machine and to order replacement parts.
Need help?
Do you have a question about the Tiger SHARK and is the answer not in the manual?
Questions and answers
Having issues with our tiger shark 2. It is **** and no longer works
A common issue with the HPC Tiger Shark 2 is that it decodes correctly but only cuts the edge of the key. Calibrating the machine does not resolve this problem. A possible troubleshooting step is to verify the machine’s calibration and ensure that the key is properly positioned in the vise. If calibration and positioning do not help, further mechanical inspection or service may be required.
This answer is automatically generated