Advertisement
Table of Contents
- 1 Table of Contents
- 2 Chapter I Safety Warnings
- 3 Chapter II Safety Symbols
- 4 Chapter III Brief Introduction of Tiller
- 5 Chapter IV Operation Method of the Tiller
- 6 Chapter V Running
- 7 Chapter VI Maintenance of Gasoline Engine
- 8 Chapter VII Maintenance of Tiller
- 9 Chapter VIII Trouble Shooting
- Download this manual
Advertisement
Table of Contents

Subscribe to Our Youtube Channel
Related Manuals for LONCIN 600


Summary of Contents for LONCIN 600
- Page 2 Foreword Thank you for purchasing our company’s mini tiller With a small size, a light weight, multiple functions, high rotary tilling efficiency, ability to work on mountains, in waters, to cross ridges of fields and ditches, and easy transport and operation of turning around, this model of tiller is especially suitable for work in mountain areas, hilly areas, arid fields, irrigated fields, orchards, gardens, arch-roofed sheds, etc.
-
Page 3: Table Of Contents
Contents Chapter I Safety warnings ........................1 Chapter II Safety symbols ........................5 Chapter III Brief introduction of tiller ....................7 i. Major technical parameters ..................... 7 ii. Names of major parts and components of tiller ............... 8 Chapter IV Operation method of the tiller ..................9 i. -
Page 4: Chapter I Safety Warnings
Chapter I Safety warnings 1. Training a) Carefully read the operation manual. Get fully familiar with the correct method of operation of this machine and its mechanisms. Understand how to stop it and how to quickly disengage the operation mechanism. b) No child is allowed to use the machine! No adult is allowed to use the machine before carefully reading the manual! c) Ensure no other persons or things with potential safety risk, especially children and... - Page 5 3) Take extra care when fueling the engine outdoors; never try to fuel the engine indoors! 4) Before starting, tighten the fuel tank cap and wipe off any fuel spilled out! e) Never try to make any adjustment when the engine is running! f) For any operation or work on the machine, for example, preparation and maintenance of the machine, wearing a pair of safety glasses is necessary.
- Page 6 fault. f) Before leaving the operating position to repair, adjust, check or remove of things jammed between blades, always remember to shut off the engine first! g) If the machine is to be left uncared by the operator, all necessary preventive measures, such as disengaging power output shaft, lowering of accessory devices, shift to neutral position of gear shift lever, and shutting off the engine shall be taken first! h) Before cleaning, repair or checking the machine, the operator must shut off the...
- Page 7 p) Never try to operate the tiller when the view is limited or lighting conditions are poor! q) Take care when tilling a hard field, because the blades may hook into the ground, hence pushing the tiller forward. If such a result does occur, just let free the handle and don’t try to control the machine! r)Never operate the tiller on an abrupt slope! s) Take care not to let the machine turn over when it is ascending or descending a...
-
Page 8: Chapter Ii Safety Symbols
Chapter II Safety symbols The following symbols are to remind you that if you don’t pay attention, you might be severely injured. Please carefully read the symbols in the manual and notices about safety. If these symbols peel off or are illegible, please contact the distributor to replace such symbols. Figure 2-1 Figure 2-2 Figure 2-1 to be stuck on engine fuel tank... - Page 9 Figure 2-5 Figure 2-6 Figure 2-7 Figure 2-5 to be stuck on fender Figure2-6 to be stuck on belt guard Figure 2-7 to be stuck on fender...
-
Page 10: Chapter Iii Brief Introduction Of Tiller
Chapter III Brief introduction of tiller This product is made in compliance with JB/T10266.1-2001 Specification of Handheld Tillers, JB/T10266.2-2001 Testing Method for Hand held Tillers, GB/T5608.3-1995 Testing Method of Rotary Tillers, GB10395.10-2006 Tractors and Machinery for Agriculture and Forestry-Technical Means for Ensuring Safety and DB50/210-2005 Technical Means for Ensuring Safe Operation of Handheld Tillers. -
Page 11: Names Of Major Parts And Components Of Tiller
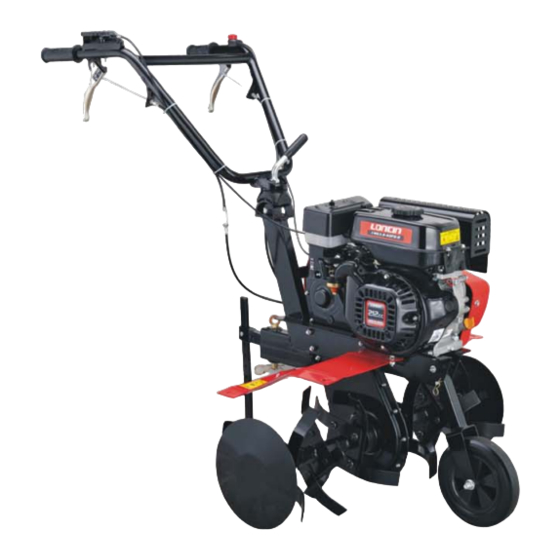
ii. Names of major parts and components of tiller Figure 1 1. Gasoline engine 2. Belt guard 3. Front wheel assembly 4. Reduction box 5. Tilling blade 6. Fender 7. Damping lever 8. Bracket 9. Handle pipe assembly 10. Clutch handle,forward 11.Extinguishing switch 12. -
Page 12: Chapter Iv Operation Method Of The Tiller
Chapter IV Operation method of the tiller Before each tiller leaves the factory, it has gone through shakedown test, but the user still should check all mechanisms of the machine and adjust them before actually using it, so as to let it work better. i. - Page 13 Oil number Temperatu Recommended numbers Extreme usable numbers Table 1 Figure 2 ● Put the tiller on a horizontal ground and screw out the plug (See Fig.4) ● Advise append appropriate lubricant to the reduction box every 50 hours. ● Recommended lubricant is Calcium base grease . .10.
- Page 14 Figure 4 Figure 5 3. Check air filter Warning! Never try to run the engine without the air filter, if so, the engine will be worn more quickly. .11.
- Page 15 ii. Status adjustment of the tiller 1. Adjustment of handle frame Note: Before adjusting height of handle frame, please put the machine on a flat horizontal ground to prevent it from accidental falling. ● Loosen the lifting handle and select the hole in an appropriate position, then adjust the handle’s cross bar to as high as user’s waist, then turn the lifting handle to tighten it (See Fig.
- Page 16 Figure 7 Figure 8 ● When the user releases clutch lever, clutch will be disengaged, and the engine power can’t be transmitted to the tiller, and tilling blades stop rotating. (See Fig 8) Note: improper adjustment of clutch cable will affect normal use of the product.
- Page 17 4. Adjustment of belt tension ●If belt tension isn’t in the normal tension range, it needs adjustment. Please loosen the engine’s 4 mounting bolts(See Fig.10 and Fig.11)。 ●After loosen the engine’s 4 mounting bolts, then if belt is too loose, push the engine forward, and if belt is too tight, move backward the engine till belt tension falls in the normal range, finally tighten engine’s mounting bolts and connection plate’s mounting bolts.
- Page 18 Figure 12 1. Turn the accelerator valve regulator on the handle frame to the maximum adjustable position without any load, and check if speed counter shows the speed is 3600±50, and then turn the accelerator valve regulator to the minimum adjustable position and check whether speed counter shows the speed is 1800±100. 2.
- Page 19 6. Use the clutch of reverse gear Warning! Before using the clutch of reverse gear, lower the engine speed. ● By “engage ” and “disengage ”of the clutch of reverse gear, the user can control output of engine’s power. ● When the user holds tight the clutch lever, the clutch is engaged and transmits engine power to the tiller and tilling blades begin to reverse rotate.
-
Page 20: Status Adjustment Of The Tiller
adjustment of clutch cable will affect normal use of the product. 7. Adjustment of front wheel 1)Adjust front wheel of tiller to the state shown in Fig. 15 when it is going to drive on the road. 2)Adjust the front wheel of tiller to the state shown in Fig.16 when it is going to till the field. Figure 15 Figure 16 .17. -
Page 21: Chapter V Running
Chapter V Running i. Steps to start it Warning! Before starting the engine, gear shift lever must be put in the neutral position. Clutch lever shall be released. 1. Set the fuel valve to the ON (open) position .18. - Page 22 2. Put the choke lever to the CLOSE position. 3. Turn the accelerator valve regulator lever slightly to the direction for high speed To minimum To maximum .19.
- Page 23 4. Put the engine switch to ON (open) position. Slightly pull the starter cable until you feel a resistance, and then pull it out fast with a big force. Note! Never abruptly release the lever, which would let it bounce back to hit and damage the engine, so if you want to release, slowly let it back in the direction of the starter cable’s resilience.
- Page 24 5. After the engine has warmed up, slowly push the choke lever to OPEN position. 6. Use the accelerator valve regulator (or throttle valve lever) to regulate the engine speed to the need level. To minimum To maximum .21.
-
Page 25: How To Stop The Engine
ii. How to stop the engine ● Under an emergency, the engine can be stopped, which means the user can directly shift the engine switch to OFF position. ● Under a normal condition, the steps to stop the engine are as follows: 1. - Page 26 3. Shift the fuel valve switch to OFF (closed) position. .23.
-
Page 27: Chapter Vi Maintenance Of Gasoline Engine
Chapter VI Maintenance of gasoline engine Warning! ● Stop the engine before any maintenance. ● In order to prevent inadvertent starting of the engine, please put the engine switch on OFF (stopped) position and pull off the line connecting spark plug. ●... - Page 28 Maintenance cycle Daily After first Every Every 6 Every year As per months shown month or season months or 100 or 300 Or actual running hours, whichever is earlier after 20 hours 50 hours hours hours Item Engine oil Check oil level ●...
- Page 29 Note! 1. If the machine is to be used in a dusty condition, maintenance frequency shall be increased. 2. The user may not disassemble the engine unless he has proper tools and mechanic repair ability. Some items can be maintained by an authorized distributor. 1.
- Page 30 ① Take apart the wing nut and air filter housing and take out the filter element. ② Use an uninflammable or high-burning-point detergent to clean filter element and let it dry up. ③ Drench filter element with engine oil and then squeeze the oil out. ④...
- Page 31 ① Use a special socket spanner to detach the spark plug. Special socket spanner for spark plug Warning! If the engine has just stopped running, the muffler will be very hot. So keep clear of hot temperature to avoid scald. ②...
- Page 32 Warning! If the engine has just stopped running, the muffler will be very hot; don’t work on the engine before it has cooled. Note! Spark arrester must be maintained every 100 hours to ensure it can work effectively. ① Loosen out two 4mm screws from the exhaust deflection pipe and take apart the exhaust deflection pipe.
-
Page 33: Chapter Vii Maintenance Of Tiller
Chapter VII Maintenance of tiller Due to wear from running, friction and change of load, the tiller’s bolts may get loose, and parts and components may get worn, causing lower power of the gasoline engine, higher fuel consumption rate and other faults that will affect use of the tiller. - Page 34 ① Conduct all items of maintenance for each shift. ② Clean reduction box , and change grease 3. Second-level maintenance (every 800 hours of work) ① Conduct all items of the maintenance for every 150 hours of work. ② Check all gears and bearings, if any of them is severely worn, replace it. ③...
- Page 35 iii. Table of mini-tiller’s technical maintenance (an item marked with √ shall be maintained) Work interval After 8 hours After Every After the third Every 2 Every of work first month year or month or after years or under a half after 20 1,000 Content of...
- Page 36 Long storage of mini-tiller If the tiller need be stored for a long time, the following measures should be taken to prevent rust and erosion. 1. Seal up and store gasoline engine as per requirements in the manual of gasoline engine. 2.
-
Page 37: Chapter Viii Trouble Shooting
Chapter VIII Trouble shooting If the engine can’t be started, please check 1. Whether the engine switch is in the ON position, 2. Whether there is enough lubricant in the machine, 3. Whether fuel valve is in the ON position, 4. - Page 38 6. Whether the spark plug can spark. a. Pull off the spark plug cap, remove dirt from it, then detach the spark plug. b. Fit spark plug cap over the spark plug. c. Contact the metallic case of spark plug to engine’s cylinder head. Slightly pull the starter to check if sparks are produced.
Need help?
Do you have a question about the 600 and is the answer not in the manual?
Questions and answers
I need the code numbers for the belts