Advertisement
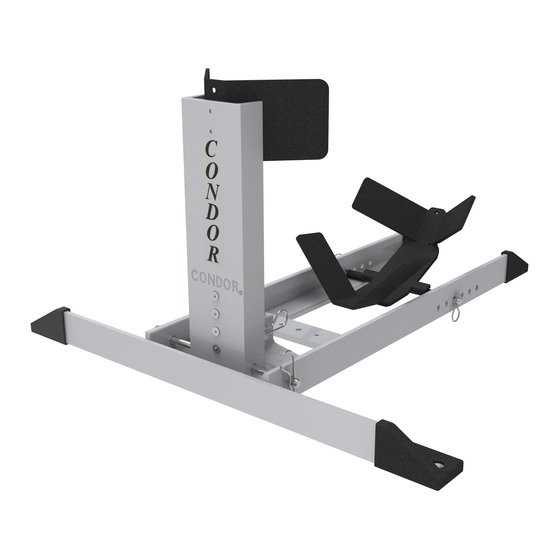
CONDOR PIT-STOP / TRAILER-STOP TRAILER ADAPTOR KIT INSTRUCTION MANUAL
STOP! WARNING: READ THIS FIRST!
First Read and Understand the Instruction manual and product labels for important safety, set-up and troubleshooting information If you have problems setting up or using
the Condor
Pit-Stop, contact customer service @ 1-630-497-1962 or contact us via e-mail @ www.condor-lift.com. Condor
TM
:
Assembly Instructions
Remove all parts from shipping box. Check the parts below to make sure you have all the parts needed to assemble your Condor
before beginning. In the unlikely event that you find a part damaged or missing, please call customer service @ #815-754-5418
Condor Pit-Stop Parts Packing list:
PICTURES OF PARTS
User Instructions:
K
P
J
KEY
QUANTITY
J
1
K
2
O
2
P
2
Q
2
R
1
R
O
Q
PART DESCRIPTION
Trailer Bracket
Socket Shoulder Screw-3/8x3/8 Thread-5/16-18
Large Washer (Fender Washer 5/16 x 1.25)
Flat Head Socket Cap Screw 82i 5/16-18 X 2-1/2
Lock Nut 5/16-18
Spade Head w/shoulder thumb Screw (5/16-18 x 1.0)
Step1: Attach parts K to the Condor Pit-Stop/Trailer-Stop cross bracket as
shown. (Torque parts K to 18 ft-lbs)
Step2: Attach part J to mounting platform first. Allow a minimum of 10.0" of
space on the mounting surface from the center of the trailer bracket J to the
locked end of the Condor Pit-Stop/Trailer-Stop. The Condor unit should
always be fully planted on the mounting platform when engaged into the
trailer bracket J. Place part J parallel to platform end using the
recommended dimension and drill holes for part P using a 5/16 drill bit.
Step3: Once the holes for part J are drilled, secure it using parts P, O and Q.
Run Part P through part J and through mounting platform. Once part P has
passed through the mounting platform, secure it with parts O and Q. Make
sure that parts O and Q are secured as shown. Torque Q to 18-24 ft-lbs.
Step4: As shown, place Condor unit into Trailer bracket by inserting parts K
into part J key way. Once parts K have entered the keyway of part K, slide
the Condor unit forward and in the direction of the keyway path. Unit must
slide in smoothly. If unit does not slide easily, use included washers under
parts K to increase clearance to compensate for floor flatness. Once unit is
locked into part J, proceed to use part R to secure and lock unit in place.
Pit-Stop is not intended for use by children.
TM
TM
.
Pit-Stop
Advertisement
Table of Contents

Subscribe to Our Youtube Channel
Related Manuals for Condor Pit-Stop/Trailer-Stop


Summary of Contents for Condor Pit-Stop/Trailer-Stop
- Page 1 Pit-Stop is not intended for use by children. Assembly Instructions Remove all parts from shipping box. Check the parts below to make sure you have all the parts needed to assemble your Condor Pit-Stop before beginning. In the unlikely event that you find a part damaged or missing, please call customer service @ #815-754-5418...
- Page 2 Caution: Always make sure that all fasteners are tight and all pins and parts are in place prior to use. Warning: Only use Condor unit when trailer adapter kit is properly installed. One Year Limited Warranty: This Condor Pit-Stop product warranty extends to the original consumer purchaser of the product. All illustrations and specifications contained in this manual are based on the latest product information available at the time of printing.
Need help?
Do you have a question about the Pit-Stop/Trailer-Stop and is the answer not in the manual?
Questions and answers