Advertisement
Quick Links
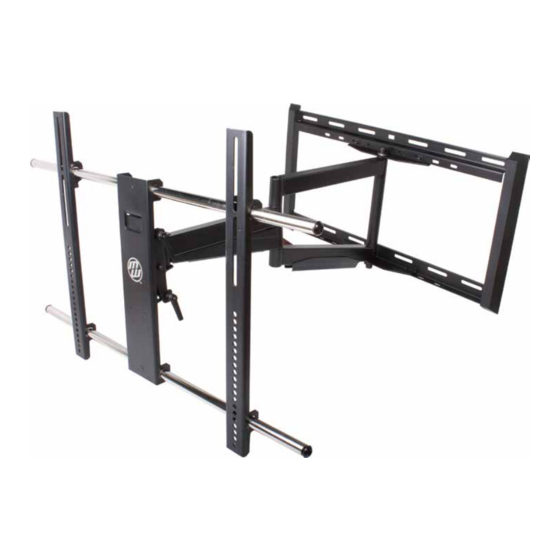
Extra Large Full Motion Mount
Low Profile Full Motion Flat Panel Mount
MOUNTS
CAUTION: DO NOT EXCEED MAXIMU
LISTED WEIGHT CAPACITY. SERIOUS
!
CAUTION:
INJURY OR PROPERTY DAMAGE MAY
THE MAXIMUM LOADING WEIGHT
OCCUR!
IS 150 LBS. USE WITH PRODUCTS HEAVIER THAN
THE MAXIMUM WEIGHT INDICATED MAY RESULT IN
INSTABILITY AND POSSIBLE PERSONAL INJURY.
Extra Large Full Motion Mount
Max Screen Size: 80"
Max Screen Size: 90"
Max Weight: 150 LBS
V10
P 1
Advertisement

Related Manuals for MW MOUNTS Extra Large Full Motion MW150C75

Summary of Contents for MW MOUNTS Extra Large Full Motion MW150C75
- Page 1 Extra Large Full Motion Mount Low Profile Full Motion Flat Panel Mount CAUTION: DO NOT EXCEED MAXIMU LISTED WEIGHT CAPACITY. SERIOUS CAUTION: MOUNTS INJURY OR PROPERTY DAMAGE MAY THE MAXIMUM LOADING WEIGHT OCCUR! IS 150 LBS. USE WITH PRODUCTS HEAVIER THAN THE MAXIMUM WEIGHT INDICATED MAY RESULT IN INSTABILITY AND POSSIBLE PERSONAL INJURY.
-
Page 2: Tools Needed
QUESTIONS? NEED HELP? PLEASE CALL ¿NECESITA AYUDA? LLÁMENOS. BESOIN D’AIDE? VEUILLEZ APPELER MOUNTS 1-602-674-1000 DISCLAIMER – WARNING INFORMATION Disclaimer –. MW PRODUCTS has extended every effort to ensure to accuracy and completeness of this manual. However, MW PRODUCTS does not claim that the information covers all installation and or operational variables. - Page 3 HARDWARE PRODUCT NUMBERS SQUARE M8 x 30 M5 x 30 M6 x 30 M4 x 30 M6 x 15 M8 x 15 M4 x 12 M5 x 12 SPACER WASHER M8 x 45 WALL LAG BOLT LAG BOLT STEEL ALLEN 10mm LLEN ACORN...
- Page 4 CORNER MOUNTING INFORMATION The Extra Large Full Motion Mount can be installed in a corner location when needed. Prior to installing the Mount it is impor- tant to determine the approprite corner wall to install the mount. Please see diagrams below to assist in determin- ing the appropriate wall placement to...
- Page 5 STEP 1- FLAT BACK FLAT PANEL (UNIVERSAL MONITOR PLATE) Connect Universal Monitor Plate to flat panel Conecte el adaptador al monitor Connectez l'adaptateur au moniteur STEP 1- CURVED BACK FLAT PANEL (UNIVERSAL MONITOR PLATE) Connect Universal Monitor Plate to flat panel Conecte el adaptador al monitor Connectez l'adaptateur au moniteur Spacers can also be used to...
- Page 6 STEP 1- USE M8 STEEL WASHER IF THE PHILLIPS SCREWS FROM THE MONITOR KIT ARE TOO LONG Diagrams show three options for using additional washers if hardware screws are too long to properly tighten into back of flat panel television. STEP 2A - CENTER UNIVERSAL MONITOR PLATE Monitor Plate must be centered (horizontal plane) on back of flat panel STEP 2B- SECURE UNIVERSAL MONITOR PLATE VERTICAL RAILS...
- Page 7 STEP 3A- WOOD STUD INSTALLATION (CONCRETE INSTALLATION SKIP TO 3B) Find stud and mark edge and center locations Ubique el panel y marque las ubicaciones de los bordes y el centro. Repérez l'emplacement d'une poutre, puis marquez l'emplacement des bords et du centre de cette poutre. LEVEL WALL PLATE DRILL BIT WITH INCLUDED...
- Page 8 STEP 3A – DRILL PILOT HOLE AND MOUNT WALL PLATE AND ARM ASSEMBLY Mount wall plate Coloque la placa de pared Montez la plaque murale Secure lag bolts with steel washer to Wall Plate STEP 3B – SOLID CONCRETE INSTALLATION Solid Concrete Drill Bit Level...
- Page 9 STEP 3B- USE TEMPLATE TO MARK WALL FOR PILOT HOLES STEP 3B – DRILL PILOT HOLES AND MOUNT WALL PLATE AND ARM ASSEMBLY Insert Wall Anchors into Concrete Wall Secure Lag Bolts to Wall Bracket...
- Page 10 OPTIONAL - ADJUST ARM ASSEMBLY LATERALLY If necessary, you can move the arm assembly laterally to center your TV. Remove 4 bolts as shown at left, move arm assembly to desired location, and reattach arm assembly with the 4 bolts. STEP 4 - ATTACH UNIVERSAL MOUNT BRACKET TO ARM ASSEMBLY &...
- Page 11 STEP 5 - SECURE MONITOR PLATE TO ARM ASSEMBLY Secure Acorn Nut and Washer on Monitor Plate to Arm Assembly Allen Wrench M6 Washer M6 Acorn Nut STEP 6 - ADJUST TILT TENSION/ POST INSTALLATION LEVEL Adjust tilt mechanism tension with ratchet handle Built-in level feature for post installation lever correction...
-
Page 12: Warranty Information
Congratulations! Installation complete WARRANTY INFORMATION This warranty applies to US Residents who purchase from an authorized MW PRODUCTS Dealer. MW PRODUCTS products are covered against defects in materials and workmanship for 5 years. MW PRODUCTS will repair or replace the defective component or product, at its sole discretion. Failure to follow product care instructions from MW PRODUCTS will result in void of warranty.
Need help?
Do you have a question about the Extra Large Full Motion MW150C75 and is the answer not in the manual?
Questions and answers