Advertisement
X
PLUS
A
B
C
D
E
LED module
positioned on
the thymus
gland
G
Battery Status
LED module
Indicator
positioned on
the gut
H
Start Button
I
Controller
J
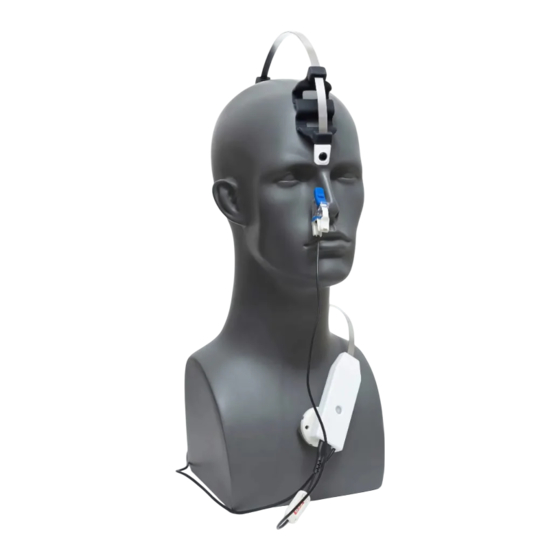
Nose Applicator Plug
K
X-Plus LED Module Plug
Position the X-Plus as shown in the diagram. Ensure that the X-Plus applicator [F} is facing
the back of the head or on the chest as shown in the drawings. The device can be used to
1
suite different head or body size by pulling or pushing the extender assembly [E]. The end
and mid supports [B, C] can slide for optimal positioning.
2
Insert the nose applicator [A] into either the right or the left nostril with the clip on the
outside and the lens in the nostril.
Insert the X-Plus LED module plug [K] and the nose applicator plug [J] into the controller as
3
shown in the diagram.
4
Press the start button [H] to begin treatment. It switches off automatically after 20 minutes.
U S E R G U I D E
Nose Applicator
End Support
Mid Support
Stainless Steel Band
Extender Assembly
LED module
positioned on the
cerebellum and
mid-brain
F
X-Plus LED Module
O P E R A T I N G I N S T R U C T I O N S
USAGE
Each session lasts
20 minutes. In
most cases, X-Plus
should not be used
more than once
every two days
Advertisement
Table of Contents

Related Manuals for Vielight X-Plus


Summary of Contents for Vielight X-Plus
- Page 1 Insert the nose applicator [A] into either the right or the left nostril with the clip on the outside and the lens in the nostril. Insert the X-Plus LED module plug [K] and the nose applicator plug [J] into the controller as shown in the diagram.
- Page 2 Limited one-Year warranty Use a UV sanitizer after cleaning with Your Vielight X-Plus is warranted to be free of defect in material and workmanship under wipe. normal use. 2. Use a soft, dry cloth to clean the other This warranty is limited to a period of one year from the purchase date.
Need help?
Do you have a question about the X-Plus and is the answer not in the manual?
Questions and answers