Advertisement
Quick Links
WOODFORD MANUFACTURING COMPANY
2121 Waynoka Road, Colorado Springs, Colorado 80915 • Phone: (800) 621-6032 • Fax: (800) 765-4115
To view our complete product line visit: www.woodfordmfg.com or email: sales@woodfordmfg.com
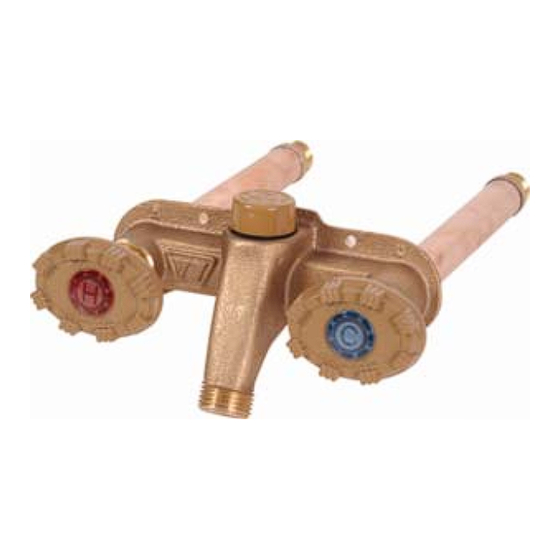
Model 22 & V22
HOT
&
COLD
Freezeless Wall Faucet
Model 22
Anti-siphon protected
FIGURE 1-22
5" Tube
Centers
Fasteners
Nozzle
FIGURE 1-V22
2 1/4" Tube
Centers
Fasteners
Nozzle
For more information contact...
A Division of WCM Industries, Inc.
Model V22
Anti-siphon protected
FIGURE 2-22
Packing Nut
(2) 1-1/8" Dia. Holes
FIGURE 2-V22
Packing Nut
Wall faucets must be properly installed and
operated to insure drainage. Improperly
installed or operated wall faucets may freeze
and burst in freezing weather.
INSTALLATION INSTRUCTIONS:
Downward Pitch
Downward
Pitch
NOTE: The packing nut, located behind the
handle, has been factory adjusted. If leakage
should occur after installation or use, the
packing nut can be tightened to stop the leak.
FIGURE 2
Rev 06/10 Form No. II22.101
1. Before installation, flush supply line to
remove any debris.
2. Drill (2) 1-1/8" diameter holes through the
wall in the desired location and insert the
faucet from the outside. FIGURE 1
a. Drill (2) holes for the horizontal
mounted Model 22 water tubes on
5" centers.
b. Drill (2) holes for the vertical
mounted Model V22 water tubes on
3 ¼" centers.
3. Install faucet with nozzle pointing down.
FIGURE 1
4. The water tubes must have a slight
downward pitch for proper drainage.
Proper drain angle is built in to the faucet
head if mounted on a vertical surface.
FIGURE 2
5. Secure faucet to the wall using
appropriate fasteners installed through the
holes in the flange. FIGURE 1
6. For a solder connection inlet, open faucet
to full open position before soldering.
Excessive heat can damage valve seat
rubber or stainless steel seat and factory
solder joint.
Advertisement

Subscribe to Our Youtube Channel
Related Manuals for Woodford 22


Summary of Contents for Woodford 22
- Page 1 Model 22 faucet from the outside. FIGURE 1 Anti-siphon protected Model V22 a. Drill (2) holes for the horizontal Anti-siphon protected mounted Model 22 water tubes on FIGURE 1-22 5” centers. 5” Tube FIGURE 2-22 Downward Pitch b.
- Page 2 Holes are provided for additional screws if needed. 2. Install the Model 22 or V22 through holes in the Mounting Plate and secure with wood screws. 3. Cut and fit 5/8” drywall over the Mounting Plate.
Need help?
Do you have a question about the 22 and is the answer not in the manual?
Questions and answers