Table of Contents
Advertisement
Quick Links
Head Office : 16‑3 Ryogoku 1‑chome, Sumida‑ku, Tokyo 130‑0026 JAPAN
Osaka Br. : 4‑4 Itachibori 2‑chome, Nishi‑ku, Osaka 550‑0012
Nagoya Br. : 4 Kanayamacho 1‑chome, Atsuta‑ku, Nagoya 456‑0002
http: // www.minitor.co.jp
●Specifications and configurations are subject to change without notice.
Phone 03‑3633‑7181 Fax 03‑3633‑7186
Phone 06‑6531‑5300 Fax 06‑6531‑5417
Phone 052‑671‑3077 Fax 052‑671‑3177
20090917
IME‑MT01CP
C ON T ROL P A C K
M T01C P
O P ERA T ION M ANUAL
01
Series
Advertisement
Table of Contents

Related Manuals for Minitor SFIDA 01 Series

Summary of Contents for Minitor SFIDA 01 Series
- Page 1 Series C ON T ROL P A C K M T01C P O P ERA T ION M ANUAL Phone 03‑3633‑7181 Fax 03‑3633‑7186 Head Office : 16‑3 Ryogoku 1‑chome, Sumida‑ku, Tokyo 130‑0026 JAPAN Osaka Br. : 4‑4 Itachibori 2‑chome, Nishi‑ku, Osaka 550‑0012 Phone 06‑6531‑5300 Fax 06‑6531‑5417 Nagoya Br. : 4 Kanayamacho 1‑chome, Atsuta‑ku, Nagoya 456‑0002 Phone 052‑671‑3077 Fax 052‑671‑3177 http: // www.minitor.co.jp 20090917 IME‑MT01CP ●Specifications and configurations are subject to change without notice.
-
Page 2: Table Of Contents
Contents Warning 1. Safety Precautions 1 6. Connection method 10 ○ This device shall be grounded using the ground wire of the power cord. Make sure that 2. Equipment Features 3 6‑1 Connection of Power Cable the ground wire is connected to the earth to avoid an electric shock when using this device. In addition, confirm that the ground wire has been grounded correctly before connecting a cable 3. Specifications and Dimensions 3 6‑2 Connection of Spindle Connection Cord to this device. 3‑1 Specifications ○ If any malfunctions such as smoke, peculiar smells and/or sounds are present, turn off the main 6‑3 Connection of Air Hose switch and unplug the power supply immediately. 3‑2 Dimensions of External Appearance 7. Mounting of brackets 12 Consult an electrician for repair after confirming that all smoking has stopped. If the machine 3‑3 Torque Output Characteristics is damaged and used without proper repair, fire and electric shock could result. 8. Replacement of operation panel 13 3‑4 The confirmation of a level ○ Do not attempt to modify or disassemble the machine since this can cause serious loss in 8‑1 Change of Mounting Direction of performance and safety; otherwise, fire and electric shock could result. meter used consecutively ○ Be sure to only use the input voltage specified in this device since fire and electric shock Operation Panel 3‑5 Accessories could result. 8‑2 Replacement of Operation Panel and ○ Do not block ventilation openings since this can result in a failure or fire from heat. 4. 5 Names and Functions of Each Component Filter Panel ○ Do not put Control Pack on unstable locations such as a shaky stand or a leaning surface, etc. 4‑1 Overall Configuration If it falls or topples over it can cause injury. -
Page 3: Equipment Features
Equipment Features 3‑3 Torque Output Characteristics(Motor Spindle) ●Maximum Output A stable, high torque is achieved with a high‑power 370W of sufficient output by loading Performance characteristic graph of a high‑power electric source. ●Worldwide Power Supply Torque (Maximum) It is equipped with an AC100〜240V‑compliant worldwide power supply. Thus, gone are trou‑ blesome changes in power‑supply settings and failures by voltage difference. ●Various Security Output It is equipped with a safety security function to constantly monitor the load condition of the main axis, overcurrent to motor, heat generated by power‑supply and air pressure. ●Maximum Speed of Rotation 60,000min ‑1 Torque (Unit Continuum Region) Motor spindles of the 01 series are equipped with a high‑performance, brushless motor with ceramic angular bearings, allowing a maximum speed of 60,000min ‑1 rpm. The adopted forced air‑cooling system (outer burner cooling) allows for high durability. Speed of Rotation ×1000 ( min ‑1 )... -
Page 4: Names And Functions Of Each Component
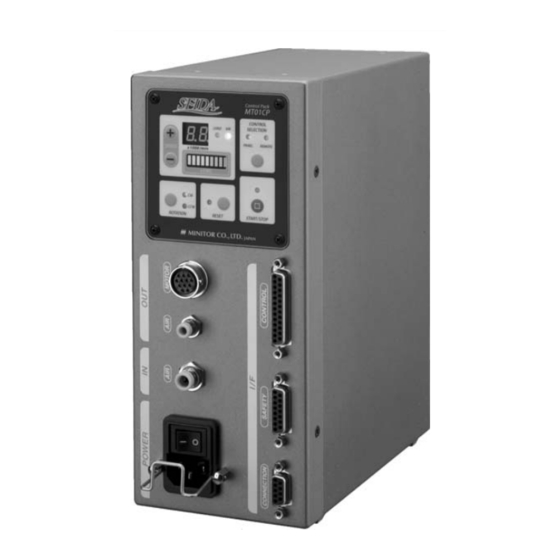
4‑2 Details of Operation Panel Names and Functions of Each Component 4‑1 Overall Configuration ・Fig.‑5 ⑪"+"Switch (for increasing the speed of rotation) When this switch is pushed during panel operation mode, the speed of rotation increases ‑1 in devices of 1,000 min . When it is held onto for more than two seconds, the speed of ‑1 rotation will continue to increase, to a maximum setting of 60,000 min ⑫"−"Switch (for decreasing the speed of rotation) When this switch is pushed during panel operation mode, the speed of rotation decreases ‑1 in devices of 1000min . When it is held onto for more than two seconds, the speed of ‑1 rotation will continue to decrease, to a minimum setting of 1,000min ‑1 When the "+"switch is pressed in the indication of 1,000min at the time of a motor ‑1 stop, it will be set at 500min for alignment. ‑1 Note: Effective working range is 5,000min or more. ・Fig.‑3 ・Fig.‑4 ⑬Indicator ①Operation Panel This indicates the speed setting or the speed of rotation per minute (rpm), and also 4‑2 See "Operation Panel Details" indicates when malfunctions occur by blinking error numbers. ⑭AIR Lamp ②CONTROL Connector This lamp lights when the motor is off and blinks when an error occurs such as abnormal For connection of external input/output signal. air pressure. ③SAFETY Connector ⑮LOAD Lamp For signaling connection to halt motor urgently in case of an emergency (Option). -
Page 5: Operating Procedure
START/STOP Switch 3.Press the ROTATION switch so that the lamp of intended rotation direction lights up. This switch turns the motor ON or OFF. 4.Press the +(UP) or −(DOWN) switch so that the intended speed of rotation is displayed on the indicator. START/STOP Lamp 5.Press the START/STOP switch to start or stop the motor. This lamp lights up in accordance with the state of the motor. (State of motor) (State of lamp) 5‑3 Panel/Remote Operation Mode During pauses Red illuminates 1.Turn on the MAIN switch. "P.E." is displayed once in the Indicator. During operation → Stop Red blinks Make sure that operation PANEL and both REMOTE lamps of are lit. Operation at fixed speed of rotation Green illuminates 2.Supply air to the motor. Refer to the details of "5‑2 Panel Operation Mode." Operation outside fixed speed of rotation Green blinks Error number being displayed Orange blinks 3.Turn the external ROTATION signal on or off so that LED of the intended rotation direction is lit. Complete the setup of the rotation direction 100ms before turning on MODE Switch the external START signal. This switch changes the operation mode. 4.Press the +(UP) or −(DOWN) switch so that the intended speed of rotation is displayed on the indicator. PANEL Mode Lamp 5. Switch the external START/STOP signal to turn the motor ON or OFF. This lamp lights when it's in Panel Operation Mode. (Operation of motor) (External START signal) REMOTE Mode Lamp Stop OFF (applied voltage 0V) This lamp lights when it is in Remote Operation Mode. Start ON (applied voltage 12V〜24V) Operating Procedure 5‑4 Remote Operation Mode 1.Turn on the MAIN switch. The indicator will display "E.E." once. Make sure that the 5‑1 Type of Operation Mode REMOTE mode lamp on the operation panel is lit. Four different modes are available ‑to switch mode press the MODE switch while the motor is 2.Supply air to the motor. Refer to the details of "5‑2 Panel Operation Mode."... -
Page 6: Setting Of The Function
5‑5 Setting of the function 6. The set‑up content of the function number will be displayed by pushing the (21)START/STOP switch while the function number for presetting is flashing This device is able to set the following functions; e.g. Setting the maximum number 7. For changing the set‑up contents, push the START/STOP switch while the contents are ‑1 of rotations by the motor at 60,000min or less. being displayed to get the state of flashing, and then push either + or −switch to display the contents to be set up ○F.0 Sets restrictions on the maximum number of rotations. 8. When the START/STOP switch has been selected after changing the set‑up contents, the Display "on" : This restricts the maximum number of rotations. modification descriptions will be recorded and the function number will be flashing Display "of." : This does not restrict the maximum number of rotations. on the display. When the contents have not been changed, push the RESET switch. the When "on" is selected, the number of rotations by panel operation or an external modification descriptions will not be recorded, and it will return to the flashing signal can not be set at more than the preset number of rotations. function number. ○F.1 Sets up the maximum number of rotations. 9. Return to No.6 above when intending to change the setup of the multiple functions ‑1 Display "1〜60" kmin continuously. After finishing the setup, it will return to the state where the MAIN When "F.0" is in the "on" position, the preset number of rotations will be the maximum. switch is turned on by pressing the RESET switch. ○F.2 Sets up the signal (voltage and pulse signal) to be used when setting the speed from an external signal. 5‑6 Initialization of Settings Display "An" : It will be set up by "SPEED Signal". Display "PL" : It will be set up by a signal of either "SPPED̲UD" or "SPEED̲PULSE". This is the method to return this device to its initial setting. * When fixing speed‑settings by the pulse count signal, the number of set rotations 1. Turn the MAIN switch ON while pushing ⑳ RESET switch and MODE switch on the operation panel. ‑1 will be set at 1,000min when the MAIN power is turned on. The number of rotations 2. Let go of the switches when blinking "y.n" is displayed in the indicator. The "y.n" will blink. ‑1 will be set at 1,000min after switching the exterior speed set‑point signal. -
Page 7: Connection Of Spindle Connection Cord
Mounting of Brackets 6‑2 Connection of Spindle connection cord There are two kinds of bracket accessories. Match to There are two fixation methods available: the floor type fixation (Fig.‑11) and the back a key groove mounting (Fig.‑12). Fix with Install accessory two brackets in the bottom aspect hole of this device. the lock part ・Fig.‑9 ・Fig.‑8 1.Connect the plug (Fig.‑9) of the spindle connection cord (MC01S or MC01Z) to a connector Brackets for the ⑤ "MOTOR" (Fig.‑8) for the motor connection in the front of this device. Floor type fixation 2.After securely putting a plug into the socket, fix it by turning the lock part. Caution Be sure to turn off the MAIN switch of the device when connecting the spindle connecton cord. Floor type fixation ・Fig.‑11 6‑3 Connection of the Air Hose 1. Plug the air hose (outside diameter 6.0mmΦ) to the air supply valve in "AIR IN" coupler Install accessory two brackets in the hole of up‑and‑down each face of this device back direction. ⑦ in the front of this device. (Fig.‑10) 2. Plug the air hose (outside diameter 4.0mmΦ) in the "AIR OUT" coupler ⑥ of this device and connect it with the air coupling on the motor side.(Fig.‑10) 3. Air pressure setting range is 0.3MPa 〜 0.5MPa. -
Page 8: Replacement Of Operation Panel
Error Number Indication Replacement of the Operation Panel 9‑1 How Error Number Is Displayed 8‑1 Changing the Mounting Direction of the Operation Panel Example:Error Number "E16" Operation panel Indicating the number of E . 1 Indication of Error tenths place digit Fixing screw Indicating the number of The first lamp ones place digit by nine lights (The sixth from the left) Setting rubber ・Fig.‑13 Error numbers are displayed in a numerical value of two‑digits. As for the display method, tenths place digit is displayed after "E." by the indicator. The LEVEL indicator displays The mounting direction of the Operation Panel can be changed vertically or horizontally ones place digit of the error number and consists of nine (9) lamps. (Fig.‑13). Remove the screws in the four corners when demounting the operation panel. The first lamp Indicates "1" of ones ... -
Page 9: External Input/Output Signals
9‑3 Error Numbers and Their Meanings 10 External Input/Output Signals Meanings When in Remote Operation Mode, controlling this device by an external signal, an external Immediately after having turned on the power supply in Remote Operation Mode, the exterior START signal will already be ON. signal will be inputted from the CONTROL connector. Moreover, this connector outputs sig‑ Error was detected in the machine. (changed to RESTART mode) nals showing the state of this device. Refer to the contents of "CONTROL Connector Signal Error was detected in setting memory data of "Rotation Direction and Speed of Rotation" in this device. Error was detected in setting memory data of "Operation Mode" in this device. Contents" the signal for each terminal to." Air pressure for motor cooling is low. 10‑1 External Input Signals Air pressure for motor cooling is high. Abnormal motor connection. The connection in this device of each signals such as "SPEED","START","ROTATION", The motor can not be activated, or it took at least three seconds before reaching the preset number of rotations. ‑1 "SPEED̲PULSE","5000min " and "RESET" etc. are shown in Fig.‑16. The revolution number hsa been set too high on the Selector Pack. As for the external signal and circuit of this device, SPEED signal is insulated by the Current value at the time of motor in operation is low. insulated amplifier and other signals are insulated by the photo‑coupler.Connect "+" or " Over‑current protection to the motor was activated. -
Page 10: External Output Signals
10‑2 External Output Signals 10‑3 Serial Signals The connection in this device of each signal such as "RUN", "PULSE", "ROTATION̲OUT, Data in this device can be output to external parties by using serial signals of the "WARNING","ERR" and "ARRIVE" etc. are shown in Fig.‑17. As for the external output CONNECTION connector in this device. Serial number is based on RS232‑C. signal and circuit of this device, it is being insulated by a photo‑coupler, and the collector side and emitter side of photo‑coupler output are being outputted per every ●Serial Communication Parameter signal. The voltage applying to the photo‑coupler output will be used within DC30V and, ... - Page 11 ●Data Contents (Command 1) ●Data Contents (Command 2) When Control Pack receives a command 1 "$44 $41 $0D", the following data 20 bytes When Control Pack receives a command 2 "$44 $42 $0D", the following data 20 bytes shall be transmitted. shall be transmitted. $2A $2A The head of data is shown. It's ASCII code "*". It is the head of data. It's ASCII code "*". Selector operating $31 Panel operation mode Air pressure 10^ ‑ 1 1/10‑digit number of the air pressure value is shown by ASCII code. ( unit : Mpa) mode $32 Remote operation mode Air pressure 10^ ‑ 2 1/100‑digit number of the air pressure value is shown by ASCII code. $33 Selector operation mode. 4〜 Confirming the operation of factory shipment $34 Panel/RemoteSelector operating mode. Setting rotation $30 CW (Forward rotation) Refer to Chart‑3 "Contents of External input signal". External input signal directions $31 CCW(Reverse rotation) External output signal Refer to Chart‑4 "Contents of External output signal". Two‑digit number of setting rpm. is shown by ASCII code.(unit : kmin ‑1 ) Setting rpm.
Need help?
Do you have a question about the SFIDA 01 Series and is the answer not in the manual?
Questions and answers