
Summary of Contents for Nice HySecurity SlideSmart DC Series
- Page 1 Installation and Programming Manual SlideSmart ™ DC10F, DCS10F, DC15, DCS15 Vehicular slide gate operator with Smart DC Controller...
- Page 2 (This page intentionally blank) SlideSmart DC Programming and Operations hysecurity.com | 800-321-9947 MX4505 Rev. E ©2020...
-
Page 3: Table Of Contents
TABLE OF CONTENTS SlideSmart DC Initial Setup .............. 45 TABLE OF CONTENTS ........4 Turning Both Power Switches On ......45 DISPLAY AND MENU OPTIONS ....45 INTRODUCING SLIDESMART DC ....5 Intelligent Features: Smart DC Controller Using Smart DC Controller Buttons In Menu Mode . 47 TM ......5 Run Mode .............. -
Page 4: Table Of Contents
TABLE OF CONTENTS Installing a Lock for 12VDC or 24VDC Systems ..91 Installing a Lock for High Voltage Systems ....91 Installing Vehicle Detectors and Loops ....92 Monitored External Entrapment Sensors ....95 External Entrapment Protection ....... 97 Photo Eye Installation Tips ........ -
Page 5: Introducing Slidesmart Dc
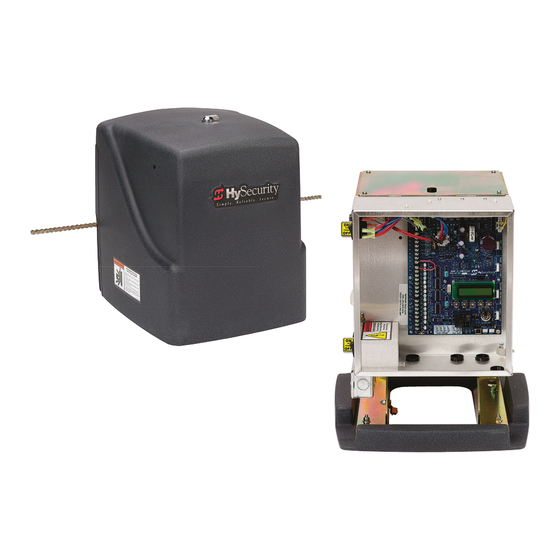
INTRODUCING SLIDESMART DC Thank you for purchasing our premium SlideSmart DC™ slide gate operator. At HySecurity® Gate, Inc., we pride ourselves on quality. Our new line of electromechanical gate operators include a number of unparalleled user benefi ts: Robust - An especially low fl ex, corrosion resistant, steel chassis combines with an attractive, key-locked, fade resistant, roto-molded cover. -
Page 6: Installer's Check List
INSTALLER'S CHECK LIST INSTALLER’S CHECK LIST The following list provides a high level overview of the tasks involved in installing the SlideSmart DC gate operator. Take a moment to review the list and check off the items as you complete the install. Site Prep - concrete pad location/dimensions, distance from gate, chain height, and ... -
Page 7: Slidesmart Dc Components
SLIDESMART DC COMPONENTS COVER, LATCH COVER WARNING LABEL BOARD, SMART CONTROL BOX DC CONTROLLER PROTECTION PLATE BUZZER & COVER PULLEY, SWITCH, RESET PULLEY, GEARBOX MOTOR EMERGENCY BELT DRIVE, 2 ft/s STOP BUTTON DC SWITCH, PULLEY, GEARBOX MOTOR ON/OFF BELT DRIVE, 1 ft/s GEARBOX CIRCUIT BRUSH... -
Page 8: Safety Requirements
SAFETY REQUIREMENTS SAFETY MESSAGES IMPORTANT SAFETY INSTRUCTIONS The safety messages below inform you about potential Hazards, associated with automatic gates, can hazards that can result in injury. Safety messages specifi cally be reduced with proper site design, installation, address level of exposure to operator and are preceded by and use. - Page 9 SAFETY REQUIREMENTS WARNING To reduce the risk of injury or death: 1. READ AND FOLLOW ALL INSTRUCTIONS. 2. Never let children operate or play with gate controls. Keep the remote control away from children. 3. Always keep people and objects away from the gate. NO ONE SHOULD CROSS THE PATH OF THE MOVING GATE.
- Page 10 SAFETY REQUIREMENTS VEHICULAR TRAFFIC ONLY WARNING This automatic gate operator is not designed nor is it intended for pedestrian traffi c. Vehicular gate operators must by their nature be powerful to function reliably. This power can cause injury or death. Accordingly, direct all pedestrian traffi c to a separate walk-through gate.
- Page 11 SAFETY REQUIREMENTS Another source of information is available from DASMA, the The following provisions shall apply to Class I, Class II, Class III, and Class IV vehicular horizontal slide gates: Door and Access System Manufacturer’s Association. The Association publishes Technical Data Sheets, one of which All weight bearing exposed rollers 8 ft (2.44 m), or less, above concerns ASTM F2200.
- Page 12 SAFETY REQUIREMENTS PHOTO EYES: One or more non-contact sensor be located and its wiring arranged so that communication (photo eyes) shall be located where entrapment risk between sensor and gate is not subjected to mechanical or obstruction exists, such as perimeter reachable by a damage.
- Page 13 SAFETY REQUIREMENTS The following sensors have been tested with HySecurity gate operators by an independent laboratory and certifi ed to comply with UL 325 7th Edition. Select sensors from this list for UL compliant gate automation solutions. Contact the sensor manufacturer for specifi c recommendations for use. All external entrapment protection sensors must have NC sensor outputs and be wired to the SENSOR COM CAUTION terminal for monitoring and powering purposes.
- Page 14 SAFETY REQUIREMENTS ELECTRICAL SAFETY To reduce risk of fi re or injury to persons: Turn gate operator and all circuit Observe polarity between batteries and charging circuit. breakers OFF before performing Never mix battery sizes, types, or brands. Charging circuit maintenance on the gate operator on HySecurity DC operators is designed for AGM-type or making contact with output...
- Page 15 SAFETY REQUIREMENTS MAINTENANCE OF GATE SYSTEMS Recyclers and manufacturers alike promote the process of recycling metal and plastic. Using a metal and plastic To keep your automated gate system performing both safely recycling center promotes energy cost savings. and reliably it is important to ensure that the components of that system are functioning properly.
-
Page 16: Installation
INSTALLATION Site Overview & Planning Key or Card reader Mount access control Pedestrian gate. Make sure a separate walk- (183cm) beyond the gate. through entrance is available and its pedestrian path is clearly designated. Be sure to place the WARNING WARNING signs on both sides of the gate. -
Page 17: Pad Condition
INSTALLATION Low voltage wiring (12V and 24V accessory PAD CONDITION power) 1. Follow the local building codes to identify the • vehicle loop control wiring frost line and determine the required depth of • primary/secondary connections the concrete pad. HySecurity recommends a minimum 16-inch depth with a minimum 2-inch ... -
Page 18: Using An Existing Pad
INSTALLATION To use an existing pad, take the following steps: USING AN EXISTING PAD 1. Remove any existing equipment from the pad. In many applications, SlideSmart may be a replacement operator for an existing gate system. 2. Measure the pad to ensure it is sized properly for SlideSmart. -
Page 19: Front Installation
INSTALLATION FRONT INSTALLATION The most common and cost effi cient type of installation is the front installation. See Figure 5 and Figure 6. Public Side Public Side Physical Stop (x2) Chain Secure Side Chain bracket (x2) Figure 5. Front Installation NOTICE Several different ways to mount the SlideSmart operator exists. -
Page 20: Rear Installation
INSTALLATION REAR INSTALLATION A rear installation requires additional idler wheels and gate brackets, but it provides aesthetics as the chain is not visible along the gate. See Figure 7. Chain to Gate 5" " 8" Side View Figure 7. Rear Installation SlideSmart DC Programming and Operations hysecurity.com | 800-321-9947 MX4505 Rev. -
Page 21: Unpacking The Operator
INSTALLATION UNPACKING THE OPERATOR Prepare the gate operator for installation. See Figure 8. 1. Open the top of the box and remove packing materials. 2. Cut open the box to access the operator. 3. Lift the cover up and off the base of the operator. DO NOT lift the cover by its lock. LATCH COVER BASE PLATE... -
Page 22: Concrete Pad Mount
INSTALLATION CONCRETE PAD MOUNT Install the operator, by taking the following steps: 1. Place the operator on the pad to best suit the conduit as shown in Figure 2. Use the operator as a template and center it on the pad. The chain path must be parallel with the gate. -
Page 23: Gate Bracket And Chain Installation
INSTALLATION 4. Attach the eye bolts to the brackets, and then GATE BRACKET AND CHAIN INSTALLATION attach the connector link between the chain 1. Secure the gate to prevent movement. and eye bolt. See Figure 11. 2. Measure for proper chain alignment BEFORE 5. -
Page 24: Aligning The Chain
INSTALLATION ALIGNING THE CHAIN 1. For a front installation, feed the chain over the sprocket and beneath the idler wheels. See Figure 12. CORRECT INSTALLATION 2. For a rear installation, see Figure 7. 3. In either situation, make sure the chain is properly aligned horizontal to the ground and parallel to the gate. -
Page 25: Connecting Battery And Turning Dc Power On
INSTALLATION C O N N E C T I N G T H E B AT T E RY A N D PROGRAMMING THE INITIAL SETUP TURNING DC POWER ON MENU 1. Connect the red battery wire to its spade Several sequential displays present information terminal. - Page 26 INSTALLATION Table 2. Menu Mode Navigational Buttons To navigate through To choose what is on To navigate between To edit the Menu the SELECTIONS the display menus Press NEXT. Press SELECT. Press SELECT. Press NEXT or PREV. Continue pressing Two top characters blinking characters Advance - press NEXT.
-
Page 27: Establishing The Open & Close Limits
INSTALLATION ESTABLISHING THE OPEN & CLOSE LIMITS CAUTION After programming the initial setup menus, the Do not install the target magnet before setting operator needs to establish the OPEN and CLOSE the OPEN and CLOSE limits. If the target limits. magnet is installed before setting the limits, the target magnet can get wound around the roller The LEARN LIMITS display automatically appears... -
Page 28: Installing The Target Magnet
INSTALLATION INSTALLING THE TARGET MAGNET CAUTION 1. With the gate CLOSED, mark the chain link To avoid damage to the idler wheel, the head directly across from target sensor that is closest of the screw must be fl ush with the chain rollers. to the trailing edge of the gate. - Page 29 INSTALLATION 8. To verify that the operator recognizes the 9. If “LEARN OPEN” appears, then the target target magnet, turn off both DC and AC power magnet was not detected. Check chain switches and watch the display go blank. Then, alignment and make sure the target magnet turn both switches on.
-
Page 30: Installing The Earth Ground
POWER Take the following steps to comply with NEC and INSTALLING THE EARTH GROUND NFPA 780 standards: An earth ground refers to the grounding rod and 1. Install a grounding rod per local building accompanying equipment ground which need codes. See Figure 21. to be installed to safeguard against potential electrical shock and damage to personnel and 2. -
Page 31: Wiring Ac Power
POWER WIRING AC POWER CAUTION DANGER Wiring of gate operators must conform to the Turn off AC power at the source (circuit breaker NEC standards and comply with all local codes. panel) before accessing the wires in the If you plan to connect to 208/230VAC power, SlideSmart junction box. -
Page 32: Wiring 115Vac Power
POWER WIRING 115VAC POWER NOTICE For standard 115VAC power connection: Table 4 assumes a dedicated circuit with an accessory power load up to 2A. Additional Verify AC power supply wires and low voltage loads require that the wire size be increased (12V &... -
Page 33: Wiring 208/230Vac Power
POWER 3. Toggle the voltage selector switch from 115V WIRING 208/230VAC POWER to 230V. Replace the High Voltage cover and CAUTION secure it. See Figure 23. All SlideSmart operators are shipped from the Voltage selector factory as 115VAC units. When connecting to switch set to 115V 208/230VAC power, the voltage selector switch on the AC power board must be moved to the... -
Page 34: Using A Solar Powered Operator
POWER USING A SOLAR POWERED OPERATOR D E S I G N R E Q U I R E M E N T S & CONSIDERATIONS HySecurity offers a solar version of the SlideSmart operator in 1ft/s or 2ft/s models. The solar Two standard 8Ah batteries are supplied with models have different internal wiring and include SlideSmart DCS and nominally support up to 1,500... -
Page 35: Connecting The Slidesmart Dcs To Solar Power
POWER Impediments to the sun’s rays reaching the CONNECTING THE SLIDESMART DCS TO solar panels. Elements such as, shade, improper SOLAR POWER alignment, or dirty panels will reduce the 1. Use 14 gauge wire or larger to connect the amount of power available. - Page 36 POWER 7. Turn both DC power switches ON and program NOTICE the Smart DC Controller. See Figure 26. See For extended battery backup installation "Programming the Initial Setup Menu" on instructions, refer to "Installing the Extended page 25. Battery Backup Kit" on page 40. Control Box 6.
-
Page 37: Connecting Peripherals To Solar Operators
POWER For example, the Smart DC Controller has specifi c CONNECTING PERIPHERALS TO SOLAR connections for photo eyes. When you attach OPERATORS photo eyes for entrapment protection, you wire the photo eyes to the EYE COM and +24VDC. To connect any peripheral devices to a solar When wired to these connections, the photo operator, use the 24VDC or 12VDC terminals. -
Page 38: Understanding Gate Activity Based On Solar Zones
POWER UNDERSTANDING GATE ACTIVITY BASED NOTICE ON SOLAR ZONES Remember, the sun is the only source of Use the solar maps to determine the number energy. If you need to increase the amount of solar hours per day that can be reasonably of gate travel per day (i.e. -
Page 39: Considerations For Dc-Powered Operators
POWER Batteries are rated to perform to capacity at IMPORTANT CONSIDERATIONS FOR DC- certain temperatures. Variations in temperature POWERED OPERATORS affect performance of the batteries. An example Since the operator is intended to run on of amp hour performance is shown in Table 6. batteries, control of the load is important. -
Page 40: Installing The Extended Battery Backup Kit
POWER INSTALLING THE EXTENDED BATTERY Screws (x4) BACKUP KIT Control Wire Access window Post-mounted operator with base extension Figure 30. Batteries Access 50Ah DANGER Posts not included in kit Accessory tray Make sure both the left and right 8Ah DC battery wires are disconnected. - Page 41 POWER 8. Connect the black wire to the black negative 10. Change the Battery Setting (BT) in the Installer terminal on the 50Ah battery. Connect its Menu to a number 1 (Extended). Follow the opposite end to the black lead exiting the steps in the menu tree shown here: support bracket.
-
Page 42: Initial Setup
DISPLAY AND MENU OPTIONS This section of the manual provides information TURNING BOTH POWER SWITCHES ON about the display and menu options. It includes AC and DC power switches are located on the how to: outside edge of the control box. See Figure 36. 1. - Page 43 DISPLAY AND MENU OPTIONS NOTICE The Smart DC Controller can be powered when either switch is turned on. If the DC power switch is OFF the motor and batteries are disconnected. The operator will not function (even though the AC power switch remains on). When the operator is connected to AC power and both switches are turned ON, the charge DC POWER...
-
Page 44: Using Smart Dc Controller Buttons In Menu Mode
DISPLAY AND MENU OPTIONS Run Mode - gate is operational awaiting USING THE SMART DC CONTROLLER commands. Refer to Using the Smart DC BUTTONS IN MENU MODE Controller Buttons in "Run Mode" on page The buttons on the Smart DC Controller let you navigate, change, or clear the information in the ... -
Page 45: Run Mode
DISPLAY AND MENU OPTIONS RUN MODE USING THE SMART DC CONTROLLER BUTTONS IN RUN MODE Gate status displays appear when the operator is ready and waiting for a gate operation command. The Run Mode buttons are distinguished by the When the menu display is flashing “GATE fact that their name appears above each button. -
Page 46: Viewing Operator Status Displays
DISPLAY AND MENU OPTIONS VIEWING OPERATOR STATUS DISPLAYS Press the MENU button once and the operator status displays appear in two second intervals. Pertinent information appears to provide a quick overview of the operator’s status or confi gurations. Refer to Table 7. Table 7. -
Page 47: User Menu
DISPLAY AND MENU OPTIONS USER MENU ADJUSTING THE CLOSE TIMER The User Menu consists of several items which The close timer assigns how many seconds will can be modifi ed using the Smart DC Controller pass before the operator initiates automatic buttons. -
Page 48: Setting The Time And Date
DISPLAY AND MENU OPTIONS A gate status appears in the display indicating SETTING THE TIME AND DATE you have returned to Run Mode. A feature of the Smart DC Controller is its 24-hour, 365 day clock. Make sure it is set to the appropriate 1. - Page 49 DISPLAY AND MENU OPTIONS Table 8. AC Power Loss Menu Menu Setting Description Normal gate functions continue until system detects battery voltage drop below 21V. DEAD BATTERY appears on display and gate automatically opens. Any pushbutton CLOSE command will close gate and any OPEN command AP 0 AC LOSS will re-open gate.
-
Page 50: Adjusting The Display Contrast
DISPLAY AND MENU OPTIONS To designate what you want operator to do during ADJUSTING THE DISPLAY CONTRAST an AC power loss, access User Menu (see "User The display contrast can be adjusted from 1 to 9 Menu" on page 47 and Figure 43) and scroll to increase visibility and ease of use. - Page 51 DISPLAY AND MENU OPTIONS Table 9. Smart DC Controller - User Menu Functions Setting Options Associated Ref. User Menu (Bold = Factory Menu Tasks and Explanations DC Controller Display Settings) Connections Assign how many seconds before open gate initiates automatic 0 = Timer closure.
- Page 52 DISPLAY AND MENU OPTIONS Table 9. Smart DC Controller - User Menu Functions Setting Options Associated Ref. User Menu (Bold = Factory Menu Tasks and Explanations DC Controller Display Settings) Connections (N/A) Controls warn-before-operate BF 2 (ON 2 SEC) WARN BEFORE OPER buzzer and can be confi...
- Page 53 DISPLAY AND MENU OPTIONS Table 9. Smart DC Controller - User Menu Functions Setting Options Associated Ref. User Menu (Bold = Factory Menu Tasks and Explanations DC Controller Display Settings) Connections Under some extreme high or low LD 5 temperature conditions, it may be LCD CONTRAST necessary to adjust LCD contrast.
-
Page 54: Installer Menu
DISPLAY AND MENU OPTIONS In the following pages, a detailed view of the more 1. Start at a gate status display. To bypass the commonly used menus is provided. Operator Status Displays, press the MENU button twice. See Figure 45. ... -
Page 55: Resetting The Open And Close Limits
DISPLAY AND MENU OPTIONS 8. An ALERT 15 message appears on the RESETTING THE OPEN AND CLOSE LIMITS display. To clear the alert, perform a full cycle On occasion, the open and close limits may need so the software recognizes the target. Press to be fi... -
Page 56: Adjusting Gate Speed
DISPLAY AND MENU OPTIONS ADJUSTING GATE SPEED 1. Start at a gate status display. The gate speed can be increased or decreased HYSECURITY a ¼ foot per second from the operator’s default GATE CLOSED speed. See Figure 49 NOTICE OPEN CLOSE STOP MENU... -
Page 57: Adjusting The Ies Sensitivity
DISPLAY AND MENU OPTIONS ADJUSTING THE IES SENSITIVITY SlideSmart uses a primary Type-A inherent SE 2 entrapment sensor (IES) per UL325 Safety IES SENSITIVITY Standards. A solid immovable object blocking the gate will trip the IES and cause the operator to stop and reverse (for two seconds) and enter OPEN CLOSE... - Page 58 DISPLAY AND MENU OPTIONS Gate maintenance - Gate rollers will deteriorate 1. Start at a gate and begin to fail over time. Gravel or dirt roads status display. will incur more debris in the gate rail or inverted HYSECURITY GATE CLOSED V-track than a paved surface.
-
Page 59: Reinstating Factory Defaults
DISPLAY AND MENU OPTIONS REINSTATING FACTORY DEFAULTS 1. Start at a gate status display. Eleven menu confi gurations are available in the HYSECURITY User Menu. Several other items in the Installer GATE CLOSED Menu let you customize the operator depending on the number of attached accessories and your OPEN CLOSE... -
Page 60: Enabling The Fire Department Override
DISPLAY AND MENU OPTIONS ENABLING THE FIRE DEPARTMENT 1. Start at a gate OVERRIDE status display. HYSECURITY GATE CLOSED Many counties and cities require a Fire Department override system for gate operators. The fire department’s alert system is a separate unit that OPEN CLOSE STOP... - Page 61 DISPLAY AND MENU OPTIONS Table 10. Smart DC Controller - Installer Menu Functions Setting Options DC Controller Ref. User Menu (Bold = Factory Menu Tasks and Explanations Display Display Settings) Connections A setting of 1 places the operator LL 0 into its learn limits mode which 0 = Normal LEARN LIMITS...
- Page 62 DISPLAY AND MENU OPTIONS Table 10. Smart DC Controller - Installer Menu Functions Setting Options DC Controller Ref. User Menu (Bold = Factory Menu Tasks and Explanations Display Display Settings) Connections Designates how quickly gate OS 5 DC 15 opens. Options available differ OPEN SPEED 0 = 0.75 ft/s depending on Operator Type (OT).
- Page 63 DISPLAY AND MENU OPTIONS Table 10. Smart DC Controller - Installer Menu Functions Setting Options DC Controller Ref. User Menu (Bold = Factory Menu Tasks and Explanations Display Display Settings) Connections Establishes communication after *See note on previous SG 0 (OFF) 0 = solo wiring two or more gate operators SEQUENCED GATE...
- Page 64 DISPLAY AND MENU OPTIONS Table 10. Smart DC Controller - Installer Menu Functions Setting Options DC Controller Ref. User Menu (Bold = Factory Menu Tasks and Explanations Display Display Settings) Connections In a Usage Class 4 environment, 0 = stop, SS 0 (OFF) operator can be set to stop gate IES STOP ONLY...
- Page 65 DISPLAY AND MENU OPTIONS Table 10. Smart DC Controller - Installer Menu Functions Setting Options DC Controller Ref. User Menu (Bold = Factory Menu Tasks and Explanations Display Display Settings) Connections Default setting is non-reversal if 0 = Open eye EO 0 (STOP ONLY) open photo eye is triggered while EYE OPEN LOGIC...
- Page 66 DISPLAY AND MENU OPTIONS Table 10. Smart DC Controller - Installer Menu Functions Setting Options DC Controller Ref. User Menu (Bold = Factory Menu Tasks and Explanations Display Display Settings) Connections 0 - disabled S1 0 UL 325 - 2018 sensor input setting SENSOR #1 TYPE 1 - (NOT USED) for external entrapment protection...
- Page 67 DISPLAY AND MENU OPTIONS Table 10. Smart DC Controller - Installer Menu Functions Setting Options DC Controller Ref. User Menu (Bold = Factory Menu Tasks and Explanations Display Display Settings) Connections Default is for full reversal when 0 = Pause closing IR 1 REVERSE Inside Obstruction Loop is only...
- Page 68 DISPLAY AND MENU OPTIONS Table 10. Smart DC Controller - Installer Menu Functions Setting Options DC Controller Ref. User Menu (Bold = Factory Menu Tasks and Explanations Display Display Settings) Connections Confi gures function of the RL 1 0 DISABLED user 1 output relay, which is an RELAY 1 LOGIC electromechanical relay.
- Page 69 DISPLAY AND MENU OPTIONS Table 10. Smart DC Controller - Installer Menu Functions Setting Options DC Controller Ref. User Menu (Bold = Factory Menu Tasks and Explanations Display Display Settings) Connections This function monitors activation LT 3 (75 SECS) of the Outside Obstruction Loop LOITERING ALERT when there is no activation of 0 = 0 seconds...
- Page 70 DISPLAY AND MENU OPTIONS Table 10. Smart DC Controller - Installer Menu Functions Setting Options DC Controller Ref. User Menu (Bold = Factory Menu Tasks and Explanations Display Display Settings) Connections 0 = Run mode ILD 0 (RUN MODE) IN OBS LOOP SET 1 = Show Controls Hy5A or Hy5B Inside frequency...
-
Page 71: Smart Dc Controller
SMART DC CONTROLLER This section provides information about the Smart DC Controller board; its inputs for peripheral connections and its monitoring capabilities. This section explains how to: 1. Make connections on the Smart DC Controller 2. Connect Vehicle Detector 3. Connect Accessory Devices •... -
Page 72: Overview Of The Smart Dc Controller
SMART DC CONTROLLER OVERVIEW OF THE SMART DC CONTROLLER The Smart DC Controller uses LED’s to indicate active inputs when AC power is present. For operators that use only DC power, you can push a button to show the active inputs. This button is at the bottom left corner near the EMERG OPEN input. - Page 73 SMART DC CONTROLLER All the control device inputs listed in Table 11 are shown as a single input. The second wire is connected to a Common Terminal Bus (1 - 8) on the Smart DC Controller board. The Fire Department Open input is an exception and requires a +24VDC input as well as activation through the Installer Menu.
- Page 74 SMART DC CONTROLLER Table 11. Smart DC Controller Board Inputs Outside Vehicle detector, box type Obstruction N.O. input. Outside reversing loop. connections outside reversing Vehicle loop Detector N.O. input. Shadow function used for swing Center gates or Reset Loop for barrier arms only. Vehicle detector, box type Loop However, User Relay 20 can be used in...
-
Page 75: Vehicle Detector Installation Options
SMART DC CONTROLLER Loop frequency is automatically set and VEHICLE DETECTOR INSTALLATION monitored by the Smart DC Controller OPTIONS Very low power draw, which is important for The Smart DC Controller provides a feature-rich maximum UPS capability during a power failure interface to four different vehicle detector inputs. -
Page 76: Connecting Hy5B Vehicle Detectors
SMART DC CONTROLLER There are four vehicle detector inputs available 5. Repeat Steps 1 through 3 for each Hy5B on the Smart DC Controller: detector. Free Exit Loop Detector - This opens a fully 6. To enable the detectors, turn on power. The closed gate or reopens a closing gate. - Page 77 SMART DC CONTROLLER If required, adjust the sensitivity using the rotary NOTICE switch which has the following eight settings: A boost feature is applied for settings 0 through A = Automatic 3. Boost increases the sensitivity during a call ...
-
Page 78: Install Standard 11-Pin Box Type Vehicle Detectors
SMART DC CONTROLLER 2. Connect 24 Volt power to the detector. INSTALLING STANDARD 11-PIN BOX TYPE Connect Pin No. 1 to a 24VAC or 24VDC VEHICLE DETECTORS terminal and Pin No. 2 to common. NOTICE 3. Connect output Pin No. 6 to the Common If photo eyes are used to monitor vehicle traffi... -
Page 79: Connecting Accessory Devices
SMART DC CONTROLLER CONNECTING ACCESSORY DEVICES Entrapment Sensor Connections Devices, such as gate edge sensors and photoelectric beams, must be installed to protect against entrapment. These external entrapment protection devices are required so the gate installation is in compliance with UL 325 Safety Standards. Figure 60 illustrates how to connect different sensors to the Smart DC Controller. -
Page 80: Manual Push Button Station
SMART DC CONTROLLER MANUAL PUSH BUTTON STATION A manual push button station controls the gate operator and opens, stops, and closes the gate. It is most often used by a guard in a 24-hour guard station. An example of the push button station connections on SlideSmart is shown in Figure 61. -
Page 81: User Relays - Programming Procedure
SMART DC CONTROLLER USER RELAYS - PROGRAMMING PROCEDURE Smart DC Controller is able to interface with many types of external devices through the use of two user programmable output relays. All user relay functions identifi ed and described in Table 13 are accessible in Installer Menu. - Page 82 SMART DC CONTROLLER Table 13. User-Programmable User Relays - Function Options Name Description Activates when gate is open longer than the user-selected period of time. Gate open too long Adjustable from a 0 second to 135 seconds delay in 15-second increments. output NOTE: TL - OPEN TIME ALERT adjustments can be made in Installer Menu.
- Page 83 SMART DC CONTROLLER Table 13. User-Programmable User Relays - Function Options Name Description External Latching Gate Not functional in SmartDC operators. Lock Output Gate at Partial Open Active when partial open position is reached or exceeded. Position Active when on AC power or the battery voltage is above 21V. When DC Power Alert used with User Relay 2, this option can shed electrical loads to conserve battery energy.
-
Page 84: Power Requirements
BI - PARTING GATE SYSTEMS Configuring two operators to be a Primary External control inputs, vehicle detectors and and Secondary pair is easy with the Smart DC external entrapment sensors may be connected Controller. There is no need to order a special to either gate operator without regard to model or any adapters. -
Page 85: Primary And Secondary Wiring Connections
BI - PARTING GATE SYSTEMS 2. Attach a ring terminal to the shield wire PRIMARY AND SECONDARY WIRING and connect it to the Smart DC Controller’s CONNECTIONS convenient ground screw. Refer to Figure 63. 1. As shown in Figure 63, connect a two-pair NOTICE twisted shielded communications cable to the DUAL GATE inputs in each unit. -
Page 86: Primary And Secondary Menu Setup
BI - PARTING GATE SYSTEMS Any control input that is attached to the PRIMARY AND SECONDARY MENU SETUP secondary unit will be recognized by the primary Determine which unit will be set up as the Primary. once the Installer Menu is properly confi gured The other unit will be set up as the Secondary. -
Page 87: Accessory Connections
ACCESSORY CONNECTIONS This section of the manual provides information 6. Mount an external antenna onto the top of a which may be useful when installing SlideSmart fi xed fence post near the operator. operators. It includes how to: 7. Connect the antenna into the socket on the ... -
Page 88: Installing A Lock For 12Vdc Or 24Vdc Systems
ACCESSORY CONNECTIONS INSTALLING A LOCK FOR 12VDC OR INSTALLING A LOCK FOR HIGH VOLTAGE 24VDC SYSTEMS SYSTEMS To install a lock for 12VDC or 24VDC systems, take To install a lock on higher voltage systems (115V the following steps: or 230V), take the following steps: 1. -
Page 89: Installing Vehicle Detectors And Loops
ACCESSORY CONNECTIONS INSTALLING VEHICLE DETECTORS AND 1. Start at a gate status display. LOOPS HYSECURITY GATE CLOSED A vehicle detector passes a small current fl ow through the “loop” which then becomes an OPEN CLOSE STOP MENU RESET inductive coil. When a vehicle passes over the loop, the detector senses the resultant drop in PREV NEXT... - Page 90 ACCESSORY CONNECTIONS 5. Loop and lead-in wire should be one continuous After the wire is installed, the slot must be piece. Avoid splices, if possible. If a splice is completely backfilled with a non-hardening necessary for any reason, “pot” the splice in sealer.
- Page 91 ACCESSORY CONNECTIONS PUBLIC SIDE This layout illustrates a bi-direc onal traffic system with ACCESS CONTROL DEVICE ENTER EXIT controlled access entry (card (Card reader, etc.) reader, radio control, etc.) and a free exit gate. The gate’s closure me is determined by the number of seconds entered in the OUTSIDE CLOSE TIMER display found in the...
-
Page 92: Monitored External Entrapment Sensors
ACCESSORY CONNECTIONS Three programmable sensor inputs are available MONITORED EXTERNAL ENTRAPMENT for use and must be programmed to a non-zero SENSORS number when initial confi guration is performed. As of January 2016, UL325 standard requires gate The three inputs are labeled Sensor 1, Sensor 2, operators to monitor the presence of all external and Sensor 3 and are confi... - Page 93 ACCESSORY CONNECTIONS After programming the sensor inputs in the installer menu or during initial startup, the appropriate type and number of sensors will need to be connected. Figure 73 below shows the wiring and dip switch settings of an EMX-MON photo eye (typical thru-beam wiring). A retrorefl ective photo eye will be similar and only have wiring similar to the receiver of the thru-beam photo eye.
-
Page 94: External Entrapment Protection
ACCESSORY CONNECTIONS • For pedestrian detection, mount thru-beam EXTERNAL ENTRAPMENT PROTECTION type photo eyes approximately 15" to 30" (4.6 Consult a photoelectric sensor manual for wiring to 9m) above the ground and as close to the details. Make all electrical connections to Smart gate as possible. -
Page 95: Photo Eye Function
ACCESSORY CONNECTIONS If the photo eye has an internal switch for setting Notes about retro-refl ective systems: Light Operate vs. Dark Operate, select Light Correct installation and alignment of a retro- Operate. If the photo eye has a relay output refl... - Page 96 ACCESSORY CONNECTIONS PUBLIC SIDE This layout illustrates a bi-direc onal traffic system with ACCESS CONTROL DEVICE ENTER EXIT controlled access entry (card (Card reader, etc.) reader, radio control, etc.) and photo eyes used as vehicle Placement of detectors. The gate’s closure photo eyes me is determined by the number OUTSIDE OBSTRUCTION...
-
Page 97: Edge Sensor Installation Tips
ACCESSORY CONNECTIONS Hard-wired edge sensor adaptors (like Hy2NC) EDGE SENSOR INSTALLATION TIPS have inputs for up to two resistor terminated Refer to Figure 72 to help plan the most appropriate edges and up to two NC contact outputs. placement of the edge sensors being installed. •... -
Page 98: Smart Dc Controller Troubleshooting
ACCESSORY CONNECTIONS SMART DC CONTROLLER TROUBLESHOOTING This section is available to help you troubleshoot any problems that may occur with SlideSmart operator. It provides information about Smart DC Controller display codes. The Smart DC Controller system includes many self diagnostics. Specifi c messages appear on LCD and Audio Alert buzzer sounds distinctive chirps. - Page 99 ACCESSORY CONNECTIONS Table 16. Smart DC Controller - Troubleshooting Description Display Alert, Error or Possible Causes Solutions Condition Fault 1. Turn AC power switch on or connect power to operator. 2. Reset operator AC power is shut off at source (breaker) circuit breaker or N o A C I n p u t or is not connected.
- Page 100 ACCESSORY CONNECTIONS Table 16. Smart DC Controller - Troubleshooting Description Display Alert, Error or Possible Causes Solutions Condition Fault 1. No AC Power. See above item. 2. Wiring / Connector problem - check all connections. Occurs when battery voltage has Clean or repair as dropped to less than 21V.
- Page 101 ACCESSORY CONNECTIONS Table 16. Smart DC Controller - Troubleshooting Description Display Alert, Error or Possible Causes Solutions Condition Fault Software is HYSECURITY being loaded Wait for software to fi nish Software is currently being loaded. LOADER into Smart DC loading. Controller.
- Page 102 ACCESSORY CONNECTIONS Table 16. Smart DC Controller - Troubleshooting Description Display Alert, Error or Possible Causes Solutions Condition Fault Smart DC Caused by removal of Hy5B or lack Controller has of integrity of socket connection. Remove and re-install detected a This message will also indicate which ALERT 10 the Hy5B and press...
- Page 103 ACCESSORY CONNECTIONS Table 16. Smart DC Controller - Troubleshooting Description Display Alert, Error or Possible Causes Solutions Condition Fault 1. Make sure target is properly fastened to chain. Target magnet on the chain 2. Check target sensor ALERT 15 Target magnet fell off or target sensor is missing or to make sure it is NO TARGET...
- Page 104 ACCESSORY CONNECTIONS Table 16. Smart DC Controller - Troubleshooting Description Display Alert, Error or Possible Causes Solutions Condition Fault 1. Check cable connections and wiring. Make sure both operators are working properly and have same current and up- to-date software versions.
- Page 105 ACCESSORY CONNECTIONS Table 16. Smart DC Controller - Troubleshooting Description Display Alert, Error or Possible Causes Solutions Condition Fault This fault can only occur if monitored P h o t o e y e i s FAULT 2 photo eye function check fails. See Correct malfunctioning missing or not PHOTO EYE...
- Page 106 ACCESSORY CONNECTIONS Table 16. Smart DC Controller - Troubleshooting Description Display Alert, Error or Possible Causes Solutions Condition Fault 1. Correct communication cable. 2. Verify each operator is confi gured properly via Installer Several possible causes: Menu. Set one operator as Primary, ...
- Page 107 ACCESSORY CONNECTIONS Table 16. Smart DC Controller - Troubleshooting Description Display Alert, Error or Possible Causes Solutions Condition Fault ERROR 6 Not used in STC-VFD SlideSmart. COMM ERR Software issue ERROR 7 exists that may Call HySecurity Technical MENU Corrupt software or data. require factory Support for assistance.
-
Page 108: Vehicle Detector And Loop Fault Diagnostics
ACCESSORY CONNECTIONS VEHICLE DETECTOR AND LOOP FAULT DIAGNOSTICS If HySecurity Hy5B vehicle detector modules are used, the Smart DC Controller has the ability to store and report detector and loop fault information for performance diagnostics. If the Smart DC Controller senses a loop or detector problem: ... - Page 109 ACCESSORY CONNECTIONS Even if the loop problem self heals, historical Table 18. Setting Loop Presence data about detector/loop performance and a Sub-menu Example Site log of Alerts, Faults and Errors can be retrieved Display Item Scenario from the Smart DC Controller by downloading With sensitivity set to from the RS232 communications port or the USB A (AUTO) and a large...
- Page 110 ACCESSORY CONNECTIONS Frequency: Table 19. Hy5B Vehicle Detector Call Level Knowing the exact frequency of a loop can Display be useful as a diagnostic tool, and verifying Setting the stability of the loop frequency is valuable Options Installer information. To view the actual loop frequency LCD Description (Bold = of a specifi...
-
Page 111: Schematics
SCHEMATICS SLIDESMART SCHEMATICS Figure 78 illustrate the schematics for SlideSmart DC 15 and SlideSmart DC 10F. Figure 79 shows the solar version. Figure 78. SlideSmart DC 15 and DC10F Schematics MX4505 Rev. E ©2020 SlideSmart DC Programming and Operations hysecurity.com | 800-321-9947... - Page 112 SCHEMATICS Figure 79. SlideSmart DC 15 and DC10F Solar Schematics SlideSmart DC Programming and Operations hysecurity.com | 800-321-9947 MX4505 Rev. E ©2020...
-
Page 113: Maintenance
MAINTENANCE 3. Enter your user name and password. If you do GENERAL MAINTENANCE not have a user name, register as an online Smart Touch Analyze and Retrieve Tool member. HySecurity provides Smart Touch Analyze and 4. Click to Download: S.T.A.R.T. software for Retrieve Tool (START) software to help HySecurity Smart Touch and Smart DC. -
Page 114: Setting User Account Controls
MAINTENANCE SETTING USER ACCOUNT CONTROLS MECHANICAL MAINTENANCE Because of the security settings inherent in VISTA CAUTION and Windows 7, you need to disable the “user Before checking internal mechanisms of account controls” in the operating system before operator, turn off all power switches. uploading START software onto your laptop. -
Page 115: Drive Belt Tension And Alignment
MAINTENANCE DRIVE BELT TENSION AND ALIGNMENT Proper drive belt tension is important for prolonging the life of the drive belt and maintaining the superior performance of the operator. To check the drive belt tension, take the following steps: 1. Remove the SlideSmart cover and protection Slide the motor plate. -
Page 116: Dc Battery Replacement
MAINTENANCE 2. To access the 8Ah batteries and disconnect its DC BATTERY REPLACEMENT wires, cut the two black wire ties and slide the HySecurity provides a one year warranty from the 8Ah batteries through the access window. See date of shipment for all batteries supplied with Figure 83. -
Page 117: Clock Battery Replacement
MAINTENANCE NOTICE If you have diffi culty removing the batteries through the access hole, an optional method for battery replacement is to remove the control box. Four Phillips-head screws secure the control box to the chassis. Remove the screws and remove the control box to access the batteries. Be careful that you do not inadvertently disconnect the control box wire bundles. - Page 118 APPENDIX A - INSTALLATION CONFIGURATIONS This appendix contains drawings of the various installation confi gurations for the SlideSmart operator. Provided in this appendix are drawing specifi cations for: Concrete pad layout and dimensions Conduit and ground Base extension ...
- Page 119 APPENDIX A - INSTALLATION CONFIGURATIONS Gate 3.25 Chain, #40 Roller 2.50 Chain to Gate 5.50 2.66 6.75 x12 10.50 Conduit Min Pad Size Area 1.63 Provisions for qty 4 1/2-13 X 3 1/2 Concrete Anchors 4.31 10.38 (1/2 inch slot in either direction) 19.0 Min Pad Size Chain...
- Page 120 APPENDIX A - INSTALLATION CONFIGURATIONS Gate 3.25 Chain 2.50 Chain to Gate 20.0 Operator 18.0 Length Route 6 AWG ground wire through conduit & attach to ground lug provided. 17.7 Operator Width 20.7 Operator Height Earth Ground High Voltage Master/Slave Wires (Optional) Vehicle Loop Consult local...
- Page 121 APPENDIX A - INSTALLATION CONFIGURATIONS 3.25 Gate 2.50 Chain Chain to Gate If no batteries In Base Riser - Conduit Area is 8.5"x12" 5.50 2.66 12.5 10.50 17.5 6x8.5 Conduit Area 4X 1/2" x 3 1/2" Concrete Anchors 10.38 3.25 2.50 18.0 CHAIN TO GATE...
- Page 122 APPENDIX A - INSTALLATION CONFIGURATIONS 3.25 2.50 Gate Chain Chain to Gate 2.66 10.50 6.75 x 9 Conduit 17.5 Area U-bolts provided for 4" OD pipe (slot allows for 3.5-4.5" OD pipe. For best results, HySecurity recommends welding plate to posts. 5.00 4.00 .625...
- Page 123 APPENDIX A - INSTALLATION CONFIGURATIONS 3.25 2.50 Chain to Gate 2.66 If no batteries In Base Riser - Conduit Area is 7"x9" 10.50 17.5 4.5 x 7 Conduit U-bolts provided for 4" OD pipe (slot allows for Area 3.5-4.5" OD pipe). For best results, HySecurity recommends welding plate to posts.
- Page 124 APPENDIX A - INSTALLATION CONFIGURATIONS 4.75 7.75 3.25 NOTE: DRAWING IS NOT TO SCALE. Figure 92. Rear Mounted Installation SlideSmart DC Programming and Operations hysecurity.com | 800-321-9947 MX4505 Rev. E ©2020...
- Page 125 APPENDIX A - INSTALLATION CONFIGURATIONS SlideSmart Operator Only - Cover On SlideSmart Operator Only - Cover Removed NOTE: DRAWING IS NOT TO SCALE. Figure 93. Plan and Elevation Views - Operator Only MX4505 Rev. E ©2020 SlideSmart DC Programming and Operations hysecurity.com | 800-321-9947...
- Page 126 APPENDIX A - INSTALLATION CONFIGURATIONS SlideSmart Operator On Optional Base Riser - Cover On SlideSmart Operator On Optional Base Riser - Cover Removed NOTE: DRAWING IS NOT TO SCALE. Figure 94. Plan and Elevation Views - Operator on Base Riser SlideSmart DC Programming and Operations hysecurity.com | 800-321-9947 MX4505 Rev.
- Page 127 APPENDIX A - INSTALLATION CONFIGURATIONS SlideSmart Operator On Optional Post Mount - Cover On SlideSmart Operator On Optional Post Mount - Cover Removed NOTE: DRAWING IS NOT TO SCALE. Figure 95. Elevation Views - Operator Post Mounted, Idlers Lowered MX4505 Rev. E ©2020 SlideSmart DC Programming and Operations hysecurity.com | 800-321-9947...
-
Page 128: Appendix B - French Translations
APPENDIX B - FRENCH TRANSLATIONS FRENCH TRANSLATIONS The following French translations provided below are found in the Safety Section located at the beginning of the manual. English French INSTRUCTIONS DE SÉCURITÉ IMPORTANTES IMPORTANT SAFETY INSTRUCTIONS AVERTISSEMENT – Pour réduire les risques de WARNING –... - Page 129 APPENDIX B - FRENCH TRANSLATIONS FRENCH TRANSLATIONS The following French translations provided below are found in the Safety Section located at the beginning of the manual. English French INSTRUCTIONS DE SÉCURITÉ IMPORTANTES IMPORTANT SAFETY INSTRUCTIONS AVERTISSEMENT – Pour réduire les risques de WARNING –...
- Page 130 APPENDIX B - FRENCH TRANSLATIONS FRENCH TRANSLATIONS The following French translations provided below are found in the Safety Section located at the beginning of the manual. English French INSTRUCTIONS DE SÉCURITÉ IMPORTANTES IMPORTANT SAFETY INSTRUCTIONS AVERTISSEMENT – Pour réduire les risques de WARNING –...
- Page 131 APPENDIX B - FRENCH TRANSLATIONS FRENCH TRANSLATIONS The following French translations provided below are found in the Safety Section located at the beginning of the manual. English French INSTRUCTIONS DE SÉCURITÉ IMPORTANTES IMPORTANT SAFETY INSTRUCTIONS AVERTISSEMENT – Pour réduire les risques de WARNING –...
-
Page 132: Parts & Limited Warranty
PARTS & LIMITED WARRANTY SLIDESMART PARTS Board, Smart DC Controller Buzzer Reset Switch, Internal Switch, On/Off Detector, Vehicle Circuit Breaker Switch, On/Off Board, Power Supply Cover, 2-Piece Belt, Drive Pulley, Motor Pulley, Gearbox Gearbox Motor, Electric Transformer Brush Kit Sprocket Target, Magnet Chain Idler Wheel... -
Page 133: Slidesmart Parts List
PARTS & LIMITED WARRANTY SLIDESMART PARTS LIST Table 20. SlideSmart DC Price Book List Part Name Part Number SlideSmart Models Base Extension MX002094 Battery Kit, 50 AH, Replacement MX002013 Battery Kit, 8 AH, Replacement MX002008 Belt, Drive, SlideSmart DC 10F MX002107 SlideSmart 10F Belt, Drive, SlideSmart DC 15... -
Page 134: Warranty
WARRANTY 6705 S 209 St, Ste 101 Kent, WA 98032 800-321-9947 WARRANTY www.hysecurity.com 1. Warranty. HySecurity- manufacture. the Distributor, to ensure that depending on whether (1) the product is purchased through an authorized It is therefore important that you register your product with HySecurity, online at www.hysecurity.com/warranty, within the 60-day period described below. -
Page 135: Slidesmart Dc Specifications
(This page intentionally blank) MX4505 Rev. E ©2020 SlideSmart DC Programming and Operations hysecurity.com | 800-321-9947... - Page 136 SPECIFICATIONS ™ 4 SlideSmart DC Models, AC and Solar FAST Standard SlideSmart DC 10F SlideSmart DC 15 Solar SlideSmart DCS 10F SlideSmart DCS 15 1,000 lb (453 kg) 1,500 lb (680 kg) Gate Weight Max. 40 ft (12 m) Gate Length Max. 200 lb 300 lb Pull Force*...
Need help?
Do you have a question about the SlideSmart DC Series and is the answer not in the manual?
Questions and answers