Table of Contents
Advertisement
Quick Links
Advertisement
Table of Contents
Troubleshooting

Related Manuals for KISS REBREATHERS Classic KISS

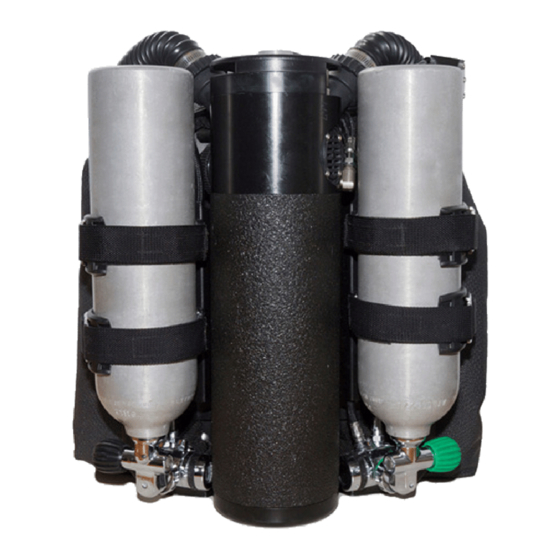
Summary of Contents for KISS REBREATHERS Classic KISS
- Page 1 KISS REBREATHERS CLASSIC KISS MANUAL MSL 72.125 Jetsam/Classic KISS manual R.5...
- Page 2 READ THE MANUAL!!!! IN ORDER TO FULLY UNDERSTAND YOUR NEW REBREATHER, THE COMPONENTS, HOW THEY WORK, HOW TO HANDLE AND TREAT THEM, YOU MUST READ THE MANUAL IN FULL, FOR YOUR REBREATHER. SPORT KISS OWNERS SHOULD READ THE SPORT KISS MANUAL. CLASSIC KISS OWN- ERS SHOULD READ THE CLASSIC KISS MANUAL. EXPLORER OWNERS SHOULD READ BOTH THE EXPLORER AND CLASSIC MANUALS. CLASSIC OWNERS WHO HAVE UP- GRADED TO SOME OF THE EXPLORER COMPONENTS SHOULD READ BOTH THE CLAS- SIC AND EXPLORER MANUALS. THIS SHOULD BE DONE PRIOR TO DIVING OR SERVICING THIS UNIT!!! SPECIAL AT- TENTION SHOULD BE PAID TO ALL NOTES &/OR WARNINGS; THEY MUST BE READ AND UNDERSTOOD!!!! FAILURE TO DO SO, MAY CAUSE SERIOUS INJURY OR DEATH!!!! YOU MUST BE A LEGAL ADULT IN THE AREA IN WHICH YOU LIVE IN ORDER TO PURCHASE AND DIVE A KISS RE- BREATHER. As with all scuba diving equipment, your KISS rebreather components should be ser- viced annually by a trained technician. For those diving frequently, servicing may be required more often. ALL INFORMATION IN THIS MANUAL IS SUBJECT TO CHANGE. Please visit our website, www.kissrebreathers.com/manuals.html, for updated manuals. MSL 72.125 Jetsam/Classic KISS manual R.5...
- Page 3 All components of the Classic KISS must be in good working order and be properly assembled and tested to reduce the risk of failure. Regardless of the training and experience of the diver and the reliability of the re- breather the risk of serious injury and/or death can never be reduced to zero. This manual is not a complete text on the maintenance and operation of the Classic KISS. The diver must complete a proper training course covering the maintenance, testing and operation of the rebreather before diving this equipment. The rebreather can malfunction while diving even when properly assembled and having passed all pre-dive tests. Only carrying adequate bailout gas and having the training and skills necessary to utilize the bailout system can reduce, but never eliminate, the risk of equipment failure. MSL 72.125 Jetsam/Classic KISS manual R.5...
- Page 4 MSL 72.125 Jetsam/Classic KISS manual R.5...
-
Page 5: Table Of Contents
Training & Basic Skills Page 82 Scrubber Duration Page 83 Warranty Page 84 O-Ring List Page 85 The photographs in this manual were taken by Curt Bowen, Alan Studley, Doug Ebersole, and Kim Mikusch. MSL 72.125 Jetsam/Classic KISS manual R.5... -
Page 6: Information
And when you take a piece of equipment into water, especially salt water, that could happen sooner rather than later. Due to this, we have built the KISS rebreathers to have the least amount of components possible and to make the components that we use durable and easily repairable if required. - Page 7 With the KISS rebreathers, you know that you should have both a good positive and negative test. If you don’t, there is a leak. If you aren’t sure if the test is good, then you probably have a small leak. Testing is easy to do, as both the lungs and loop hoses are accessible and are the key components which need to be watched while testing.
- Page 8 Please see the back of the manual for more information on absorbent and run times. Absorbent can easily be obtained at most dive resorts and is easy to pack for travel, should the need arise. The Classic KISS has an axial flow design.
- Page 9 Is it flexible and will it meet all your diving needs? The Classic KISS is an exceptional unit for explorers of all kinds as it is extremely reliable and flexible. Cave, wreck, and deep divers choose it as it is easy to travel with, light enough to carry into remote areas, and for those that just want to do a basic reef dive, it’s small and easy to use.
-
Page 10: Specifications
The Classic KISS Rebreather Kit comes with the O-rings NOT installed. You will have to do this yourself. However, the O- rings for the mouthpiece, ADV, manual add valve and the displays are already in place. -
Page 11: Parts List
Additional LP and HP swivels. EXTRAS: We are happy to supply you with more LP swivel elbows, HP swivel elbows, webbing tank straps, off-board gas acces- sory. MSL 72.125 Jetsam/Classic KISS manual R.5... -
Page 12: Schematic
Schematic Illustration By Curt Bowen, Advanced Diver Magazine www.advanceddivermagazine.com MSL 72.125 Jetsam/Classic KISS manual R.5... -
Page 13: Components
J. Oxygen Tank and First Stage: 13 cuft tanks are recommended. K. Diluent Tank and First Stage: The Classic KISS is compatible with either air or trimix as a diluent gas. 13 cuft tanks are recommended. -
Page 14: Unpacking & Disassembly
Unpacking & Disassembly After removing your new Classic KISS from the crate, ensure that you have a DSV, 2 breathing hoses, 4 hose stubs, dis- plays (if ordered), 2 counterlungs, 1 CD’s, and of course, the rebreather. First, various components will need to be disassembled in order to install the O- Rings. - Page 15 O-Rings. From that bag, set aside the bags labeled “mouthpiece” and “MAV” These O-Rings are spares. The unit comes with the O-rings installed in the DSV, manual add valve, ADV and the displays. MSL 72.125 Jetsam/Classic KISS manual R.5...
-
Page 16: O-Ring Installation
O-rings should be checked annually, and serviced as required. For those doing extensive diving, the vari- ous components and O-rings should be checked more frequently. Servicing of your Classic KISS can be done by you, your dealer, or the parts can be returned to us. You are now ready to start installing the O-rings. First, un- screw the counterlung attachments and the exhaust valve and remove them from the scrubber head. - Page 17 Install the last 2 large O-rings, a 248 and a 250 on the bottom of the scrubber canister. The 248 goes in the radial grove and the 250 in the axial groove. *WARNING: IT IS IMPORTANT THAT ALL O-RINGS ARE IN GOOD CONDITION, THAT THE COMPONENTS ARE NOT DAMAGED AND THAT THE SEALING AREAS ARE CLEAN. IF THEY AREN’T, THE O- RINGS MAY LEAK CAUSING THE REBREATHER TO FLOOD. THIS MAY LEAD TO SERIOUS INJURY OR DEATH!!! ALSO, IF THE THREADED ROD IS DAMAGED, IT MAY BE DIFFICULT OR IMPOSSIBLE TO ATTACH THE DRAWNUT. IF THE DRAWNUT IS EXTREMELY DIFFICULT TO ATTACH, IT MAY PULL THE ROD OUT OF THE BOTTOM FIXTURE!! IF THIS HAPPENS, YOU WILL NOTICE THAT IT IS VERY DIFFI- CULT TO ATTACH AND THAT THE HEIGHT OF THE ROD HAS CHANGED! MSL 72.125 Jetsam/Classic KISS manual R.5...
-
Page 18: Assembly
When secure, place the scrubber tube inside the canister. Reattach the scrubber head to the counterlung case using the two large flat head screws. It should be securely attached without over-tightening. Reattach the diluent addition hose. MSL 72.125 Jetsam/Classic KISS manual R.5... -
Page 19: Counterlungs
COUNTERLUNGS: The Classic KISS uses two back mounted counterlungs that are available in two sizes; 2 & 4 liter capacity. A com- bination of these will normally provide a good match between the counterlung volume and the divers tidal volume. -
Page 20: Counterlung Size
This will cause either a decrease in lung volume &/or will in- crease the work of breathing. See the note at the top of the page. MSL 72.125 Jetsam/Classic KISS manual R.5... -
Page 21: Manifold
MANIFOLD: In the past, Classic KISS units were shipped with the manifold attached to the counterlung case, via plate and screws. New units are now shipped with the manifold attached to the case via a quick release system. -
Page 22: Quick Disconnects
Quick Disconnects The Classic KISS is shipped with the QR hose adapters already installed on the mouthpiece and the QR hose at- tachment towers already installed on the scrubber head. *NOTE: IN THE PAST, THE TOWERS WERE SEALED ONTO THE SCRUBBER HEAD AND WERE NOT TO BE REMOVED. THE TOWERS NOW SEAL WITH AN O-RING. THE O-RINGS HAVE BEEN IN- STALLED FOR YOU. WHILE THE TOWERS ARE DIFFICULT TO TURN, IT IS STILL IMPORTANT THAT THEY ARE NOT ACCIDENTLY UNSCREWED WHILE REMOVING OR INSTALLING THE BREATHING HOSE. A LOOSE TOWER WILL LEAK!!! *NOTE: The old method of attaching the loop hoses to the quick disconnect hose stubs, re- quired the black plastic ring and a standard hose clamp. In the past this method was required due to the lack of the quick disconnect system. As we now have the quick connect system and are not continuously attaching and removing ... - Page 23 Repeat to attach the other hose ends to the hose attachments. Use the same method to attach the breathing hose to the QR hose attachment towers. Note that the attachment method is similar to opening and closing a child proof medicine bottle. *SERVICE: THE O-RINGS ON THE HOSE STUBS AND THE CORRESPONDING SURFACES ON THE DSV ADAPTERS AND HOSE ATTACHMENTS SHOULD BE LUBRICATED ON A REGULAR BASIS. PRIOR TO DIVING, ENSURE THAT HOSES HAVE BEEN PROPERLY ATTACHED TO THE TOWERS AND TO THE DSV!!! FAILURE TO DO SO COULD CAUSE INJURY OR DEATH!!! MSL 72.125 Jetsam/Classic KISS manual R.5...
-
Page 24: Tank/Bcd Installation
The Classic KISS should be positioned so that it sits as high as possible on the divers back. Also, the harness sys- tem should keep the rebreather tight to your back. If the unit is sitting low or loose, the work of breathing will increase. -
Page 25: Changing The Scrubber
797 grade; this is the brand we recommend. Changing the scrubber on the Classic KISS is an easy process. Start by removing the top hat and the large brass draw nut which secures the scrubber canister to the scrubber head and then remove the canister. - Page 26 Wipe away any dust from the top and inside edge of the canister and also from the outside of the inner tube. These surfaces, A, B, C, should be lightly lubricated. On the bottom of the scrubber head are three O-rings, A, B, C, these should also be lightly lubricated. MSL 72.125 Jetsam/Classic KISS manual R.5...
-
Page 27: Positive/Negative Testing
POSITIVE / NEGATIVE TESTING: Once the Classic KISS has been completely assembled, you are ready to do the positive and negative pressure tests. While these tests will give you the best indication of any leaks in the system, it is still a good idea to do a quick bubble check when you enter the water. - Page 28 After the test is complete and you open the DSV, again you will hear the sound of the pressure being released. This is important! MSL 72.125 Jetsam/Classic KISS manual R.5...
- Page 29 MSL 72.125 Jetsam/Classic KISS manual R.5...
-
Page 30: Sensor Installation
*WARNING: On the following pages are the calibration instructions for the displays systems. It is essential that the calibration procedures are followed properly. Failure to do so can cause in- jury or death!! First, remove the hat from the scrubber head. Then, remove the 6 screws securing the kidney using a 5/32 alan wrench. Lift the kidney off the scrubber head. MSL 72.125 Jetsam/Classic KISS manual R.5... - Page 31 Replace the kidney plate on the scrubber head, ensuring that the wires are not pinched under the plate. *WARNING: If the wires are pinched under the plate, the scrubber head will not be water tight. Water damage in this area will ruin the sensors and/or the electronics. If the wires do get pinched, inspect them for damage!! Using a 5/32 Allen wrench, secure the 6 screws which hold the kidney plate in place. *WARNING: Do not over tighten the screws that secure the kidney plate as the head can be stripped. Use just 2 fingers on the Allen wrench to tighten. Remember, you just need to squeeze the O-rings to seal!!! MSL 72.125 Jetsam/Classic KISS manual R.5...
-
Page 32: Jetsam Triple Display, Info & Calibration
The lever must be pushed over in order for the dial to be turned in this direction. Once in this position, a small port will open to allow access to the meter. Insert the jewellers screwdriver into the port and gently turn the screw to adjust the reading. MSL 72.125 Jetsam/Classic KISS manual R.5... - Page 33 Once the displays have been calibrated, close the calibration ports on the back of the displays. *WARNING: DO NOT FORGET TO CLOSE THE CALIBRATION PORTS ON THE DISPLAYS. THE DIS- PLAYS WILL NOT BE WATER-TIGHT WITH THE PORTS OPEN!! The KISS rebreather should be flushed with oxygen on every dive to ensure that the displays are reading correctly, and re-calibrated every time the absorbent is changed. MSL 72.125 Jetsam/Classic KISS manual R.5...
- Page 34 To change the batteries, remove the four outer screws on the back of the display case and carefully remove the cover. After changing the battery and logging the date, ensure that the o-ring is LIGHTLY lubricated and clean prior to replacing the cover. MSL 72.125 Jetsam/Classic KISS manual R.5...
-
Page 35: Replacing Batteries, Meters, Circuit Boards
It will be snug. If you like, you can use a tool such as a dental pick to assist you or one of the small jewellers screw drivers from your tool kit. HOWEVER, be very careful that you do not damage the circuit board!! Replace the battery, meter or circuit board, as required. MSL 72.125 Jetsam/Classic KISS manual R.5... - Page 36 Then tighten the screws until the back is secure and seated properly. While it is important that the screws are tight enough, it is also important that they are not over tightened. Remember, the O-ring creates the seal. MSL 72.125 Jetsam/Classic KISS manual R.5...
-
Page 37: Replacing A Single Display Case
If you tap on any other part of the case, use too much force or twist it, you can dam- age the case which could cause breakage at a later date. MSL 72.125 Jetsam/Classic KISS manual R.5... - Page 38 *NOTE: Only tap the cases by the puzzle pieces, as per above instructions. If you tap the cases on the outer edges, as shown in the two above photos, you will stress the plastic. This will cause breakage. Following the directions on page 36, insert the circuit board assembly into the case, reattach the wire to the board, insert the O-ring and seal the case. MSL 72.125 Jetsam/Classic KISS manual R.5...
-
Page 39: Replacing The Wire
To remove the wire from either the Classic KISS sensor plate or the Sport KISS three hose connector, you will need to remove the white molex connector. -
Page 40: Display Troubleshooting
When sea water comes in contact with electronics, even if it is just a small amount it is difficult to determine where and how bad the damage is. It could even be in the wire. When in doubt, change the wire, cir- cuit board and meter. MSL 72.125 Jetsam/Classic KISS manual R.5... -
Page 41: Sensor Information
Electrolyte, which is a gel like substance is inside the sensors. If you notice this substance leaking out of the sen- sors, do not touch it as it is caustic. Do not dive with a leaking sensor. The readings will be high!!!! MSL 72.125 Jetsam/Classic KISS manual R.5... -
Page 42: Vr Triple Pendent Display, Info & Calibration
4 minutes to conserve the battery. Note that the red LED light will turn on for a moment, just as the display is about to turn off. This is normal. WARNING: WHEN THE LOW BATTERY INDICATOR LIGHT COMES ON, THE BATTERY MUST BE CHANGED!!!! DIVING WITH A LOW BATTERY WILL AFFECT THE PPO2 READINGS! THIS CAN CAUSE INJURY OR DEATH!! MSL 72.125 Jetsam/Classic KISS manual R.5... - Page 43 It will take a few minutes for the oxygen percentage to drop. The KISS rebreather should be flushed with oxygen on every dive to ensure that the displays are reading correctly, and re-calibrated every time the absorbent is changed. MSL 72.125 Jetsam/Classic KISS manual R.5...
-
Page 44: Single Fischer & Dual Fischer Plate Information
SINGLE FISCHER & DUAL FISCHER PLATES In the past, the KISS rebreathers were shipped with plates that had a single fischer connector attached. Those have now been discontinued and we are now only shipping the plates with dual fischers. This allows divers to util- ize the VR products and still have redundancy. Resistors have been added to the wiring system. -
Page 45: Care For Fischer Connectors & Cables
Remember, the cleanliness of the contacts is essential to the integrity of the link. Following these simple steps will ensure that your system works properly. Look after your cable and connectors and they will look after you. MSL 72.125 Jetsam/Classic KISS manual R.5... -
Page 46: Vrx Programming & Calibration
*WARNING: DO NOT MIX THEM UP AS THEY WILL NOT WORK PROPERLY AND COULD CAUSE IN- CORRECT READINGS WHICH COULD CAUSE SERIOUS INJURY OR DEATH!! MSL 72.125 Jetsam/Classic KISS manual R.5... - Page 47 4. Then do a long press on both buttons. 5. Do another long press on both buttons and you will see the screen change to “Flush” 6. Completely flush the loop with oxygen. The steps for this are as follows: MSL 72.125 Jetsam/Classic KISS manual R.5...
- Page 48 These instructions are here to provide you with some quick notes on how the VRx computer works. This is not a complete list of the VRx instructions. Prior to diving this computer, the VRx manufac- turer’s instruction manual must be read in full. THESE INSTRUCTIONS ARE SUBJECT TO CHANGE!! MSL 72.125 Jetsam/Classic KISS manual R.5...
-
Page 49: Vr3 Programming
VR3 PROGRAMING The VR3 dive computers from VR Technology Ltd. are compatible with the KISS rebreathers. They can be dove either independently or with a live link. These computers offer recreational and technical KISS divers an alterna- tive way to monitor PPO2 and decompression. - Page 50 This procedure will switch your VR3 from running independently to live. To do this, a special PIN will need to be purchased from the manufacturer in order to open this feature on your dive computer. You will also need to change your Jetsam triple display for a Jetsam dual display with a VR cable. MSL 72.125 Jetsam/Classic KISS manual R.5...
- Page 51 “XDec” IS OFF, THE COMPUTER WILL READ FROM THE SELECTED GAS AND INTERNAL SETPOINT (INDEPENDENT MODE). CLOSED CIRCUIT REBREATHER LINK - CALIBRATION VR3 Assemble your Classic KISS rebreather and attach your VR3 to your VR cable. 1. Push either button to turn the computer on. 2. Push the left button to take you to the home screen.
- Page 52 Operation: While diving, the “Xo2” can be turned on and off. To do this, do a quick push on the right button. This will take you to the “DVo” screen where you can select “Xo2” on or off. With the “Xo2” turned off, your decom- pression will be calculated using the internal set point. MSL 72.125 Jetsam/Classic KISS manual R.5...
-
Page 53: Shearwater Hud
Shearwater Research Inc. designs and builds both computers and HUD’s (Heads Up Display) for rebreather diving. To secure either computer or HUD to a Classic KISS, a dual fischer sensor plate must be used. These systems attach to the KISS rebreathers via the KISS dual fischer plate. - Page 54 DISPLAY DESCRIPTIONS After calibration, each of the sensors should be flashing one orange. That means the PP02 is between 0.95 and 1.05. Remember, the ac- tual value it uses for calibration is 0.98. MSL 72.125 Jetsam/Classic KISS manual R.5...
- Page 55 This should not be a cause for concern as the battery should last many months, even years. REBREATHER ATTACHMENT The box should be attached to the loop hose, behind the divers head. Use the enclosed Velcro for this. In this location it will not be in the way and it is also possible to reach the button. Attach the HUD tie to either side of the BOV. It is handy to attach it to the left side so that dumping the right loop hose after a dive isn’t ef- fected. Wrap the cable for the HUD around the loop hose, and then snap on to the attachment. The HUD attachment consists of 2 pieces; one part attaches to the BOV with the tie and the other the HUD snaps into. The two parts are joined by magnets. These are extremely strong magnets! Slide magnets apart and back together only. MSL 72.125 Jetsam/Classic KISS manual R.5...
-
Page 56: Manual Add Valve/Metering Orifice
Do not scratch the O-ring grooves. The orifice does not need to be removed unless it is damaged or plugged. The parts in the valve are: A. snap ring; B. nut; C. spring; D. spool & orifice; E. valve body MSL 72.125 Jetsam/Classic KISS manual R.5... - Page 57 The valve body is not a substitute for a wrench. Older Classic KISS units were shipped with the Swagelok SS/Teflon hoses. New units are shipped with the Miflex hoses. When attaching the manual add valve to these hoses, remember that the inlet port is the one nearest the add button.
-
Page 58: Adjusting The Oxygen Flow Rate
TINGS FROM THE MANUAL ADD VALVE!!! ONE MUST BE USED TO ENSURE THAT THE FITTING ON THE VALVE DOES NOT SPIN!! SEE THE PHOTOS AT THE TOP OF PAGE 53 (THE PREVIOUS PAGE) WHICH SHOW HOW TO DO THIS PROPERLY. MSL 72.125 Jetsam/Classic KISS manual R.5... - Page 59 The metering orifice flow rate will decrease as the depth (ambient pressure) increases. The amount it decreases depends on the upstream pressure (regulator pressure setting) versus the downstream pressure (depth). This is not a fault, it is physics. MSL 72.125 Jetsam/Classic KISS manual R.5...
-
Page 60: Manual Add Valve Trouble Shooting
If the pressure is inconsistent the high pressure seat or diaphragm may be damaged. The regulator should be serviced regularly and maintained in an oxygen clean condition. *WARNING: It is very important that this valve is in good working order, with proper flow rates and good O-rings. Ensure that you rinse your gear after diving in salt water, and if you flood your rebreather, and you think water has gotten into the valve, service it!! If you pay attention to how often you usually add oxygen to your rebreather during a typical dive, it will be easier for you to notice a problem. MSL 72.125 Jetsam/Classic KISS manual R.5... - Page 61 MSL 72.125 Jetsam/Classic KISS manual R.5...
- Page 62 MSL 72.125 Jetsam/Classic KISS manual R.5...
-
Page 63: Exhaust Valve/Adv/Work Of Breathing
Then as you lift the tab, push on the top of the valve while continuing to turn it counter clock wise. Be very careful to not break the tab!! If you do, the entire valve is garbage. MSL 72.125 Jetsam/Classic KISS manual R.5... - Page 64 Then, unscrew the valve; ensure that it stops turning when it reaches the tab. Your valve is now ready to be replaced on your Classic KISS. ADV problem. If your counterlung volume is correct and...
- Page 65 Again, this is a case where over tightening can cause a leak. On the other hand, if the button assembly is loose, air can leak through this area. *NOTE: Severely over tightening the ADV diaphragm screws can damage the threads on the KISS head!!! MSL 72.125 Jetsam/Classic KISS manual R.5...
- Page 66 This is why having a proper fitting harness is important. If the fit is good, the difficulties of being vertical are greatly decreased. MSL 72.125 Jetsam/Classic KISS manual R.5...
-
Page 67: Mouthpiece Disassembly (Older Style)
This will release the hose sleeve retainers /quick connect mouthpiece adapters. Once the monofilament is removed, pull the hose retainers/ quick disconnect adapters out of the body and shake the valve plates loose. MSL 72.125 Jetsam/Classic KISS manual R.5... - Page 68 The second stage can now be re- moved. Once the regulator has been removed, remove the two screws on the spool guide and the four screws on the se- lector knob. MSL 72.125 Jetsam/Classic KISS manual R.5...
- Page 69 Pull the knob out of the body. Once the knob has been removed, pull the spool guide and spool out of the body as well. MSL 72.125 Jetsam/Classic KISS manual R.5...
-
Page 70: Mouthpiece Parts List (Older Style)
B: Body C: Exhaust Valve Plate D: Inlet Valve Plate E: Hose Sleeve/Quick disconnect mouthpiece adapters F: Regulator Attachment Plate G: Regulator H: Spool I: Spool Guide J: Selector Knob and Selector Knob Plate MSL 72.125 Jetsam/Classic KISS manual R.5... -
Page 71: Mouthpiece Reassembly (Older Style)
Place the nub end of the plate in first, and then using your thumbs, push the plate into place. It will snap in. Insert the pin which holds the plastic plate in place. * WARNING: Those using the Mares Prestige second stage, must use the bottom screw to as- sist in securing it to the DSV!!! MSL 72.125 Jetsam/Classic KISS manual R.5... -
Page 72: Mouthpiece Disassembly (New)
Next, the switch will need to be removed. Remove the screw which holds the switch in place; pull the switch off. Unscrew the front cover. MSL 72.125 Jetsam/Classic KISS manual R.5... - Page 73 THESE VALVES ARE EXPENSIVE; TAKE CARE TO NOT DAMAGE THEM! To remove the second stage regulator, remove the metal U-clip and pull the adapter loose. The second stage is permanently attached to the adapter. MSL 72.125 Jetsam/Classic KISS manual R.5...
-
Page 74: Mouthpiece Parts List (New)
IN YOUR MOUTH THE GAS FLOW IS FROM LEFT TO RIGHT. SUCK IN AND THE LEFT SIDE VALVE OPENS AND EX- HALE AND THE RIGHT SIDE VALVE OPENS. DO NOT POSITION THE MUSHROOM VALVES IN ANY OTHER DIRECTION!!!! MSL 72.125 Jetsam/Classic KISS manual R.5... -
Page 75: Mouthpiece Reassembly (New)
Push the adapter into position and secure with the metal U-clip. Be gentle while pushing in the U-clip and push it in straight. It must be inserted fully to secure the adapter. If the clip is bent, it will be difficult to insert it properly. MSL 72.125 Jetsam/Classic KISS manual R.5... -
Page 76: Mouthpiece Testing (New)
These tests will determine if the rubber mouthpiece has a leak or if the 2nd stage regulator a fault. The 2nd stage adapter O-ring could also be causing a leak. CLEAN AND INSPECT THE MOUTHPIECE AND SECOND STAGE AS REQUIRED. SERVICING OF THE SECOND STAGE SHOULD BE DONE BY A QUALIFIED SERVICE TECH. MSL 72.125 Jetsam/Classic KISS manual R.5... -
Page 77: Mouthpiece Servicing & Troubleshooting
If after all that you still have a bubbling 2nd second stage the problem could be with the seat, inhale diaphragm, exhale diaphragm or it could be debris. Your local dive shop should be able to service the 2nd stage for you. *NOTE: When doing your negative pressure test, it is possible to damage the exhaust dia- phragm in the second stage. If your inhalation is extremely hard, for an extended period of time, this can happen. Also, on the new BOV, the 2nd stage exhaust diaphragm can be dis- torted if the negative is too hard causing the test to fail. MSL 72.125 Jetsam/Classic KISS manual R.5... - Page 78 Also check for a tear underneath the zip tie which holds the rubber mouth bit in place. Damage here will also cause water to leak into the system. Many cases of water into the loop come from torn or damaged rubber mouth pieces. Loose lips. IT SHOULD BE NOTED THAT A LEAK ON THE MOUTHPIECE, INCLUDING THE RUBBER MOUTH BIT, WILL NOT BE DETECTED ON THE POSTIVE AND NEGATIVE TESTS!! THIS IS WHY IT IS VERY IM- PORTANT TO KEEP YOUR MOUTHPIECE PROPERLY SERVICED AND CLEANED. ALSO, ALWAYS CARRY A SPARE RUBBER MOUTHBIT. MOST MOUTHPIECE LEAKS ARE FROM THIS!! MSL 72.125 Jetsam/Classic KISS manual R.5...
-
Page 79: Pre-Dive Checklist's
The bottom line is that this 5 minute pre-breath confirms your system check has been done and that all is working. DIVERS SHOULD FOLLOW THE PREDIVE CHECKLISTS BEFORE EVERY DIVE AND KEEP A COPY OF THE CHECKLIST WITH THE KISS REBREATHER AT ALL TIMES. MSL 72.125 Jetsam/Classic KISS manual R.5... - Page 80 ____ My PPO2 display uses ________ batteries and they have ________ hours left on them. ____ I have analyzed my O2 cylinder and it has ________% O2 ____ I am diving with _______________ diluent in my on-board diluent cylinder. I have analyzed it and have confirmed what percentage of O2/Helium/Nitrogen it contains. ____ I am diving with _______________ mix in my first off-board cylinder. I have analyzed it and have confirmed what percentage of O2/Helium/Nitrogen it contains. ____ I am diving with _______________ mix in my second off-board cylinder. I have analyzed it and have confirmed what percentage of O2/Helium/Nitrogen it contains. ____ If I am using more off-board cylinders I will also write down the mixture and ensure that I have analyzed them and have confirmed what percentage of O2/Helium/Nitrogen they contain. ____ My absorbent has been used for ________ hours, which means that I have ________ hours left on it. ____ My dive computer is in perfect working order. ____ The battery voltage on my computer is ________. ____ My buddy and I have practiced bailout procedures and understand what to do in an emergency. ____ My surface interval before this dive is ________. ____ My CNS before this dive is ________. ____ I am using ________ lb/kg of weight. MSL 72.125 Jetsam/Classic KISS manual R.5...
- Page 81 I enter the water. ____ Once in the water, I will do a bubble check with my buddy to double check that there are no leaks in my system. The diluent tank is NOT an adequate gas supply for emergency situations. MSL 72.125 Jetsam/Classic KISS manual R.5...
-
Page 82: Training & Basic Skills
• DILUENT FLUSH - Required when the diver needs to verify that the displays are reading correctly or to bring the PPO2 to a safe level • HYPERCAPNIA - High CO2 • DILUENT LOSS MSL 72.125 Jetsam/Classic KISS manual R.5... -
Page 83: Scrubber Duration
RMV of 75 lpm for one or two minutes. We believe that the design of the Classic KISS scrubber canister is one of the most efficient axial canisters, per weight of absorbent, available today. -
Page 84: Warranty
Canada. Note that if you ship via a courier such as UPS or Federal Express, there will be a brokerage fee, even if there are no duties. While there may be no charges for the warranty work, this brokerage fee must be paid for by the shipper. MSL 72.125 Jetsam/Classic KISS manual R.5... -
Page 85: O-Ring List
30 x 3 mm INNER BARREL SIDE PORT X 2 46 x 2.5 mm INNER BARREL END PORT X 2 45 x 3 mm HOSE ATTACHMENT X 4 28 x 2.5 mm 2ND STAGE ADAPTER X 1 MSL 72.125 Jetsam/Classic KISS manual R.5... - Page 87 KISS REBREATHERS www.kissrebreathers.com info@jetsam.ca 1 604 469 9176 Skype: kissccr MSL 72.125 Jetsam/Classic KISS manual...
Need help?
Do you have a question about the Classic KISS and is the answer not in the manual?
Questions and answers