
Related Manuals for HYVST SPX300

Summary of Contents for HYVST SPX300
- Page 1 AIRLESS PAINT SPRAYER INSTRUCTION MANUAL Release the paintline pressure and switch off the power, before doing maintenance with the sprayer or changing accessories. SPX300/400...
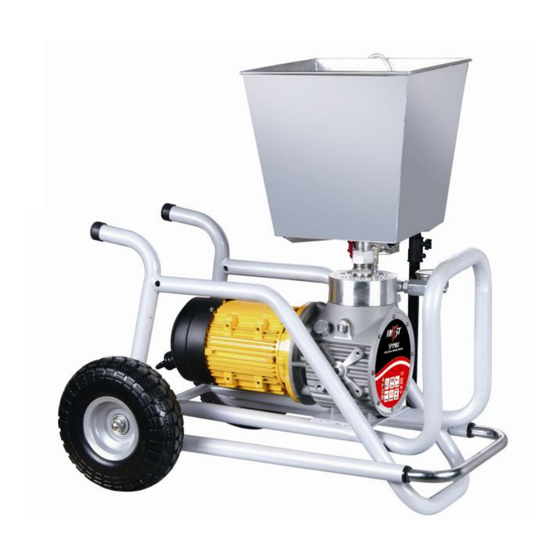
- Page 2 13. Use proper tools when to tight, adjust or maintain the machine with proper procedures, avoid damage machine and injury of the user. 14. Never change the structure of the machine, always use the parts from the manufacturer. Technical data Item Description Model SPX300 Power of motor 750W Voltage/Frequency 110V/220V 50HZ/60HZ Max. working pressure 210 Bar Max.
- Page 3 Setting-up 1. Install the machine as the diagram shelf Pressure gauge T-Connector Inlet hose, return hose Spray gun, hose Figure 1 Caution: Open the inlet valve stem before the inlet valve is installed (Figure 2) Put your finger into the inlet valve, open the inlet valve stem so it can move freely.
- Page 4 Preparation of the operation Dip the inlet hose into water, turn on the motor, tighten the pressure valve(Figure 3, left) Clockwise, Close the outlet valve clockwise when some water is sucked and comes out for outlet valve (Figure3,right).When the pressure reaches up to about 20MPa, check if there is any leakage on the outlet hose and other connections, if no, turn on the spray gun and try to spray (if there is no water in inlet hose, hold the inlet hose, fill some water in it then turn on and off the motor for several times until water comes out for the return hose)
-
Page 5: Cleaning And Storage
Caution: if the tip is blocked during operation, turn the tip 180°anticlockwise for several times, it will spray properly when it is turned back to the spraying Position. Spraying position Cleaning position Figure 5 Stop of operation When the operation is finished, loosen the pressure valve (Figure 6. left), open the outlet valve anticlockwise (Figure 6.right), release the pressure to zero, turn off the motor, the motor will be burned if it is turned off without the pressure release completely!(Figure 6) - Page 6 paint comes out from pump body, hose and spray gun. 2. Clean the filter regularly. Remove the handle: take out the filter stem inside the handle and wash it, then install and tighten it, replace it if there is any damage. Filter Handle Washer...
-
Page 7: Problems And Solutions
Check oil value through Figure 9. Problems and solutions Problem Cause Solution The machine doesn’t 1. The voltage is too low or power 1. Check the correct connection to the start supply used is not compatible power supply with the machine. 2. - Page 8 Figure 10.parts of pump body Description Q’TY Description Q’TY Handle Spray gun Switch box Hose Motor Valve block Pump body Inlet hose (Filter) Pressure gauge Returned hose Shelf...
- Page 9 Figure 11 Valve block assembled Description Q’TY Description Q’TY Valve block Seal on inlet valve Valve block connector Inlet valve stem Outlet valve Valve base Outlet valve washer Inlet valve body Base of outlet valve Holder of spring Valve base body Spring Steel ball Washer...
- Page 10 Figure 13.Spray gun assembled Description Q’TY Description Q’TY Gun body Seal Gun filter Valve seat Gun handle Valve stem Washer Fixing screw for trigger Removable connector Top leaver Protector of trigger Top block Trigger Tip seat...
- Page 11 Figure 14. Diaphragm assembled Description Q’TY Description Q’TY Diaphragm Spring Diaphragm holder Figure 15. Inlet hose Description Q’TY Description Q’TY Returned hose Clamp Inlet hose Filter...
- Page 12 HYVST’s written recommendations. This warranty does not cover, and HYVST shall not be liable for general wear and tear, or any malfunction, damage or wear caused by faulty installation, misapplication, abrasion, corrosion, inadequate or improper maintenance, negligence, accident, tampering, or substitution of non-HYVST component parts.
- Page 13 All written and visual data contained in this document reflects the latest product information available at the time of publication. HYVST reserves the right to make changes at any time without notice. YONGKANG OCEAN IMP & EXP CO.,LTD. ADD: 23 F, Jinsong Mansion, Headquarter Center, Yongkang City, Zhejiang Province, China.
Need help?
Do you have a question about the SPX300 and is the answer not in the manual?
Questions and answers