Table of Contents
Advertisement
Advertisement
Table of Contents

Related Manuals for baldertech BALDER

Summary of Contents for baldertech BALDER
- Page 1 12.03.2020 BALDERTECH BALDER Owner’s Manual Balder www.baldertech.com...
-
Page 2: Table Of Contents
4.2.4. Adjusting the width between the foot supports 4.2.5. Removing and pivoting out the foot supports 4.3. Adjusting the joystick 4.4. Adjusting the swing away for joystick (optional extra) 4.5. Adjusting the headrest (optional extra) Owner’s Manual Baldertech Balder | Baldertech... - Page 3 8.2. Maintenance procedures 8.2.1. Battery charging 8.2.2. Frame and body cleaning 8.2.3. Seat cleaning 8.2.4. Releasing the seat 8.2.5. Disconnecting the batteries 8.2.6. Fitting the batteries 8.2.7. Tire 9. TROUBLESHOOTING 10. OPTIONAL EXTRAS CONTACTS Owner’s Manual Baldertech Balder | Baldertech...
-
Page 4: Introduction
1.3. Individual labeling All Balder wheelchairs are labeled individually with their own unique serial number. This is locat- ed on the chassis, between the front wheels. Always quote the serial number of your chair if you require any assistance. -
Page 5: Use Of Hazard Symbols
Baldertech. 1.8.1. TERMS OF WARRANTY Fulfillment of the warranty by Baldertech AS is conditional on the following terms: Adjustments, service, and maintenance must be carried out by Baldertech AS authorized service partners. The products must be used for their intended purpose in accordance with the Owner’s Manual. -
Page 6: Warranty Exclusions
We recommend the wheelchair to be inspected by an authorized service partner once per year for your own safety and for the wheelchair to function smoothly. All Baldertech wheelchairs are identified with a unique serial number on the product label. The product label can be found on the chassis, between the front wheels. -
Page 7: Key Data
6°. If you are in doubt if the wheelchair is suitable to your usage, contact your supplier. • Balder F and Junior series are offered in several models with user weight up to 120 kg. The product label provides information on user weight, model, type, serial number and year of man- ufacture. - Page 8 Models that have seat lift, backrest angle and seat angle, the center of gravity will shift when using these, and increases the risk of tipping. Use seat lift, backrest angle and seat angle only on flat surfaces. Owner’s Manual Baldertech Balder | Baldertech...
-
Page 9: Transfer In And Out Of The Wheelchair
Every precaution should be taken to reduce the distance between the wheelchair and the place to which the user is transferring Overextending the distance, may cause a is a risk of falling or losing balance. Owner’s Manual Baldertech Balder | Baldertech... -
Page 10: Parts And Tools
Balder range can primarily not be dismantled without using tools, and parts are not to be re- moved unless it is mentioned in the user manual. - Page 11 18 kg x 2 18 kg x 2 18 kg x 2 18 kg x 2 Tested to the following standards EN 12184 And the underlaying standards. ISO 1021 1/2 All fabrics are restistance to ignition. Owner’s Manual Baldertech Balder | Baldertech...
-
Page 12: Technical Description
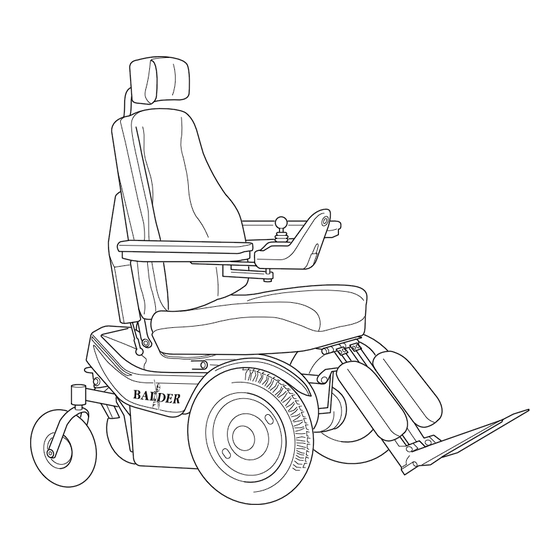
Contact authorized personnel if you require assistance. The illustration shows the Balder Finesse, but the structure is also applicable to the Balder and Junior. The Balder Finesse and Balder Junior are electric wheelchairs with front wheel drive. -
Page 13: Joystick
Driving directions and control of seat adjustment are carried out by using joystick and buttons on the control panel. Programming of the control system can only be car- ried out by authorized Baldertech service personnel. Incorrect programming can lead to uncon- trolled and/or unstable driving characteristics. - Page 14 ECU) Seat raise *) 2 red, 2 yellow and 2 green LEDs will be on when the battery is at full capacity. These will gradually go out as the remaining battery capacity is reduced. Owner’s Manual Baldertech Balder | Baldertech...
-
Page 15: Operating Program
There are attachments on the wheelchair – 2 in front (1) and 1 ring (2) at the rear. These are indi- cated by means of symbols as shown in the illustration. In Front Back For securing the wheelchair during transportation, see section 6. Owner’s Manual Baldertech Balder | Baldertech... -
Page 16: Attendant Control (Optional)
3.2.4. ATTENDANT CONTROL (OPTIONAL) All Balder chairs are available with attendant control. This guide describes a standard attendant control. See also section 5.4.1 for more information. Attendant control 1. Fixing bracket 2. Panel for electrical functions 3. Ring for moving the wheelchair forwards or backwards. -
Page 17: Swing Away For Joystick (Optional Extra)
3.2.5. SWING AWAY FOR JOYSTICK (OPTIONAL EXTRA) Swing away for joystick: All Balder chairs are available with swing away (1) for the joystick. The swing away makes the positioning and accessibility of the joystick more flexible. See section 4.4 for a description of the fitting and adjust- ment of this. -
Page 18: Adapting Your Wheelchair
5. Tighten the screws, place the back cover (1) in position. 4.1.2. HEIGHT ADJUSTMENT Balder Junior 1. Undo the locking screw (1) beneath the armrest. 2. Push the armrest up or down to adjust the height. 3. Tighten the locking screw (1). Owner’s Manual Baldertech Balder | Baldertech... -
Page 19: Adjusting The Armrest Pads
4.2. Adapting the footrest / foot supports All Balder chairs can be supplied with different types of footrest, both manual and electric. The type of footrest selected is dependent on – among other things – what other equipment or func- tions the chair has. -
Page 20: Length Adjustment, Electric Footrests
4.2.2. ANGLING THE FOOTREST PLATES Electric footrests 1. Loosen the nuts (1). 2. Turn the adjusting screw (2) counterclockwise for a steeper angle, or clockwise for a less steep angle. 3. Tighten the nut (1). Owner’s Manual Baldertech Balder | Baldertech... -
Page 21: Foot Support Angling
4.2.4. ADJUSTING THE WIDTH BETWEEN THE FOOT SUPPORTS Manual footrest 1. Loosen the attaching screw (1). 2. Move the foot supports sideways. 3. Tighten the attaching screw (1). 4. Repeat the same procedure for the other foot support. Owner’s Manual Baldertech Balder | Baldertech... -
Page 22: Removing And Pivoting Out The Foot Supports
1. Move the joystick carefully while tightening the hex screw (1). 2. Stop when you feel the joystick becoming fixed in posi- tion. NOTE Do not turn the adjusting screws so far that they bottom out. Owner’s Manual Baldertech Balder | Baldertech... -
Page 23: Adjusting The Headrest (Optional Extra)
The headrest has three angle joints for individual adjust- ment. By loosening the screws (1) you can change the angle, height and distance form the backrest. Move the headrest to the right position and tighten the screws. Owner’s Manual Baldertech Balder | Baldertech... -
Page 24: Chair Operation
When traveling on slopes in excess of 6 degrees, remember that this will affect the stability of the chair and there is a risk of the chair overturning. Never switch off the chair while it is moving, as this will result in an unpleasant abrupt stop. Owner’s Manual Baldertech Balder | Baldertech... - Page 25 4. Move joystick forwards and backwards to check function. 5. Check driving performance by press program button. 6. Move joystick forward, drive carefully the first meters too see that the chairs behave as normally. Owner’s Manual Baldertech Balder | Baldertech...
-
Page 26: Operating The Attendant Control (Optional Extra)
5.1.4. OPERATING THE ATTENDANT CONTROL (OPTIONAL EXTRA) Alternatively Balder wheelchairs can be fitted with attendant control and emergency stop, and it can also be provided as a removable model. Attendant control with emergency stop Use the panel (1) for the electrical functions such as seat raising, seat tilt and back angle. -
Page 27: General Seat Functions
2. Move the joystick to the right or back to change the angle of the left until the symbol shows on back. the display. 3. Move the joystick forwards and back to change the angle of the back. Owner’s Manual Baldertech Balder | Baldertech... -
Page 28: Left Footrest / Length Compensation
5.2.3. LEFT FOOTREST / LENGTH COMPENSATION The Balder wheelchairs are available with different types of footrest. The function which the left footrest button operates will therefore depend on which footrest is supplied with your chair. Dolphin joystick Joystick G90 1. Press the left footrest button. -
Page 29: Stand Up Function
5.3. Stand up function Balder Finesse and Balder Junior are available with a stand up function. Read this section if it is applicable to your wheelchair. DANGER When in standing position, the wheelchair must only be used indoors and on a flat surface. -
Page 30: Interference
If the chair stops, check the automatic fuse as described in section 5.4.1. If you need to push the chair, the chair can be disconnected as described in section 5.4.2. See also section 9, or contact your dealer if you require assistance. Owner’s Manual Baldertech Balder | Baldertech... -
Page 31: Checking The Automatic Fuse
Disconnect: Move the two switches (1) down until they lock in position. Connect for operation: Move the two switches (1) up until they lock in position. WARNING Do not leave the wheelchair in unlocked position with the occupant seated. Owner’s Manual Baldertech Balder | Baldertech... -
Page 32: Transport Of Wheelchair And User In Car
There are attachments on the wheelchair – 2 in front (1) and 1 ring (2) at the rear. These are indi- cated by means of symbols as shown in the illustration. In Front Back Owner’s Manual Baldertech Balder | Baldertech... -
Page 33: General Occupant Restraint Instructions
SHOULDER, CHEST AND PELVIS SUCH AS ARMRESTS OR AND PELVIS BELTS SHOULD WHEELS. BE POSITIONED LOW ON THE PELVIS NEAR THE THIGH- ABDOMINAL JUNCTION. Illustration of improper belt-restraint fit Illustration of proper belt-restraint fit Owner’s Manual Baldertech Balder | Baldertech... -
Page 34: Securing The Chair In A Car With A 4 Point Strap Tie-Down System
4. Push down the locking catch to lock the chair in this posi- tion. DANGER When fitted, tie-down straps angles should fall within the preferred angles shown below. Preferred angles for front tie-down straps Preferred angles for rear tie-down straps Owner’s Manual Baldertech Balder | Baldertech... -
Page 35: Using A Docking System (Optional Extra)
• If the wheelchair and user are not correctly secured. • If there are indications that the clamp down is not functioning normally. • Before the user’s seat belt is secured and tightened. Owner’s Manual Baldertech Balder | Baldertech... -
Page 36: Dahl Docking System
Attempting to reverse the wheelchair before the red LED has been illu- minated will result in blocking the docking stations locking mechanism, which makes it impossible to reverse. If this happens repeat above unlock- ing procedure. Owner’s Manual Baldertech Balder | Baldertech... - Page 37 30° to 75° as shown. A steeper (greater) angle within the preferred zone, 45° to 75° is desirable i.e. closer to, but never exceed- ing 75° degrees. Preferred and optional angles for location of the lap belt Owner’s Manual Baldertech Balder | Baldertech...
-
Page 38: Balder Docking System
(2) will come on if the chair is in the correct position. Repeat the process if necessary. Owner’s Manual Baldertech Balder | Baldertech... -
Page 39: Transportation By Air
6.4. Transportation by air NOTE Balder wheelchairs are supplied in many specially adapted variants, so equipment may be fitted which has to be removed in addition to what is described here. Balder wheelchairs are supplied as standard ex works with Sonnenschein dryfit gel batteries. -
Page 40: Storage
Your Balder wheelchair must be kept dry, protected from the elements and preferably kept in- doors. If you store your chair for any length of time without it being used, the batteries must be disconnected. -
Page 41: Frame And Body Cleaning
2. Remove the cover using six body screws on the main cover which covers all of the lower part of the wheelchair. 3. Lift off the main cover. Owner’s Manual Baldertech Balder | Baldertech... -
Page 42: Disconnecting The Batteries
5. Switch on the chair using the on/off switch on the control panel, then check that all the elec- trical functions work. 8.2.7. TIRE Your Balder is fitted with either ordinary air-filled tires or puncture-free compact tires. Even with compact tires, it is sensible to ensure that these are not worn or damaged to an unreasonable extent. - Page 43 Avoid traveling in the chair when it has a punctured tire. See technical specifications, section 2.1.3 If a Balder wheelchair is equipped with air filled tiers, please pay tension to the air pressure: 206,84 kPa on drive wheel.
-
Page 44: Troubleshooting
• Trap guard activated if this cover, and remove these. is mounted on your chair. • Contact your dealer. These points are intended to provide simple guidance. Contact your dealer for further assistance. Owner’s Manual Baldertech Balder | Baldertech... -
Page 45: Optional Extras
10. OPTIONAL EXTRAS Below is a list of some of the optional extras available for Balder electric wheelchairs. Item Bag with the Balder logo, black Bag with the Balder logo, small, black Fixing bar for ruck-sack/bag F Fixing bar for ruck-sack/bag Junior Kneepads, removable (set), F... -
Page 46: Contacts
11. CONTACTS Baldertech Ltd Roentgen Road Basingstoke Hampshire RG24 8NG Email : uksales@baldertech.com Telephone : +44 12 56 76 71 81 www.balder.uk Baldertech AS Email : info@baldertech.com Telephone : +47 32 11 11 00 www.baldertech.com Owner’s Manual Baldertech Balder | Baldertech... - Page 47 Owner’s Manual Baldertech Balder | Baldertech...
- Page 48 Label serial number Baldertech AS Email : info@baldertech.com Telephone : +47 32 11 11 00 www.baldertech.com...
Need help?
Do you have a question about the BALDER and is the answer not in the manual?
Questions and answers
how to operate standing mode
To operate standing mode on the Baldertech BALDER:
1. Move the seat and back to the required starting positions.
2. Move the footrest to the required starting position.
3. Activate the seat raise function.
4. Raise the seat until the correct height is reached, indicated by a yellow light on the vertical function panel.
5. Push the lower part of the lock pin up so it sticks out.
6. Thread the buckle of the knee brace cushion into the fixing bracket.
7. Push the lock pin back so it stays upright, with the broadest part facing down. The knee brace cushion must be tight below the knee.
This answer is automatically generated
How do I change the digital clock?