Table of Contents
Advertisement
Advertisement
Table of Contents

Subscribe to Our Youtube Channel
Related Manuals for North Kiteboarding NAVIGATOR CONTROL SYSTEM


Summary of Contents for North Kiteboarding NAVIGATOR CONTROL SYSTEM
- Page 1 2 0 2 0 NAV I G ATO R C ONTR OL SYSTEM U S E R M A N U A L...
- Page 2 RELEASE DATE: AUGUST 2019 VERSION: CS01...
- Page 3 Thank you for choosing North. At North we are drawn to nature’s ever-changing playground – where water meets wind. Those two elements create an alchemy that is never the same, one day to the next. It stirs our restless souls, our hearts quicken. It promises us fire within. We chase it.
- Page 4 To waive any and all claims, that you have or may have in the future against North Kiteboarding and all related parties resulting from the use of the North Kiteboarding product and any of its components.
- Page 5 SAFETY WARNINGS For your safety and the safety of others, North Kiteboarding strongly urge you to undergo lessons with a recognised certified instructor prior to using this product. This user manual is NOT a substitution to lessons. Kiteboarding involves unavoidable risks so it is important that you familiarise yourself with these risks and take appropriate measures to minimise risks as much as possible.
- Page 6 North Kiteboarding website. North Kiteboarding warranties our products to be free from major defects in material or workmanship to the original purchaser ONLY, for a period of 365 days* from the date of purchase.
- Page 7 There are no warranties that extend beyond the warranty specified herein. For any warranty claims please contact your North Kiteboarding retailer. A claim form can be downloaded from northkb.com.
-
Page 8: Table Of Contents
CON T EN TS PAG E 1. Overviews 1.1. Control System Overview 1.2. Line Assembly Overview 1.3. North Connect Quick Release Overview 2. Set Up 2.1. Check your line lengths 2.2. Attaching control lines to the kite 3. Operation 3.1. Emergency safety procedures Summarised: 3.2. -
Page 9: Overviews
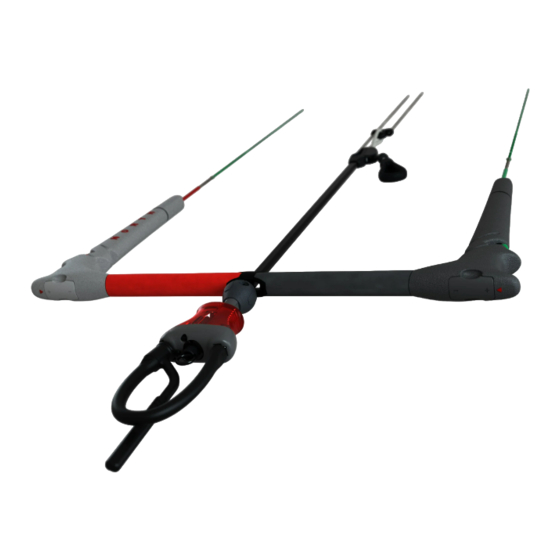
1. OV ERV I EWS 1.1. CONTROL SYSTEM OVERVIEW 1 - Front lower lines 2 - Back lower lines 3 - Pulley Power Bracket 4 - Power balls 5 - Elasticised trim line 6 - Elasticised landing line 7 - Depower Cleat 8 - Cleat Base 9 - Cleat stopper ball 10 - Trim handle... -
Page 10: Line Assembly Overview
9 - Upper Leader Line 10 - Lower Leader Line 11- Fixed front line stopper 12- Landing Line NAVIGATOR CONTROL SYSTEM 1.3. NORTH CONNECT QUICK RELEASE OVERVIEW 1 - Connect QR 2 - Quick release handle 3 - The North InterLoop... -
Page 11: Set Up
WARNING: Whilst the Navigator Control System is compatible with most other kites, it features a low V which can impact the steering behavior of a kite. When using a non North Kite, ensure your kite is suited to a low V setup. -
Page 12: Operation
Let go of the bar. If you are still overpowered let go of the bar. This depowers the kite as much as possible while the Navigator Control System is still attached to your harness. North Connect Quick Release. If your kite is still overpowered grab ahold of the red quick release handle on the North Connect. -
Page 13: Deploying The North Connect Quick Release
The quick release has not been tested in icy conditions so may not be suitable for use snow kiting. WARNING: Use of the release system in ways not outlined in this North Kiteboarding User Manual may cause serious injury or death. -
Page 14: Resetting The Single Line Flag Landing Line
important that when you come to the North Control System not to grab hold of it. Instead, continue to move towards the kite until you reach the leading edge and can secure the kite. 3.2.2. RESETTING THE SINGLE LINE FLAG LANDING LINE Once you have recovered all equipment safely, you will need to reset the landing line to use it again. -
Page 15: Replacement Of North Connect Quick Release
3.2.3. REPLACEMENT OF NORTH CONNECT QUICK RELEASE Spare parts for your North Control Systems are available at your local North Kiteboarding retailer or online at northkb.com Unwind lines from Control System. Pull landing line attached to the landing line leash ring in the middle of the Modular Harness Loop until you get to the connection to the front lines. -
Page 16: Kite Leash
WARNING: Ensure the security finger is fully rotated, positioned in the interior of the harness loop, before engaging it into the centre of the harness hook. Engaging it into the harness hook when not fully rotated may risk the security finger releasing itself from the harness hook. To release the security finger, bend and slide the security finger out of the harness hook. -
Page 17: Attaching Kite Leash To Harness
3.4.2 ATTACHING KITE LEASH TO HARNESS Pull the quick release handle to release the pin. Thread the covered line around a secure connection point on the harness. We recommend fastening to a ring on the side of the harness or front of the harness spreader bar as shown below. -
Page 18: Depower System
WARNING: The secondary quick release system on the kite leash should only be activated in an emergency. Activating will disconnect the kite from your body. Uncontained kites can be an extreme danger to the rider and others and can cause damage, serious injury or death. 3.5. -
Page 19: Adjustable Bar Length
3.6. ADJUSTABLE BAR LENGTH The North Navigator Control System is adjustable. When the cassettes, located on the underside of the bar, are positioned with the positive ends facing outwards, the bar will be at its maximum length. When the cassettes are positioned with the negative ends facing outwards, the bar will be at its minimum length. -
Page 20: Adjustable Line Length
3.7. ADJUSTABLE LINE LENGTH You can adjust the length of your North lines easily from your North Control System Adjusting your line length compensates for stretch in the lines and is not primarily designed for trim as that is the purpose of the depower system. To adjust the line length: Remove the cassette clip and pull the lines through approximately 20cm. -
Page 21: Accessories
4. ACCESS O R I ES 4.1. THE NORTH INTERLOOP SYSTEM You can change your Modular Harness Loop using the North InterLoop System. 4.1.1. TO RELEASE THE MODULAR HARNESS LOOP: Pull the primary quick release to release the North Connect end of the Modular Harness Loop as explained above. - Page 22 WARNING: Before each use of the North Navigator Control System ensure the North Interloop is assembled and the LockGuard is placed in it’s dedicated base position WARNING: ALWAYS check your North InterLoop is secure after changing between loops. Pull down firmly on the loop to ensure it is installed correctly.
-
Page 23: How To Care For Your Control System
• When your North Navigator Control System is not in use, it should be stored in a dry area and away from direct exposure to the sun. NOTE: Spare parts for your North Control System can be purchased at your local North Kiteboarding retailer or online at northkb.com... - Page 24 N O R T H K B . C O M...
Need help?
Do you have a question about the NAVIGATOR CONTROL SYSTEM and is the answer not in the manual?
Questions and answers