Table of Contents
Advertisement
Quick Links
beam premium
INDOOR / OUTDOOR AMPLIFIED HDTV ANTENNA
BOX INCLUDES
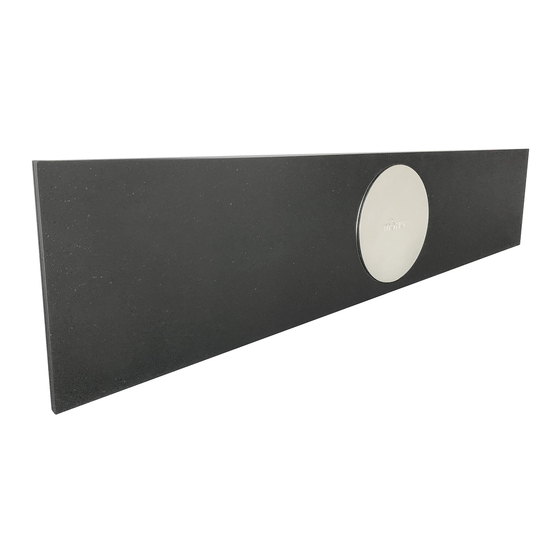
Beam Premium
Antenna
TM
90° Coaxial Adapter
Power Injector
Antenna Mounting Hardware
x2 - 3/16*32L Wood Screws
x2 - 16mm Wood Screws
Safety Bracket
IMPORTANT!
FOLLOW ALL SAFETY PROCEDURES, WARNINGS AND
INSTRUCTIONS WHEN INSTALLING YOUR ANTENNA.
SAFETY PROCEDURES
• Make sure there is another person present (on the ground) while
installing the antenna.
• DO NOT attempt to mount the antenna on a windy, rainy or
snowy day.
MOUNT THE ANTENNA AT LEAST 20 FT. FROM ALL
POWER LINES OR UTILITY POLES.
POWER LINE WARNING
If you intend to mount the antenna on a
rooftop, make sure to mount it at least
20 ft. away from any power lines or
utility poles.
SUPPORT@GOMOHU.COM
||
1.855.446.6648
Para español, visite gomohu.com/setup
™
10 ft. Coaxial Cable
6 ft. Coaxial Cable
Coaxial Coupler
USB Power Adapter *
*Actual USB power adapter may di er in appearance.
Antenna Kickstand
DANGER
MINIMUM
20 FT.
||
WWW.GOMOHU.COM
Use the included template on the bottom of
this page to mark your mounting surface with
the correct screw placement.
Use the 3/16*32L wood screws for mounting in
the holes you have marked with the template.
You can also insert the included kickstand
in one of the two screw slots to sit the antenna
1
on a flat surface.
OPTIONAL:
To secure your antenna, install the included
safety bracket above the antenna to block the
antenna from being raised and removed from
the screw slots.
Attach end of the 10 ft. coaxial cable to the
2
connector on the antenna.
If you wish to extend the cable, use the
included coupler and 6 ft. coaxial cable.
When antenna is sitting on a flat surface, use
the included 90° coax adapter.
3
Run the free end of the coaxial cable from the mounting location to the
location of the TV. Connect the coaxial cable to the connector on the power
injector. If needed, additional coaxial cable can be added. Excessive cable
may cause reception loss.
Connect the coaxial cable attached to the power injector
4
to the ANT/IN connector on the back of the TV.
NOTE: If using an RF splitter, turn to the next page
and follow the RF splitter installation instructions.
The power injector must be
8
powered in order to
function. Plug the
amplifier's USB cable
5
into an open USB port
on the back of the TV.
If the TV does not have
a USB port, use the
included power adapter
to power the power injector
via any standard 120V
wall outlet.
6
In the TV's setup menu, set the tuner mode to
"Antenna" or "Air". Refer to the TV manual for
detailed instructions.
In the TV's setup menu, set TV to "scan" for
7
channels. This can sometimes be listed as
auto-program, auto-scan, channel search or
channel scan. Refer to the TV manual for
detailed instructions.
OPTIONAL:
Antenna
Coax
Cable
Optional
Coax
Coupler
Coax
Cable
Power
Injector
6
Coaxial
POWER OPTIONS:
Cable
USB Cable (attached)
(attached)
a. TV's USB Port
Back of TV
OR
7
ANT/IN
b. Wall Outlet*
*Actual USB power adapter may di er in appearance.
Tuner Mode
Antenna
Channel Search
Scanning For Channels
Advertisement
Table of Contents

Related Manuals for Mohu Beam Premium


Summary of Contents for Mohu Beam Premium
- Page 1 ™ Use the included template on the bottom of this page to mark your mounting surface with INDOOR / OUTDOOR AMPLIFIED HDTV ANTENNA the correct screw placement. Use the 3/16*32L wood screws for mounting in the holes you have marked with the template.
- Page 2 Place the this manual on your wall or other intended mounting surface. Use these targets to mark your wall through the paper. You will drive screws into these spots and the antenna will mount perfectly. Have antenna questions? 1-855-446-6648 Monday-Friday support@gomohu.com 8 a.m. - 5 p.m. ET Contact Mohu Support...
Need help?
Do you have a question about the Beam Premium and is the answer not in the manual?
Questions and answers