
Subscribe to Our Youtube Channel
Related Manuals for Ukoke UTE01

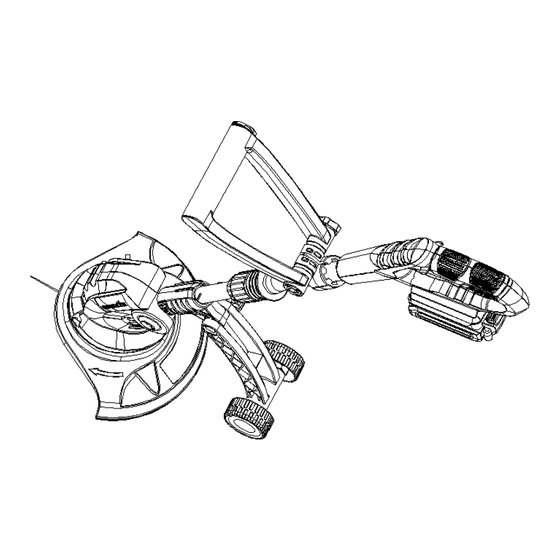
Summary of Contents for Ukoke UTE01
- Page 1 20V Cordless Grass Trimmer Model:UTE01 Customer Service Ukoke Tech E:Service@ukoke.com (909)-606-4551 Customer Central: (Items Replacement) 19575 East Walnut Drive South, Units C16& C17, City of Industry, California 91748. Te: (909)-734-6812...
-
Page 2: Table Of Contents
Contents General Information ............1 Intended Use................3 Safety warnings..............3 Product description...............6 Assembly................8 Operation ................12 Maintenance and Care............16 Troubleshooting..............19 Technical Data...............19... -
Page 3: General Information
General Information Reading and storing the instruction manual This instruction manual accompanies this line trimmer. It contains important information on setup and handling. Before using the line trimmer, read the instruction manual carefully. This particularly applies to the safety notes. Failure to follow the contents of this instruction manual may result in severe injury or damage to the line trimmer. - Page 4 Objects thrown by the product could hit the user or other bystanders. Always ensure that other people and pets remain at a safe distance from the product when it is in operation. In general, children must not come near the area where the product is. Guaranteed sound power level.
-
Page 5: Intended Use
Do not dispose of batteries in a fire. They will explode and cause injury. Contains Li-ion battery. Battery must be recycles or disposed of properly. Do not dispose of batteries. Return exhausted batteries to your local collection or recycling point. INTENDED USE This Li-ion cordless grass trimmer N0E-22ET-230 is intended for cutting weed, grass or similar soft vegetation in areas that are hard to reach, e.g. - Page 6 10. Stay alert, watch what you are doing. Use common sense when operating the appliance. Do not operate the tool when you are tired. 11. Grip the tool securely. Operator should have one hand on the main handle, the other on the front handle.
-
Page 7: Product Description
and matching outlets will reduce risk of electric shock. 2. Use your charger only to charge batteries of the type supplied with your tool. Other batteries could burst, causing personal injury and damage. 3. Only 2 battery packs are allowed to be charged continuously in order to prevent overheating of charger, necessary rest time is required to let the charger cool down before further charging. - Page 8 FIG A FIG B FIG C...
-
Page 9: Assembly
FIG D 1. Lock off button 2. Operating handle 3. On/Off Switch 4. Battery pack 5. Front Handle 6. Locking knob for the front handle 7. Locking Knob for the operating handle 8. Telescopic Knob 9. Locking knob for the support rollers 10. - Page 10 Please refer to FIG D 1. Charging procedure 1). Connect the charger (20) to the charger station(22). 2). Plug the charger into an appropriate AC power outlet. The LED (21) lights green to tell you that the charger is ready for use. 3) Slide the charger station (22) into the battery pack (4), make sure the charger station is...
- Page 11 least 15 minutes rest between battery pack charging. WARNING! NEVER TO LEAVE THE BATTERY AND CHARGER UNATTENDED WHEN CHARGING THE BATTERY. WARNING! TO AVOID THE SHORT CIRCUIT OF THE BATTERY PACK, DON’T TOUCH THEBATTERY TERMINALS WITH RINGS AND OTHER METALLIC OBJECTS. INSTALL THE GUARD (FIG E) FIG E...
- Page 12 FIG G MOUNTING THE FRONT HANDLE (FIG H) Put the front handle (5) to the clamp (A) and align the mounting holes with holes on the clamp. Inset the bolt through the mounting holes and tighten the locking knob (6) (FIG H) REMOVE OR INSTALL BATTERY PACK (FIG.
-
Page 13: Operation
from the tool. 2) Install the battery pack. Align the ribs on both side of the battery pack with the slots in the housing and slip it into place. Always insert it all the way until it locks in place with a click sound. If not, it may accidentally fall out of the tool, causing injury to you or someone around you. - Page 14 Rotate the operating handle (2) 90°. Release the locking Knob (7) and it will return to the original position automatically and lock the operating handle (2). FIG L SETTING THE ANGLE OF THE SUPPORT ROLLERS (FIG. M ) Open the locking knob (9). Rotate the support roller to the desired angle.
- Page 15 (FIG. N) STARTING 1. Before starting the grass trimmer for the first time, check that the nylon line touch or pass over the wire cutting blade. If it is not long enough: (1). Take off the battery pack from machine. (2).
- Page 16 1. Let the trimmer run for a few seconds to cut the line. 2. Use the trimmer at an angle of approximately15 degree to the working area. 3. Swing the trimmer head from side to side.(See Fig. FIG O 4. If the grass is very long cut in stages rather than trying to cut in one ago. Do not overload your trimmer, take small cuts this will keep machine operating at high speed and will greatly improve cutting efficiency.
- Page 17 assembly with one hand, while pushing down and turning the spool head with the other to unlock it (FIG Q). The spool carrier and spool will now disassemble easily. Note: There is a spring inside the head that could easily be lost. Ensure that it is put in a safe place.
-
Page 18: Troubleshooting
If not, check the power supply to the socket used for charger plug. 5. If a fault is suspected return the trimmer to an authorized dealer for repair. TECHINICAL DATA UTE01 Grass trimmer Voltage No-load speed... - Page 19 HOW TO OBTAIN REPLACEMENT PARTS: A replacement parts list is available online at Ukoke.com/Amazon.com/Walmart.com/newegg.con,. Replacement parts can be purchased online or by calling Ukoke Customer specialist (909)-606-4551 or by Email:Service@ukoke.com HOW TO LOCATE A RETURN CENTER: Return centers can be located at 19575 East ◆...
- Page 20 INC.’S, OBLIGATION UNDER THIS WARRANTY IS workmanship will be repaired or replaced without charge for STRICTLY AND EXCLUSIVELY LIMITED TO THE parts and labor by an authorized service center for UKOKE REPAIR OR REPLACEMENT OF DEFECTIVE PARTS ™ brand outdoor products.
Need help?
Do you have a question about the UTE01 and is the answer not in the manual?
Questions and answers