Table of Contents
Advertisement
Advertisement
Table of Contents

Related Manuals for Julabo Fusion Chef Pearl

Summary of Contents for Julabo Fusion Chef Pearl
- Page 1 Operating manual English pearl premium sous vide collection > &...
-
Page 2: Table Of Contents
Table of contents Table of contents Sous Vide basics ................4 Safety..................... 6 Proper use............... 6 Safety notices for your Pearl ........6 Safety notices for Sous Vide cooking .......10 Description of your Pearl............12 Front and rear views............12 Display and keypad............13 Accessories ................14 Attachments..............14 Accessories for cooking containers ......14... - Page 3 Table of contents Enjoying the first results..........23 Improving the results...........23 Working with your Pearl ............25 Switching on and starting the unit ......25 Operating the unit ............25 Setting the desired temperature .......25 Working with the timer ..........26 Changing settings ............27 Care and maintenance............30 Changing the water ............30 Decalcifying ..............31 Cleaning the unit ............31...
-
Page 4: Sous Vide Basics
Sous Vide basics Sous Vide basics Important! Always exercise the greatest possible care and maintain hygienic conditions at all times. 1. Preparation Use only fresh ingredients of the highest pos- sible quality. Prepare raw ingredients prop- erly. 2. Vacuuming Place the raw, refrigerated ingredients into special bags suitable for Sous Vide. - Page 5 Proper use 5. Refrigerated Remove the cooled bag from the ice water storage and store it at 3 °C (37 °F) or colder. 6. Regeneration Warm the cooled bag in a water bath shortly before serving. Complete the cooking proc- ess and serve the food.
-
Page 6: Safety
Safety Safety Proper use This product is designed to control the tem- perature of water in a bath tank. The product is used to prepare food in this water bath according to the Sous Vide technique (low- temperature, slow cooking of food in vac- uum-sealed packaging). - Page 7 Safety notices for your Pearl This device is not intended for use by persons (including children) with reduced physical, sensory or mental capabilities or lack of ex- perience and knowledge unless they have been given supervision or instruction con- cerning the use of the device by a person responsible for their safety.
- Page 8 Do not attempt to use the unit if the po- wer cord is damaged! For safety reasons a damaged power cord may only be re- placed by the manufacturer, a fusionchef by Julabo service representative or a simi- larly qualified person.
- Page 9 Safety notices for your Pearl Allow only authorized technicians to per- form service and repair tasks. Low bath fluid safety float This unit includes a low bath fluid safety float. Switching off this safety device (by blocking the float) can result in a hazard- ous situation.
-
Page 10: Safety Notices For Sous Vide Cooking
Safety Safety notices for Sous Vide cooking Only trained experts should attempt the Sous Vide cooking technique. It is important to follow precise and uniform work steps and maintain a hygienic environment in order to ensure adequate safety during food prepa- ration. - Page 11 Safety notices for Sous Vide cooking Observe HACCP It is also important that kitchen personnel regulations employ an appropriate HACCP (Hazards Analysis and Critical Control Points) system in order to monitor and document every step the food takes from delivery to serving. Monitor water Monitor the quality of the water in the Sous quality...
-
Page 12: Description Of Your Pearl
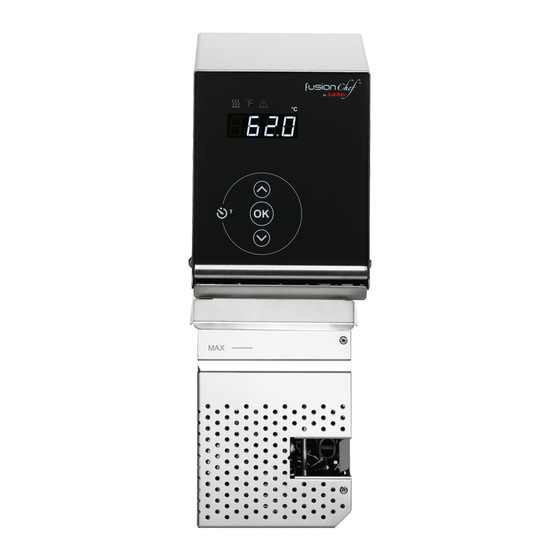
Description of your Pearl Description of your Pearl Front and rear views Front without protection grid Rear with protection grid LED display (see next Mains switch, illumi- page) nated Keypad (see next page) Micro fuses Safety float switch Power cord with plug Pump discharge Protection grid Heating coil... -
Page 13: Display And Keypad
Display and keypad Display and keypad LED display for temperature and timer Control displays: Heating Alarm °F Temperature units Fahrenheit °C Temperature units Celsius Timer key Keypad: Arrow keys for setting the temperature and timer OK key for entering values... -
Page 14: Accessories
Accessories Accessories The following accessories are available for your Pearl. Attachments Bath attachment clamp Use the bath attachment clamp to secure the Pearl to the wall of a cooking container. Max. wall Order No. thickness Attach. 60 mm 9FX1119 clamp Accessories for cooking containers Separation grid The separation grid is used to divide bath... -
Page 15: Temperature Sensor
Temperature sensor Retaining grids Retaining grids are inserted into the bath tank from above and are used to keep vacuum bags underwater. They help ensure that the food is cooked evenly from all sides. Order No. 2 retaining grids for baths S, M 9FX1125 2 retaining grids for baths L, XL 9FX1126... -
Page 16: Other Accessories
Accessories Order No. Handheld core temperature 9FX1151 sensor Adhesive sealing tape Place the adhesive sealing tape onto the vacuum bag before inserting the core tem- perature sensor. This will help maintain much of the vacuum. Order No. Adhesive sealing tape 4 m 9FX1141 Other accessories Travel case... -
Page 17: Installation And Initial Operation
Unpacking and inspecting the unit Installation and initial operation Unpacking and inspecting the unit Unpack the unit and accessories and imme- diately check the items for any damage that may have occurred during transport. Even if only the packing has been damaged, please notify the freight forwarder, railway com- pany, or postal service so they can file a damage report. -
Page 18: Adding Water To Tank
Installation and initial operation Fasten the unit in place Warning! Danger of electric shock! Carefully fasten the unit in place! If the unit is installed or fastened improperly, it may fall into the cooking container. If this happens: Pull the power plug from the power so- cket. - Page 19 Adding water to tank 20 mm max. 60 mm 80 mm 86 mm Optionally: Bath attachment clamp for wall thickness to 60 mm (~ 2 ⅜ inches), Order No. 9FX119.
-
Page 20: Beginning Initial Circulator Operation
Installation and initial operation Beginning initial circulator operation Caution! Compare the available power voltage and frequency with the specifications on the type label. This device may be attached only to power outlets with an earthing contact! The mains plug serves as a protective separator and must be easily accessible at all times. -
Page 21: First Steps
Prep work First steps This chapter is intended for users with little or no experience with the Sous Vide cooking technique. If you are an experienced Sous Vide cook or professional chef, you may skip this chapter and continue on page 25 „Work- ing with your Pearl“. -
Page 22: Starting The Unit
First steps Starting the unit After all preparations have been completed, you can begin the cooking process. 1. Make sure that the cooking container is properly filled and the Pearl is correctly in- stalled and connected. 2. Switch on the Pearl at the rear of the unit. The unit will go into Standby and display the OFF message. -
Page 23: Enjoying The First Results
Enjoying the first results... ally return to the currently measured tem- perature. Enjoying the first results... 1. After the Pearl has heated the water bath to the desired temperature, place the meat into the cooking container. 2. Allow it to cook for at least 60 minutes. Use the timer function: Press the timer key, use the arrow keys to select the desired time, and confirm with OK. - Page 24 First steps How did it For these reasons, it is unlikely that you will taste? achieve optimal results the first time you use the unit. To improve the results over time, you should ask your guests for their honest opin- What can I do ions and request their suggestions for im- better?
-
Page 25: Working With Your Pearl
Switching on and starting the unit Working with your Pearl Switching on and starting the unit Caution! Never operate a damaged or leaking unit! Do not attempt to use the unit if the power cord is damaged! 1. Use the power switch on the rear of the unit to turn the unit on. -
Page 26: Working With The Timer
Working with your Pearl 2. Confirm by pressing OK. The temperature will be adopted as the new target value and will remain in memory even after the unit is switched off. Working with the timer The Pearl has a programmable timer. The decimal point of the display will blink when- ever the timer is active. -
Page 27: Changing Settings
Changing settings Displaying and correcting the timer To display the remaining running time while the unit is in operation, press the timer key once. The remaining time will be displayed and can be modified with the arrow keys. If no value is entered, the display will eventu- ally return to the measured current tempera- ture and the previously set remaining time will be active. - Page 28 Working with your Pearl Setting the temperature units You can choose to display the temperature in either degrees Celsius or degrees Fahren- heit. Change the temperature units as fol- lows: 1. Switch off the unit. 2. Press the up-arrow and timer keys simul- taneously.
- Page 29 Changing settings The selected units will be displayed: C or F. The unit will now convert all temperatures to the desired units. Reset to factory settings You can reset the unit's settings to the original factory settings. This will clear all stored val- ues.
-
Page 30: Care And Maintenance
Care and maintenance Care and maintenance The circulator is designed for continuous op- eration under normal conditions. Regular maintenance is not required. However, you should perform the following cleaning tasks each day. Changing the water The circulator is suitable only for use with sof- tened/decalcified water. -
Page 31: Decalcifying
Decalcifying Draining bath tanks with single units Single units must be disassembled before draining the bath tank. 1. Switch off the unit and pull the mains plug. 2. Unscrew the bath attachment clamp and remove the unit from the bath tank. 3. - Page 32 Care and maintenance Chlorine in drinking water can result in corrosion. Iron in drinking water will precipitate and result in rust formation. 1. Use water with a low surface tension (such as a soap solution) to rinse the stain- less steel bath tank and immersed func- tional parts of the unit (circulation pump, float switch, and heater).
- Page 33 Cleaning the unit 4. Move the protection grid to the left. 5. Lift the protection grid Draw it over the float by turning it to the right by approx. 30° and slightly tilting backwards. 6. Turn the protection grid to the left back into the initial position and remove it.
-
Page 34: Confirming Temperature Accuracy
Care and maintenance Confirming temperature accuracy Checking temperature accuracy Fusionchef by Julabo units are precisely cali- brated and inspected before leaving our factory. The units are designed for highly pre- cise temperature control in continuous op- eration. Even over long periods of time, the sensors will retain their accuracy or become only marginally inaccurate. - Page 35 Confirming temperature accuracy Calibrating the unit Starting sensor calibration Calibrate the Pearl temperature sensor as follows: 1. Switch on the circulator and start the unit. 2. Start the calibration by pressing the timer key and OK simultaneously. Hold the keys down until the display's decimal point starts blinking.
- Page 36 Care and maintenance Deleting the most recent calibration If you have determined that a calibration is unnecessary or faulty, you can delete it. To do this, reset the unit to its factory condi- tion as described on page 29.
-
Page 37: Error Messages
If there is enough water in the bath tank: The float switch is defective (transport damage, etc.). Sent the unit to an authorized fusionchef by JULABO re- pair facility. E 05: WORKING SENSOR Please contact our service depart- ALARM ment. - Page 38 Error messages Shown on the display What should I do? E 12: TEMPERATURE Please contact our service depart- MEASUREMENT ALARM ment. CALL SECURE E 14: EXCESS TEMPERA- Please contact our service depart- TURE PROTECTOR ment. CALL SECURE ALARM E 33: SAFETY SENSOR Please contact our service depart- ALARM ment.
-
Page 39: Information About The Unit
Technical data Information about the unit Technical data Unit type Pearl Pearl Z Pearl S Order No. 9FT1000 9FT1113 9FT1B20 Working temperature range 20 ° C…95 ° C(68 ° F …203 ° F) Operating temperature range 0 ° C…95 °C (32 ° F …203 ° F) Temperature stability +/- 0,03 K (+/- 0.05 °... - Page 40 Information about the unit All data assume rated voltage and rated frequency Operating temperature: 70 °C (158 ° , ambient temperature: 20 °C (68 ° heat transfer fluid: water. Information subject to technical changes. Unit type Pearl M Pearl L Pearl XL Order No.
-
Page 41: Ec Compliance
Fax: 07823 / 2491 Technical Service E-mail: service@fusionchef.de If sending a product to fusionchef by Julabo: Please clean the device in order to avoid endangering the service personnel. Prepare the device for shipment with ca- reful and proper packaging. Always include a brief description of the problem. -
Page 42: Disposal
Information about the unit fusionchef by Julabo will not be liable for any damage caused by improper packaging. Notice During the repair process fusionchef by Ju- labo reserves the right to perform any tech- nical changes necessary to ensure flawless operation of the device. -
Page 43: Warranty
Warranty Warranty fusionchef by Julabo warrants flawless func- tionality of this unit, assuming it has been insatlled and used properly and in accor- dance with the directives contained in these operating instructions. The warranty time period is two years. The warranty is limited to our choice of im- provement, no-charge repair, or replace- ment in response to customer complaint.
Need help?
Do you have a question about the Fusion Chef Pearl and is the answer not in the manual?
Questions and answers