Table of Contents
Advertisement
Operating manual
premium sous vide collection
Printed in Germany
Changes without prior notification reserved
1.951.0550-V6
06/16
diamond
17.06.16
English
fusionchef
Julabo GmbH
Gerhard-Juchheim-Strasse 1
77960 Seelbach / Germany
Tel. +49 (0) 7823 / 51-170
Fax +49 (0) 7823 / 2491
info@fusionchef.de
www.fusionchef.de
Advertisement
Table of Contents

Subscribe to Our Youtube Channel
Related Manuals for Julabo Fusion Chef diamond

Summary of Contents for Julabo Fusion Chef diamond
- Page 1 Operating manual English diamond premium sous vide collection fusionchef Julabo GmbH Gerhard-Juchheim-Strasse 1 77960 Seelbach / Germany Tel. +49 (0) 7823 / 51-170 Fax +49 (0) 7823 / 2491 info@fusionchef.de www.fusionchef.de Printed in Germany Changes without prior notification reserved 1.951.0550-V6 06/16 17.06.16...
-
Page 2: Table Of Contents
Table of contents Table of contents Sous Vide basics ................5 Safety ..................... 7 Proper use ............... 7 Safety notices for your Diamond ........7 Safety notices for Sous Vide cooking ......11 Description of your Diamond ............ 13 Front and rear views ............ 13 Display and keypad ............ - Page 3 Table of contents Improving the results ........... 28 Working with your Diamond ............ 30 Gaining experience ............30 Switching on and starting the unit ..........30 Operating the unit ................30 Setting the desired temperature ..........31 Using the quick keys ............... 31 Changing the stored temperatures ..........
- Page 4 Table of contents Confirming temperature accuracy ......59 Checking temperature accuracy ..........59 Calibrating the external sensor ........... 59 Calibrating the unit in an ice water bath ........61 Error messages ................64 Basic troubleshooting ..........64 Error messages ............. 65 Information about the unit ............
-
Page 5: Sous Vide Basics
Proper use Sous Vide basics Important! Always exercise the greatest possible care and main- tain hygienic conditions at all times. 1. Preparation Use only fresh ingredients of the highest possible quality. Prepare raw ingredients properly. 2. Vacuuming Place the raw, refrigerated ingredients into special bags suitable for Sous Vide. - Page 6 Sous Vide basics 5. Refrigerated Remove the cooled bag from the ice water and store storage it at 3 °C (37 °F) or colder. 6. Regeneration Warm the cooled bag in a water bath shortly before serving. Complete the cooking process and serve the food.
-
Page 7: Safety
Proper use Safety Proper use This product is designed to control the temperature of water in a bath tank. The product is used to pre- pare food in this water bath according to the Sous Vide technique (low-temperature, slow cooking of food in vacuum-sealed packaging). - Page 8 Safety This device is not intended for use by persons (includ- ing children) with reduced physical, sensory or mental capabilities, or lack of experience and knowledge unless they have been given supervision or instruction concerning the use of the device by a person respon- sible for their safety.
- Page 9 Safety notices for your Diamond It is essential that you read the operating instruc- tions before initial operation. Install the stainless steel bath tank indoors only and on a level, noncombustible surface. Do not use this unit outdoors! ...
- Page 10 Do not attempt to use the unit if the power cord is damaged! For safety reasons a damaged power cord may only be replaced by the manufacturer, a fusionchef by Julabo service representative or a similarly qualified person Allow only authorized technicians to perform service and repair tasks.
-
Page 11: Safety Notices For Sous Vide Cooking
Safety notices for Sous Vide cooking Safety notices for Sous Vide cooking Only trained experts should attempt the Sous Vide cooking technique. It is important to follow precise and uniform work steps and maintain a hygienic envi- ronment in order to ensure adequate safety during food preparation. - Page 12 Safety It is also important that kitchen personnel employ an Observe HACCP appropriate HACCP (Hazards Analysis and Critical regulations Control Points) system in order to monitor and doc- ument every step the food takes from delivery to serving. Monitor water qual- Monitor the quality of the water in the Sous Vide bath and change it regularly.
-
Page 13: Description Of Your Diamond
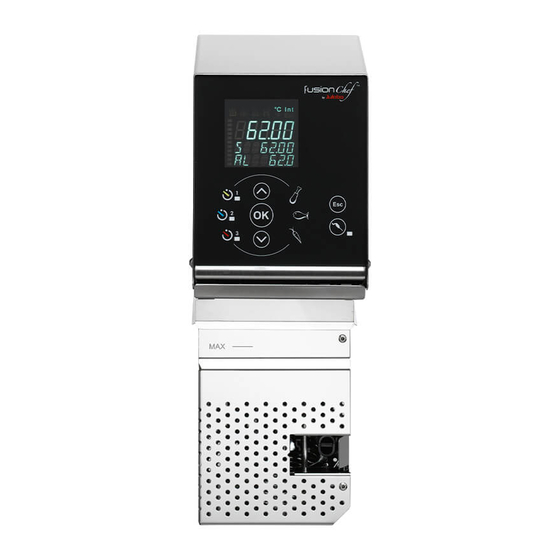
Front and rear views Description of your Diamond Front and rear views Front without protection grid Rear with protection grid VFD display (see next page) RS232 interface for computer connection Keypad (see next page) Mains switch, illumi- nated Safety float switch Micro fuses Pump discharge Power cord with plug... -
Page 14: Display And Keypad
Description of your Diamond Display and keypad VFD display Status icons: Heating/Alarm Datalogger activation indicator Temperature unit display (°C or °F) and temperature sensor for current temperature: Int for temperature sensor in water bath Ext for attached core temperature sensor Main display for current temperature value Display line 1 for set point value Display line 2 for time value... - Page 15 Display and keypad Quick keys for MEAT, FISH, Core temperature sensor button Keypad: Arrow keys to set temperature and timer key to confirm the values Key to correct settings, stop functions or enter a menu (press together with key 10)
-
Page 16: Accessories
Accessories Accessories The following accessories are available for your Dia- mond. Attachments Bath attachment clamp Use the bath attachment clamp to secure the Dia- mond to the wall of a cooking container. Max. wall thickness Order No. Attach. clamp 30 mm 9FX1118 Accessories for cooking containers Separation grid... - Page 17 Accessories for cooking containers Retaining grids Retaining grids are inserted into the bath tank from above and are used to keep vacuum bags underwater. They help ensure that the food is cooked evenly from all sides. Order No. 1 retaining grid for bath XS 9FX1127 2 retaining grids for baths S, M 9FX1125...
-
Page 18: Temperature Sensor
Accessories Temperature sensor Core temperature sensor Use the core temperature sensor to achieve optimal results when cooking meat or fish. Refer to the chap- ter A closer look starting on page 37 for more de- tails on how to use the Diamond with the core tem- perature sensor. -
Page 19: Other Accessories
Other accessories Other accessories Travel case The travel case is designed to hold your Diamond and accessories. Order No. Travel case 9FX1190 Soft Travel case (Polyester) Sturdy soft travel case made of polyester, with carry- ing straps and removable shoulder strap. Order No. - Page 20 Accessories RS232 interface cable Use the RS232 interface to connect the Diamond to a computer. Order No. RS232 interface cable 9FX1162 USB adapter cable Use the USB adapter to connect the Diamond to a computer. Order No. USB adapter cable 9FX1161...
-
Page 21: Installation And Initial Operation
Unpacking and inspecting the unit Installation and initial operation Unpacking and inspecting the unit Unpack the unit and accessories and immediately check the items for any damage that may have oc- curred during transport. Even if only the packing has been damaged, please notify the shipping provider, railway company, or postal service so they can file a damage report. - Page 22 Installation and initial operation Fasten the unit in place Warning! Danger of electric shock! Carefully fasten the unit in place! If the unit is installed or fastened improperly, it may fall into the cooking container. If this happens: Pull the power plug from the power socket. ...
-
Page 23: Adding Water To Tank
Adding water to tank Please insert the enclosed distance sleeves (∅ 8 mm x 17 mm) into the combination units Diamond Edi- tion XS, S and L. Optionally Bath attachment clamp for wall thickness > 30 mm: max. wall Order No. thickness Attachm. -
Page 24: Beginning Initial Circulator Operation
Installation and initial operation Beginning initial circulator operation Caution! Compare the available power voltage and fre- quency with the specifications on the type label. This device may be attached only to power out- lets with an grounding contact! ... -
Page 25: First Steps
Prep work First steps This chapter is intended for users with little or no experience with the Sous Vide cooking technique. If you are an experienced Sous Vide cook or profes- sional chef, you may skip this and continue with page 30 „Working with your Diamond“. -
Page 26: Starting The Unit
First steps Starting the unit After all preparations have been completed, you can begin the cooking process. 1. Make sure that the cooking container is properly filled and the Diamond is correctly installed and connected. 2. Switch on the Diamond at the rear of the unit. The unit will go into standby. -
Page 27: Enjoying The First Results
Enjoying the first results... 5. When you have found the desired temperature, press in order to adopt it as the target tem- perature. We recommend starting at a tempera- ture of 62 °C (144 °F), but you can also select your own values. -
Page 28: Improving The Results
First steps 5. Sear the meat briefly at high temperature on both sides in order to achieve an attractive brown col- or. Then serve. Enjoy your meal! Improving the results The results of the cooking process are influenced by many factors, including: •... - Page 29 Improving the results Now that you know how to use your Diamond, How can I influence the careful manipulation of two major variables can influ- results? ence the cooking process: Cooking temperature Cooking time. The following chapter explains how to adjust the temperature and monitor cooking time.
-
Page 30: Working With Your Diamond
Working with your Diamond Working with your Diamond Gaining experience Switching on and starting the unit Caution! Never operate a damaged or leaking unit! Do not attempt to use the unit if the power cord is damaged! 1. Use the power switch on the rear of the unit to turn the unit on. -
Page 31: Setting The Desired Temperature
Gaining experience Setting the desired temperature You can change the target temperature from the main view while in standby or during regular operation. 1. Press the arrow keys in order to change the temperature. The whole digits will change first. Confirm your selection by pressing 2. -
Page 32: Changing The Stored Temperatures
Working with your Diamond This displayed temperature will be adopted as the new set point. Changing the stored temperatures After you have more experience, you may wish to store your own temperature values. You can do this in two ways: ... -
Page 33: Working With The Timer
Gaining experience 1. While in the main view, press and hold the de- sired quick key for at least two seconds (in this example: the Meat key). Quick key 1 will be displayed; only the number 59. 6 0 will blink. 2. - Page 34 Working with your Diamond Setting the timers Proceed as follows to set one of the timer: 1. Press and hold the timer key for at least two seconds. The timer view will appear and the most recently set timer value will blink on the bottom line. The timer's value is always preset with the most re- cently used time.
- Page 35 Gaining experience Adjusting a timer You can adjust a timer at any time while the unit is in operation, even if the signal has already triggered. 1. Press the desired timer key to display the timer. 2. Use the arrow keys to add (+) or sub- tract (-) minutes from the timer.
- Page 36 Working with your Diamond When the timer triggers An audible signal (loud beeping noise) is emitted when a timer has run out. The corresponding timer key blinks at the same time. The timer will continue to run even while the signal is active and display the number of minutes that have passed since the signal was triggered as a negative number.
-
Page 37: A Closer Look
A closer look For example, let us assume that your filet has not been adequately cooked after the timer has run down and you wish to keep it in the water bath for another 10 minutes. 1. Press the timer key. 2. -
Page 38: Connecting The Core Temperature Sensor
Connecting the core temperature sensor We recommend using only the fusionchef by Julabo core temperature sensor, which has been calibrated at our factory and is designed to work with precision. -
Page 39: Inserting The Core Temperature Sensor
A closer look Inserting the core temperature sensor Notice Although the core temperature sensor is inserted into the vacuum bag through the special adhesive sealing tape, we cannot exclude the possibility that the food will come into contact with liquid from the wa- ter bath. -
Page 40: Switching Off The Temp. Sensor Alarm
Working with your Diamond 2. Use the arrow keys to set the desired core temperature. The alarm will signal when the temperature reaches 1 °C (33.8 °F) below the target temperature. 3. Press to activate the temperature sensor alarm. As soon as the temperature sensor alarm is activated, the temperature sensor key will illuminate and the selected alarm value will be shown on the bottom line... -
Page 41: Automating Processes
Automating processes Temperature sen- If the core temperature sensor's plug is accidentally sor removed pulled out or the connection separated in any other or connection way while the temperature sensor alarm is activated, separated the Diamond will display an alarm and error mes- sage. -
Page 42: Starting Automatic Cooking Time Detection
Working with your Diamond CONFIG to select the CON- 2. Use the arrow keys FIG menu entry and confirm with CDETECT 3. Select CDETECT (Cooking Time Detection) and confirm with 4. Select ON and press Automatic cooking time detection has been activated. Starting automatic cooking time detection Once automatic cooking time detection has been activated in the menu, you can start using this feature... - Page 43 Automating processes 1. When the food reaches its optimal temperature, trigger the alarm by pressing and holding the temperature sensor key for at least 2 sec- onds. As soon as the alarm has triggered, the unit will give you the option of storing the cooking time in whichever timer you choose.
-
Page 44: Retrieving The Cooking Time
Working with your Diamond Retrieving the cooking time Retrieving a stored cooking time is very easy. 1. Press and hold the timer key with the desired time for at least two seconds. The timer view will appear and your preset cooking time will be dis- played. - Page 45 Automating processes Consider the following example: 1. You activate automatic cooking time detection in the menu. 2. You set the temperature sensor alarm to the desired core temperature. 3. As soon as the core temperature is reached, the alarm activates. The time that passed between these two events is stored as your cook- ing time.
-
Page 46: Special Functions
Working with your Diamond Special functions Automatic temperature monitoring Using automatic temperature monitoring Our units are designed to achieve a precise target temperature in the water bath. Temperature changes, like those caused by the addition of refrigerated food, are quickly compensated for. However, certain condi- tions such as the adding cold water to the water bath may result in larger temperature fluctuations. - Page 47 Special functions 5. Use the arrow keys to set the appropri- ate temperature limits. Then confirm your selec- tion by pressing Temperature monitoring is now activated. Notice Guidelines for temperature limits: If using a larger cooking container, set the limit from 0.5 °C to 1 °C (33 °F to 34 °F (;...
-
Page 48: Recording And Exporting Data
Working with your Diamond CODE 03: EXCESS WATER TEMPERATURE WARNING - CODE 04: LOW WATER TEMPERATURE WARNING - You may also mute this alarm. Do this the same way you mute other alarms - by pressing once. The alarm message will still be visible. The alarm will switch off automatically as soon as the current temperature is back within the tolerance range. - Page 49 Special functions Setting the date and time You must set the date and time in order for the data- logger to record the correct data. 1. Access the menu by pressing the Esc sensor keys simultaneously. CONFIG 2. Use the arrow keys to select the CON- FIG menu entry and confirm with TIME/DT...
- Page 50 Working with your Diamond Internal datalogger modes Datalogger is switched off ALWAYS The datalogger will record at all times. When the memory is full, the oldest data will be overwritten. The memory space will not be displayed and the memory will not be deleted when the data is exported.
- Page 51 Special functions Adjusting the recording interval The datalogger records data at specified time inter- vals. This ensures that important data will be record- ed without unnecessarily filling up the memory. The factory default recording interval is five minute. You can adjust this interval if you require shorter recording intervals or if the memory fills up too fast.
-
Page 52: Additional Menu Settings
Working with your Diamond Delete the contents of the memory as follows: 1. Access the menu by pressing the Esc sensor keys simultaneously. LOGGER to select the LOG- 2. Use the arrow keys GER menu entry and confirm with CLR MEM 3. - Page 53 Special functions ALDELAY 3. Select ALDELAY and confirm with 4. Set the desired alarm delay in seconds (10 to 999) and confirm with The time delay that you set will now be adopted. Switching key tones on and off If desired, the unit will emit a short beep every time you press a key.
- Page 54 Working with your Diamond Setting the temperature units You can choose to display the temperature in either degrees Celsius or degrees Fahrenheit. Change the temperature units as follows: 1. Access the menu by pressing the Esc sensor keys simultaneously. CONFIG to select the CON- 2.
-
Page 55: Care And Maintenance
Changing the water Care and maintenance The circulator is designed for continuous operation under normal conditions. Regular maintenance is not required. A particle filter protects the circulation pump from large contaminants in the thermal bath fluid. However, you should perform the following cleaning tasks each day. -
Page 56: Decalcifying
Care and maintenance Draining bath tanks with single units Single units must be disassembled before draining the bath tank. 1. Switch off the unit and pull the power plug. 2. Unscrew the bath attachment clamp and remove the unit from the bath tank. 3. - Page 57 Cleaning the unit Iron in drinking water will precipitate and result in rust formation. Removing/installing the protection grid To properly clean the unit and the particle filter and to check the low-level protection device, it is neces- sary to remove the protection grid. Do this as fol- lows: 1.
- Page 58 Care and maintenance 10. Then rinse well with water and dry the parts with a soft towel. Do not turn the unit upside down. When drying the unit, hold it in such away that the water does not run into the interior of the circulator.
-
Page 59: Confirming Temperature Accuracy
Confirming temperature accuracy Confirming temperature accuracy Checking temperature accuracy Fusionchef by Julabo units are precisely calibrated and inspected before leaving our factory. The units are designed for highly precise temperature control in continuous operation. Even over long periods of time, the sensors will retain their accuracy or become only marginally inaccurate. - Page 60 Care and maintenance 3. Access the menu by pressing the Esc sensor keys simultaneously. SENSCAL 4. Use the arrow keys to select the SENSCAL menu entry and confirm with EXECUTE 5. Select EXECUTE and confirm with Sensor calibration will now start. The necessary steps will be shown on the display.
-
Page 61: Calibrating The Unit In An Ice Water Bath
Confirming temperature accuracy 1. Access the menu by pressing the Esc sensor keys simultaneously. SENSCAL 2. Use the arrow keys to select the SENSCAL menu entry and confirm with ERASE 3. Select ERASE and confirm with The most recent calibration of the temperature sen- sor will be deleted. - Page 62 Care and maintenance Starting calibration 1. Access the menu by pressing the Esc sensor keys simultaneously. AUTOCAL to select the AU- 2. Use the arrow keys TOCAL menu entry and confirm with EXECUTE 3. Select EXECUTE and confirm with Calibration will now start. During calibration, all func- tions will be blocked and the warning symbol will illuminate.
- Page 63 Confirming temperature accuracy Deleting the most recent calibration If you have determined that a calibration is unneces- sary or faulty, you can delete the most recent calibra- tion. 1. Access the menu by pressing the Esc sensor keys simultaneously. AUTOCAL 2.
-
Page 64: Error Messages
Error messages Error messages The following table contains some of the possible error messages with the associated warnings messag- es and resolutions. All warning messages are indicated on the display and accompanied by an audible signal. To mute the audible signal, press once. -
Page 65: Error Messages
If there is enough water in the bath tank: The float switch is defective (transport dam- age, etc.). Sent the unit to an authorized fusionchef by Julabo repair facility. CODE 05: WORKING Please contact our service department. SENSOR ALARM CODE 06: SENSOR DIFFE- Please contact our service department. -
Page 66: Information About The Unit
Information about the unit Information about the unit Technical data Diamond Diamond Z Unit type Order No. 9FT2000 9FT2113 Working temperature range 20°C…95°C (68 °F …203 °F) Operating temperature range 0°C…95°C (32 °F …203 °F) Temperature stability +/- 0.01K Temperature setting digital Temperature display VFD-Display... - Page 67 Technical data Diamond XS Diamond S Unit type 9FT2B13 9FT2B20 Order No. Working temperature range 20°C…95°C (68 °F …203 °F) Operating temperature range 0°C…95°C (32 °F …203 °F) Temperature stability +/- 0.01K Temperature setting digital Temperature display VFD-Display Display resolution 0,01 °C Temperature control Connections...
- Page 68 Information about the unit Diamond M Diamond L Diamond XL Unit type 9FT2B27 9FT2B44 9FT2B58 Order No. Working temperature range 20°C…95°C(68 °F …203 °F) Operating temperature range 0°C…95°C (32 °F …203 °F) Temperature stability +/- 0.01K Temperature setting Digital Temperature display VFD display Display resolution 0.01 °C (0.01 °F)
-
Page 69: Ec Compliance
Repairs We recommend that you speak with our technical service department before requesting a service tech- nician or sending a fusionchef by Julabo device in for repair. fusionchef by Julabo Telephone: 07823 / 51-66... -
Page 70: Disposal
Information about the unit fusionchef by Julabo will not be liable for any damage caused by improper packaging. Notice During the repair process fusionchef by Julabo re- serves the right to perform any technical changes necessary to ensure flawless operation of the device. -
Page 71: Warranty
Warranty Warranty fusionchef by Julabo warrants flawless functionality of this unit, assuming it has been installed and used properly and in accordance with the directives con- tained in these operating instructions. The warranty time period is two years. The warranty is limited to our choice of improve- ment, no-charge repair, or replacement in response to customer complaint.
Need help?
Do you have a question about the Fusion Chef diamond and is the answer not in the manual?
Questions and answers