
Summary of Contents for Radware APSolute Vision
- Page 1 APSolute Vision INSTALLATION AND MAINTENANCE GUIDE Software Version 4.00 RDWR_APSV_V400_IG1808 August, 2018...
- Page 2 APSolute Vision Installation and Maintenance Guide Document ID: RDWR_APSV_V400_IG1808...
-
Page 3: Important Notices
Ce guide d’informations est fourni à nos clients dans le cadre de l’installation et de l’usage des produits de Radware décrits dans ce document et ne pourra être utilisé dans un but autre que celui pour lequel il a été conçu. -
Page 4: Copyright Notices
APSolute Vision Installation and Maintenance Guide Copyright Notices The following copyright notices are presented in English, French, and German. Copyright Notices The programs included in this product are subject to a restricted use license and can only be used in conjunction with this application. - Page 5 The OnDemand Switch may use software components licensed under the GNU General Public License Agreement Version 2 (GPL v.2) including LinuxBios and Filo open source projects. The source code of the LinuxBios and Filo is available from Radware upon request. A copy of the license can be viewed at: http://www.gnu.org/licenses/old-licenses/gpl-2.0.html.
- Page 6 APSolute Vision Installation and Maintenance Guide This product contains code developed by the OpenBSD Project Copyright 1983, 1990, 1992, 1993, 1995 © The Regents of the University of California. All rights reserved. Redistribution and use in source and binary forms, with or without modification, are permitted provided that the following conditions are met: 1.
- Page 7 GNU General Public License Agreement Version 2 (GPL v.2), y compris les projets à source ouverte LinuxBios et Filo. Le code source de LinuxBios et Filo est disponible sur demande auprès de Radware. Une copie de la licence est répertoriée sur: http://www.gnu.org/licenses/old- licenses/gpl-2.0.html.
- Page 8 Der OnDemand Switch verwendet möglicherweise Software, die im Rahmen der DNU Allgemeine Öffentliche Lizenzvereinbarung Version 2 (GPL v.2) lizensiert sind, einschließlich LinuxBios und Filo Open Source-Projekte. Der Quellcode von LinuxBios und Filo ist bei Radware auf Anfrage erhältlich. Eine Kopie dieser Lizenz kann eingesehen werden unter: http://www.gnu.org/licenses/old-licenses/gpl-2.0.html...
-
Page 9: Standard Warranty
Radware software carries a standard warranty that provides bug fixes for up to 90 days after date of purchase. Should a Product unit fail anytime during the said period(s), Radware will, at its discretion, repair or replace the Product. - Page 10 S'agissant de la garantie d'échange ou de réparation du matériel informatique, le Produit doit être retourné chez un réparateur désigné par Radware. Le Client aura à sa charge les frais d'envoi du Produit à Radware et Radware supportera les frais de retour du Produit au client. Veuillez consulter les conditions spécifiques décrites dans la partie "...
-
Page 11: Limitations On Warranty And Liability
The following limitations on warranty and liability are presented in English, French, and German. Limitations on Warranty and Liability IN NO EVENT SHALL RADWARE LTD. OR ANY OF ITS AFFILIATED ENTITIES BE LIABLE FOR ANY DAMAGES INCURRED BY THE USE OF THE PRODUCTS (INCLUDING BOTH HARDWARE AND SOFTWARE) DESCRIBED IN THIS USER GUIDE, OR BY ANY DEFECT OR INACCURACY IN THIS USER GUIDE ITSELF. -
Page 12: Safety Instructions
To reduce the risk of fire and electrical shock, disconnect the device from the power line before removing cover or panels. The following figure shows the caution label that is attached to Radware platforms with dual power supplies. Figure 1: Electrical Shock Hazard Label DUAL-POWER-SUPPLY-SYSTEM SAFETY WARNING IN CHINESE The following figure is the warning for Radware platforms with dual power supplies. - Page 13 APSolute Vision Installation and Maintenance Guide GROUNDING Before connecting this device to the power line, the protective earth terminal screws of this device must be connected to the protective earth in the building installation. LASER This equipment is a Class 1 Laser Product in accordance with IEC60825 - 1: 1993 + A1:1997 + A2:2001 Standard.
- Page 14 APSolute Vision Installation and Maintenance Guide REPLACEABLE BATTERIES If equipment is provided with a replaceable battery, and is replaced by an incorrect battery type, then an explosion may occur. This is the case for some Lithium batteries and the following is applicable: •...
- Page 15 Pour réduire les risques d’incendie et de chocs électriques, déconnectez le dispositif du bloc d’alimentation avant de retirer le couvercle ou les panneaux. La figure suivante montre l’étiquette d’avertissement apposée sur les plateformes Radware dotées de plus d’une source d’alimentation électrique.
- Page 16 APSolute Vision Installation and Maintenance Guide LASER Cet équipement est un produit laser de classe 1, conforme à la norme IEC60825 - 1: 1993 + A1: 1997 + A2: 2001. FUSIBLES Assurez-vous que, seuls les fusibles à courant nominal requis et de type spécifié sont utilisés en remplacement.
- Page 17 APSolute Vision Installation and Maintenance Guide BATTERIES REMPLAÇABLES Si l’équipement est fourni avec une batterie, et qu’elle est remplacée par un type de batterie incorrect, elle est susceptible d’exploser. C’est le cas pour certaines batteries au lithium, les éléments suivants sont donc applicables: •...
- Page 18 Servicepersonal durchgeführt werden. Zur Reduzierung der Feuer- und Stromschlaggefahr muss das Gerät vor der Entfernung der Abdeckung oder der Paneele von der Stromversorgung getrennt werden. Folgende Abbildung zeigt das VORSICHT-Etikett, das auf die Radware-Plattformen mit Doppelspeisung angebracht ist. Figure 5: Warnetikett Stromschlaggefahr...
- Page 19 APSolute Vision Installation and Maintenance Guide SICHERHEITSHINWEIS IN CHINESISCHER SPRACHE FÜR SYSTEME MIT DOPPELSPEISUNG Die folgende Abbildung ist die Warnung für Radware-Plattformen mit Doppelspeisung. Figure 6: Sicherheitshinweis in chinesischer Sprache für Systeme mit Doppelspeisung Übersetzung von Sicherheitshinweis in chinesischer Sprache für Systeme mit Doppelspeisung: Die Einheit verfügt über mehr als eine Stromversorgungsquelle.
- Page 20 APSolute Vision Installation and Maintenance Guide BESONDERER HINWEIS FÜR BENUTZER IN NORDAMERIKA Wählen Sie für den Netzstromanschluss in Nordamerika ein Stromkabel, das in der UL aufgeführt und CSA-zertifiziert ist 3 Leiter, [18 AWG], endend in einem gegossenen Stecker, für 125 V, [10 A], mit einer Mindestlänge von 1,5 m [sechs Fuß], doch nicht länger als 4,5 m.
-
Page 21: Electromagnetic-Interference Statements
APSolute Vision Installation and Maintenance Guide Vorsicht - Zur Reduzierung der Stromschlag- und Feuergefahr 1. Dieses Gerät ist dazu ausgelegt, die Verbindung zwischen der geerdeten Leitung des Gleichstromkreises und dem Erdungsleiter des Gerätes zu ermöglichen. Siehe Montageanleitung. 2. Wartungsarbeiten jeglicher Art dürfen nur von qualifiziertem Servicepersonal ausgeführt werden. - Page 22 APSolute Vision Installation and Maintenance Guide Install and use the equipment according to the instruction manual. KCC KOREA Figure 8: KCC—Korea Communications Commission Certificate of Broadcasting and Communication Equipment Figure 9: Statement for Class A KCC-certified Equipment in Korean Translation of...
- Page 23 APSolute Vision Installation and Maintenance Guide DÉCLARATIONS SUR LES INTERFÉRENCES ÉLECTROMAGNÉTIQUES VCCI Figure 11: Déclaration pour l’équipement de classe A certifié VCCI Traduction de la Déclaration pour l’équipement de classe A certifié VCCI: Il s’agit d’un produit de classe A, basé sur la norme du Voluntary Control Council for Interference by Information Technology Equipment (VCCI).
- Page 24 APSolute Vision Installation and Maintenance Guide Hinweis: Dieses Gerät wurde geprüft und entspricht den Beschränkungen von digitalen Geräten der Klasse 1 gemäß Teil 15B FCC-Vorschriften und EN55022 Klasse A, EN55024; EN 61000-3-2; EN; IEC 61000 4-2 to 4-6, IEC 61000 4-8 und IEC 61000-4- 11 für Konformität mit der CE-Bezeichnung.
-
Page 25: Altitude And Climate Warning
APSolute Vision Installation and Maintenance Guide Figure 18: Erklärung zu BSMI-zertifizierten Geräten der Klasse A 這是甲類的資訊產品,在居住的環境使用中時,可能會造成射頻 干擾,在這種情況下,使用者會被要求採取某些適當的對策。 Übersetzung von Erklärung zu BSMI-zertifizierten Geräten der Klasse Dies ist ein Class A Produkt, bei Gebrauch in einer Wohnumgebung kann es zu Funkstörungen kommen, in diesem Fall ist der Benutzer verpflichtet, angemessene Maßnahmen zu ergreifen. -
Page 26: Document Conventions
APSolute Vision Installation and Maintenance Guide Document Conventions The following describes the conventions and symbols that this guide uses: Item Description Description Beschreibung An example scenario Un scénario d’exemple Ein Beispielszenarium Example Possible damage to Endommagement Mögliche Schäden an equipment, software, or possible de l’équipement,... -
Page 27: Table Of Contents
Installing APSolute Vision Server with APM Server VA ..........APSolute Vision Server with APM Server VA Requirements ..........Installing and Configuring APSolute Vision Server with APM Server VA on VMware ..Installing APSolute Vision Server with APM Server VA on KVM ......... - Page 28 Shutting Down and Rebooting ..................Managing Configuration Files ..................Recovering the “radware” User Password ..............Upgrading the APSolute Vision Server and APSolute Vision Server with APM Server VA Upgrading Using the CLI ..................... Upgrading using the Web Browser ..................Upgrading Licenses ....................
-
Page 29: Chapter 1 - Platforms
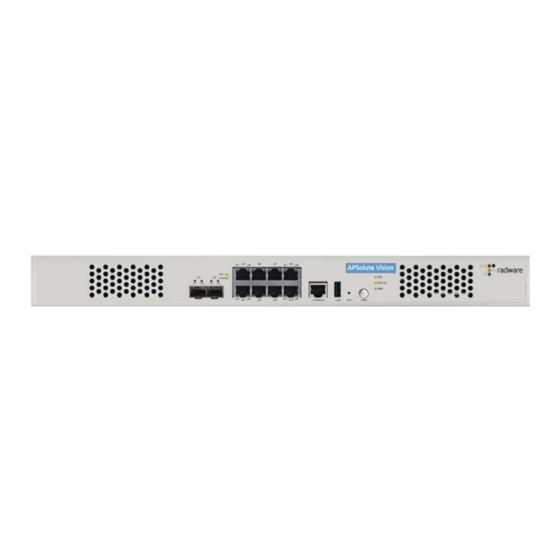
This section describes the APSolute Vision server ODS-VL physical platform. Note: For more information on the APSolute Vision platform and the APSolute Vision server and client software, see the APSolute Vision User Guide. Figure 19: APSolute Vision ODS-VL Platform Front Panel... -
Page 30: The Apsolute Vision Server Ods-Vl2 Physical Platform
This section describes the APSolute Vision server ODS-VL2 physical platform. Note: For more information on the APSolute Vision platform and the APSolute Vision server and client software, see the APSolute Vision User Guide. Figure 21: APSolute Vision ODS-VL2 Platform Front Panel... - Page 31 APSolute Vision Installation and Maintenance Guide Platforms Table 3: APSolute Vision ODS-VL2 Platform Front Panel Feature Label/Description USB port for recovery. Status LEDs: • FAN—Green indicates normal operation. Red indicates that one or more fans are not operating. • SYS OK—Green indicates normal operation. Red indicates that the platform is booting.
-
Page 32: Dc Power Supply Connectors
Figure 23 - DC Power Supply Connector 1U-size platforms, page 32 shows the DC connector for the APSolute Vision single and dual DC power supply platform. Figure 23: DC Power Supply Connector 1U-size platforms Document ID: RDWR_APSV_V400_IG1808... -
Page 33: Chapter 2 - Pre-Installation
2. Locate, remove, and set aside the accessories box. 3. Verify the contents of the accessories box with the packing list. Immediately report any missing item to your Radware representative. Notes — The accessories box contains all cables, power cords, mounting kits, a product CD with a user guide, and all other accessories required for the particular platform model and version. -
Page 34: Checking The Contents
APSolute Vision Installation and Maintenance Guide Pre-Installation Checking the Contents Before beginning the installation, verify that all components required for the installation, as listed in the packing list document attached to the box, is at hand. If you are missing any of the components, contact Radware Technical Support. -
Page 35: Connecting Cables To The Platform
For an ODS VL2 platform: Connect an Ethernet cable to the port labeled G3 or G5 Note: You can use one port for APSolute Vision clients and the second port for connecting to other networks or to connect to a laptop for troubleshooting the APSolute Vision appliance. - Page 36 APSolute Vision Installation and Maintenance Guide Pre-Installation Document ID: RDWR_APSV_V400_IG1808...
-
Page 37: Chapter 3 - Platform Installation
This section describes the procedure for preparing the USB flash drive for versions 3.0 and later. To install APSolute Vision server using a USB flash drive, you need to have a USB flash drive pre- installed with the required APSolute Vision version, or to prepare the USB flash drive yourself from the ISO file using USB preparation utility. -
Page 38: Installing An Apsolute Vision Server
1. If APSolute Vision is not powered off, press the PWR (Power) button until the platform powers off. 2. Insert the USB flash drive into the USB slot on the front of the APSolute Vision server. 3. Connect a console terminal to the APSolute Vision platform through the RJ-45-to-DE-9 cable. -
Page 39: Installing The Apsolute Vision Virtual Platform
APSolute Vision VA runs on VMware, KVM, Microsoft Hyper-V, or OpenStack virtual machines and supports all the functionality of APSolute Vision. Radware provides a full-scale APSolute Vision VA version for production use, and a demo-scale VA version not for use for production systems. -
Page 40: Apsolute Vision Va Requirements
2. After you click Finish to finish deploying the APSolute Vision VA OVA template, from the Home > Inventory drop-down list, select Templates and VMs. 3. Right-click the required APSolute Vision VA from the list, and then select Power On. After the system boots, the login prompt is displayed. -
Page 41: Installing Apsolute Vision Va On Kvm Using An Iso Image
APSolute Vision User Guide. Installing APSolute Vision VA on KVM using an ISO Image You can install APSolute Vision VA or APSolute Vision Server with APM Server VA on the KVM virtualization infrastructure. This procedure details how to install the APSolute Vision virtual appliance (VA) platform on a KVM hosts using an ISO image with manual configuration of the virtual machine. - Page 42 APSolute Vision Installation and Maintenance Guide Platform Installation 7. Enter the amount of RAM memory required (with APM minimum 24576 MB, without APM minimum 16384 MB). 8. Enter the number of CPUs required (with APM 12, without APM 8) and click Forward.
- Page 43 APSolute Vision Installation and Maintenance Guide Platform Installation 11. Select Customize configuration before install and click Finish. 12. If APM is required, select + Add Hardware, and in the Storage pane, select Create a disk image.., and enter 350 GB (minimum).
- Page 44 APSolute Vision Installation and Maintenance Guide Platform Installation 15. Select + Add Hardware. 16. In the Network pane, select the network that you want to connect to, and click Finish. 17. For NIC1, select the network that you want to connect to, and click Finish.
- Page 45 Options are: • APSolute Vision 3.30.xx build xxx - for APSolute Vision VA (without APM) • APSolute Vision allinone 3.30.xx build xxx - for APSolute Vision Server with APM Server VA 23. Type Yes to start the installation. Document ID: RDWR_APSV_V400_IG1808...
- Page 46 Serial 1 to switch to the Serial 1 console. 25. When the installation completes, a log in prompt will display. 26. Log in as radware (default password radware) to run first time wizard and to set the IP address. Note: The ISO image can be disconnected from the VM after successful installation.
-
Page 47: Installing Apsolute Vision Va On Microsoft Hyper-V
APSolute Vision Installation and Maintenance Guide Platform Installation 27. Continue with the initial configuration of the APSolute Vision server, described in the APSolute Vision User Guide. Installing APSolute Vision VA on Microsoft Hyper-V Microsoft Hyper-V Server is a hypervisor-based server virtualization product that enables you to consolidate workloads, helping organizations improve server utilization and reduce costs. - Page 48 APSolute Vision Installation and Maintenance Guide Platform Installation 2. Connect to the server. 3. Select New to run the New Virtual Machine Wizard. 4. Click Next. Document ID: RDWR_APSV_V400_IG1808...
- Page 49 APSolute Vision Installation and Maintenance Guide Platform Installation 5. Enter a name for the virtual machine and click Next. You can keep the default location provided. 6. Select Generation 1 and click Next. Document ID: RDWR_APSV_V400_IG1808...
- Page 50 7. Assign the startup memory and click Next. For a standard APSolute Vision installation: 8192 MB (minimum), 16384 MB (recommended). For an APSolute Vision with APM server installation: 16384 MB (minimum), 24576 MB (recommended). 8. Select a network connection from the drop-down list and click Next.
- Page 51 Platform Installation 9. Select Create a virtual hard disk. 10. Click Browse and navigate to select the location of the APSolute Vision virtual hard disk. 11. Set the hard disk size as 250 GB and click Next. Document ID: RDWR_APSV_V400_IG1808...
- Page 52 12. Select Install an operating system from a bootable CD/DVD-ROM and select Image file (.iso). 13. Click Browse and navigate to the location of the APSolute Vision image file. 14. Click Next to view a summary of the configuration of the virtual machine created.
- Page 53 For a standard APSolute Vision installation, add 2 (for a total of 3) network adapters. For an APSolute Vision with APM server installation, add 3 (for a total of 4) network adapters. 19. For an APSolute Vision with APM server installation, you have to do the following:...
- Page 54 APSolute Vision Installation and Maintenance Guide Platform Installation a. Select Add Hardware, and choose SCSI Controller and click Add. b. Select Hard Drive and click Add. Document ID: RDWR_APSV_V400_IG1808...
- Page 55 APSolute Vision Installation and Maintenance Guide Platform Installation Click New. d. Click Next. Document ID: RDWR_APSV_V400_IG1808...
- Page 56 APSolute Vision Installation and Maintenance Guide Platform Installation e. Select VHDX and click Next. Select Fixed Size and click Next. Document ID: RDWR_APSV_V400_IG1808...
- Page 57 APSolute Vision Installation and Maintenance Guide Platform Installation g. Enter a new name for the disk and click Next. h. Set 350 GB and click Next. Click Finish. 20. In the Hyper-V Manager, right-click the virtual machine that you created and select Connect.
-
Page 58: Installing Apsolute Vision Va On Openstack
3.80.00 build xxx. Note: If you are installing APSolute Vision with APM server installation (AllInOne) on a machine with less than 24 GB of RAM, reboot the machine after the installation process finishes. You can now run the APSolute Vision Virtual Machine. -
Page 59: Installing Apsolute Vision Va Using An Iso Image
[root@vision ~]# chkconfig cloud-init-local on Installing APSolute Vision VA using an ISO Image This procedure details how to install the APSolute Vision virtual appliance (VA) platform on a VMware, KVM, or Hyper V virtual infrastructure using an ISO image with manual configuration of the virtual machine. -
Page 60: Installing Apsolute Vision Server With Apm Server Va
APSolute Vision Server with APM Server VA: • 24 GB RAM • 12 vCPUs • 600 GB HD (250 GB is used by the APSolute Vision server, and 350 GB is used by the embedded APM server.) • 4 NICs Document ID: RDWR_APSV_V400_IG1808... -
Page 61: Installing And Configuring Apsolute Vision Server With Apm Server Va On Vmware
2. After you finish deploying the APSolute Vision VA OVA template, from the Home > Inventory drop-down list, select Templates and VMs. 3. Right-click the required APSolute Vision VA from the list, and select Power On. After the system boots, the login prompt is displayed. -
Page 62: Installing Apsolute Vision Server With Apm Server Va On Kvm
IP address of the G3 port (optional) and the G4 net ip set port. The G3 port is for data and configuration backup of APSolute Vision and APM data. The G4 port, which is mandatory in the APSolute Vision Server with APM Server VA offering, carries APM data. -
Page 63: Installing Lvm For Vmware
Platform Installation Note: The LVM installation only works with a fresh installation of APSolute Vision version 3.95 and above, or an upgrade from a fresh installation of APSolute Vision version 3.95 and above. In many cases, there may not be enough disk space available on the present hard disk in order to install LVM, and you will need to first add an extra disk (partition) in order to resize (enlarge) the disk volume needed to install LVM. -
Page 64: Installing Lvm For Microsoft Hyper-V
This opens the LVM feature allowing you to increase the disk size for storage. Connecting to the APSolute Vision Platform You can connect to the APSolute Vision platform via a Web interface or via the command line interface (CLI). •... - Page 65 The default username and password is radware/radware. This is an administrator user with full access and authorization to the CLI and the Web interface. • For more information on using the Web interface or CLI for APSolute Vision, refer to the APSolute Vision User Guide. Document ID: RDWR_APSV_V400_IG1808...
- Page 66 APSolute Vision Installation and Maintenance Guide Platform Installation Document ID: RDWR_APSV_V400_IG1808...
-
Page 67: Chapter 4 - Maintenance And Upgrade
Managing Configuration Files, page 67 • Recovering the “radware” User Password, page 67 • Upgrading the APSolute Vision Server and APSolute Vision Server with APM Server VA, page 68 • Upgrading Licenses, page 69 • Migrating APSolute Vision from the OnDemand Switch VL Platform to the OnDemand Switch VL2 Platform, page 70 •... -
Page 68: Upgrading Using The Cli
Upgrading the APSolute Vision Server and APSolute Vision Server with APM Server VA The following sections describe the procedures for upgrading your APSolute Vision server software. APSolute Vision server upgrade can be performed via the command line interface (CLI) or via the Web browser. Note: The upgrade process of the APSolute Vision Server with APM Server VA is identical to the APSolute Vision Server upgrade. -
Page 69: Upgrading Using The Web Browser
- A password is required for upgrades to all major versions. Upgrading to a minor version does not require a password. - The password is based on the size of the upgrade file and the MAC address of the APSolute Vision management or data port (which is displayed in the Basic Parameters pane). -
Page 70: Licensing Mechanism
To change the license, you need to insert a new license code. The license is based on the MAC address port G1 of the APSolute Vision server and on a license ID that is changed every time a new license is inserted. To get a license upgrade, you need to send the MAC address of the platform. -
Page 71: Troubleshooting Fan Failure
APSolute Vision Installation and Maintenance Guide Maintenance and Upgrade 3. Create a full system backup of the APSolute Vision on the ODS-VL platform. 4. Export the full system backup from the storage location on the ODS-VL platform to a specified location (for example, your computer). - Page 72 APSolute Vision Installation and Maintenance Guide Maintenance and Upgrade Document ID: RDWR_APSV_V400_IG1808...
-
Page 73: Appendix A - Specifications
APPENDIX A – SPECIFICATIONS This appendix contains specifications for all Radware platforms and includes the following sections: • APSolute Vision ODS-VL Platform Specifications, page 73 • APSolute Vision ODS-VL2 Platform Specifications, page 74 • Airflow Requirements, page 75 • AC Power Factor, page 75 •... -
Page 74: Apsolute Vision Ods-Vl2 Platform Specifications
APSolute Vision Installation and Maintenance Guide Specifications Table 5: General Specifications of APSolute Vision ODS-VL Physical Platform Item OnDemand Switch VL Certifications Safety: EN 60950-1:2006, CB - IEC 60950-1, cTUVus, CCC, cULus EMC: CE - EN 55022 EN 55024, EN 61000-3-2, EN 61000-3-3, IEC... -
Page 75: Airflow Requirements
APSolute Vision Installation and Maintenance Guide Specifications Table 6: General Specifications of APSolute Vision ODS-VL2 Physical Platform Item OnDemand Switch VL2 Certifications Safety: CE LVD( EN 60950-1), CB - IEC 60950-1, CCC, cTUVus, AS/NZS 60950.1 EMC: CE EMC (EU directive 2004/108/EC), FCC Part 15B Class A, ICES-... -
Page 76: Serial Cable Pin Assignment
1 – Commonly referred to as DB-9. 2 – Commonly referred to as RJ-45. On the OnDemand Switch VL platforms, the console port uses an 8P8C connector. Radware supplies a RJ-45-to-DE-9 adapter cable to connect the console port of the platform to a console PC. -
Page 77: Radware Ltd. End User License Agreement
EMPLOYEES AND THIRD PARTY CONTRACTORS TO COMPLY WITH THE TERMS OF THIS LICENSE AGREEMENT. 1. License Grant. Subject to the terms of this Agreement, Radware hereby grants to you, and you accept, a limited, nonexclusive, nontransferable license to install and use the Software in machine-readable, object code form only and solely for your internal business purposes (“Commercial License”). - Page 78 You may use the Software only for internal evaluation purposes (“Evaluation Use”) for a maximum of 30 days or such other duration as may specified by Radware in writing at its sole discretion (the “Evaluation Period”). The evaluation copy of the Software contains a feature that will automatically disable it after expiration of the Evaluation Period.
- Page 79 Software, or to your relationship with, Radware or any of the Radware Parties (including, without limitation, loss or disclosure of data or information,...
- Page 80 If any Radware Party is found to be liable to You or to any third- party under any applicable law despite the explicit disclaimers and limitations under these terms, then any liability of such Radware Party, will be limited exclusively to refund of any license or registration or subscription fees paid by you to Radware.
- Page 81 License Agreement. IF YOU DO NOT AGREE WITH THE TERMS OF THIS LICENSE YOU MUST REMOVE THE SOFTWARE FROM ANY DEVICE OWNED BY YOU AND IMMEDIATELY CEASE USING THE SOFTWARE. COPYRIGHT © 2018, Radware Ltd. All Rights Reserved. Document ID: RDWR_APSV_V400_IG1808...
Need help?
Do you have a question about the APSolute Vision and is the answer not in the manual?
Questions and answers