Table of Contents
Advertisement
Quick Links
Advertisement
Table of Contents

Related Manuals for Shini SPV-U Series

Summary of Contents for Shini SPV-U Series
- Page 1 SPV-U series Date Apr. 2009 Version V2.3 (English)
-
Page 3: Table Of Contents
1. General Description 2. Technical Specifications 2.1 SPV Outer Dimensions 2.2 Specification List 3. Function Description 3.1 Working Principle 4. Safety Regulations 5. Installation 5.1 Working With SAL-U 5.2 Working With Crusher 5.3 Installation Space 6. Operation Guide 6.1 SAL-U Function Instruction 6.2 SPV-U With Independent Control Box 7. - Page 4 10.2 Electrical Components layout 10.3 SPV-38U-(C) / SPV-50U-(C) Electrical Components List 11. Maintenance Schedule General Machine Information Check After Information...
-
Page 5: General Description
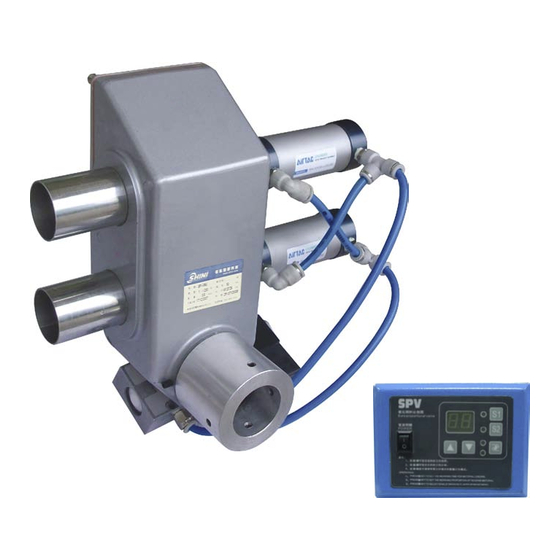
Please read this manual carefully before installation and using of the machine to prevent damage or personal injuries. SPV-U series proportional valves mix regrind and new materials in a proper proportion, and then send them back to the process machine to achieve a proportional mixing and loading effect. - Page 6 Other chapters contain instructions for the daily operator. Any modi cations of the machine must be approved by SHINI in order to avoid personal injury and damage to machine. We shall not be liable for any damage caused by unauthorized change of the machine.
-
Page 7: Technical Specifications
2. Technical Specifications 2.1 SPV Outer Dimensions (Proportional Valve) (Control Box) - Page 8 2.2 Specification Table Pipe Size Compressed Air Maximum Dimensions (mm) Weight (kg) Model Driven Means (inch) Pressure Material Flow H W D Note:1) "C"stands for control box, t here is no need of control box when working with SAL-U loaders. We reserve the right to change specifications Power supply: 1 , 115 / 230V, 50/60Hz.
-
Page 9: Function Description
3. Function Description 3. Function Description 3.1 Working Principle SHINI "Euro" proportional valves offer a simple, economical, highly accurate way to mix regrinds and new materials in a proper propo rtion back to the process machine. Feed-in pipe1 Feed-in pipe2... -
Page 10: Safety Regulations
4. Safety Regulations 4. Safety Regulations To avoid any body injures and damages of the machine, please do to observe the regulations in this manual. When operating this machine, please observe the regulations as follows. Warning Becareful This label means that this area should be taken care Attention No need for regular inspection because all the electrical parts in the control unit are fixed tightly... - Page 11 +70 . Storage 1) SPV-U series should be stored indoors with temperature kept from 5 C to 40 C and humidity below 80%. 2) Keep the whole machine, especially the electrical components away from water to avoid potential troubles caused by the water.
- Page 12 4. Safety Regulations 4) This equipment works normally in the environment with altitude within 3000m. 5) At least a clearance of 1m surrounding the equipment is required during operation. Keep this equipment away from flammable sources at least two meters. 6) Avoid vibration, magnetic disturbance at the operation area.
-
Page 13: Installation
5. Installation 5. Installation Read the instructions carefully before installation,Must observe the installation steps as follows When installation SPV, Please connecting the pressure-air tube a- ccording to the requirements. 5.1 Working with SAL-U Moulding machine Regrind material material Moulding machine material... -
Page 14: Installation Space
5.3 Installation Space During installation of the machine, keep at least 150mm installation space around the machine as shown by the picture. Do not install the machine in a position crowded with other objects. This would cause inconvenience to operation, maintenance and repair. -
Page 15: Operation Guide
6. Operation Guide 6. Operation instruction When SPV-U works with SAL-U loading time should be set on SAL-U please refer to SAL-U manual. 6.1 SAL-U Function instruction 6.1.1 Parameter settings on SAL-U 6.1.2 Instruction diagram about connecting with "SAL-U" Connected... -
Page 16: Spv-U With Independent Control Box
6. Operation Guide 6.2 SPV-U With Independent Control Box 6.2.1 About the control panel Name Function description Power Power on to start the machine Loading time set Press this key to set loading time Regrind percentage set Press this key to set the percentage Up key Press this key to increase set value Down key... - Page 17 6. Operation Guide 6.2.2 Start/Stop 1. Power on to start the machine, it will display software version XX about 1second). 2. Turn off the power to stop the machine. 3. Shut off the loading signal to stop mixing. 6.2.3 Settings 6.2.3.1 Time setup 1.
- Page 18 6. Operation Guide 6.2.3.2 Working mode selection 1. Working mode 1: (1-percentage) loading time is for new material + percentage loading time is for regrind material. For example: Total loading time is 10 second. Regrind percentage is 10%. 2. Working mode 2: (1-percentage) half of the loading time is for new material + percentage half of the loading time is for regrind material + (1-percentage) half of the loading time is for new material + percentage half of the loading time is for regrind...
- Page 19 6. Operation Guide For example working mode 2 Loading time 20sec. Regrind percentage 10% 6.2.3.3 Settings 1. Working mode 1: Applicable range 5~99sec 2. Working mode 2: Applicable range 16~99sec 3. Working mode 3: Applicable range 31~99sec 4. Working mode 4: Applicable range 45~99sec Minimal regrind loading time is 1sec At setting mode if to adjust F01~F03 , the software will automatically ensure regrind loading time be no less than 1sec...
-
Page 20: Service And Maintenance
7. Service & Maintenance 7. Service and Maintenance All the repair work should be done by professionals in order to prevent personal injuries and damage of the machine. Keep the external valve body clean, attention the Solenoid valve's service. -
Page 21: Trouble Shooting
8. Trouble Shooting 8. Trouble Shooting Failures Possible reasons Solutions Solenoid valve broken Replace Cylinder does Did not connect the pressure-air Connect not work tube Did not connect signal wire or Connect or changed broken... -
Page 22: Assembly Drawing And Parts List
9. Assembly Drawing and parts List 9. Assembly Drawing And Part List 9.1 Assembly Drawing Diagram... -
Page 23: Parts List
9. Assembly Drawing and parts List 9.2 Parts List SPV-38U-(C) SPV-50U-(C) A3146003 A3146003 O sealing ring* F1306150 F1306150 Flat head screw Pipe sleeve for absorbing material D2105001 D2105001 solenoid valve M1605050 M1605050 proportional valve feed-in pipe Lock nut Membrane D1214007 D1214007 Air pipe connector D1214011... -
Page 24: Electrical Circuit
10. Electrical Circuit 10. Electrical Circuit 10.1 Electrical Circuit 10-1... - Page 25 10. Electrical Circuit 10.2 Electrical Components Layout L EVEL 10-2 10-2...
- Page 26 10. Electrical Circuit 10.3 SPV-38U-(C) / SPV-50U-(C) Electrical Components List Specifications Name No . Symbol Part list Fuse Box 250V 2A E3202008 Control Switch 19 5A E1307000 D2105001 Solenoid Valve 230V 60Hz Circuit Board 115 / 230VAC 50 / 60Hz E2207005 E5209002 250VAC 10A...
- Page 27 11. Maintenance Schedule 11.1 About the Machine Manufacturing date: Model: Voltage: Frequency: Total power: 11.2 Check after Installation Make sure the pipe connecting is correct Make sure the connecting pipe is lock and tighten Make sure the mounting base is lock and tighten Electrical installation Voltage check: Signal wire connecting...
- Page 28 (d) Wear parts and accessories. 7. If your SHINI product is not the same place of purchase, you can still send the product to your local SHINI's branch or distributor for servicing at your full costs according to the individual country service policy.
- Page 29 Date of purchase: Please send all queries and comments to: Shini Plastics Technologies, Inc. Corporate Product & Marketing Center 1 Shini Road, Dalang, Dongguan, Guangdong, China Tel: (0769) 8331 3588 Fax: (0769) 8331 3589 Corporate e-mail: shini@shini.com Corporate internet: www.shini.com...
Need help?
Do you have a question about the SPV-U Series and is the answer not in the manual?
Questions and answers