Table of Contents
Advertisement
Advertisement
Table of Contents

Related Manuals for Atmos MISSION ONE


Summary of Contents for Atmos MISSION ONE
- Page 1 © ATMOS Co., Ltd. All rights reserved. V3.1-20200130...
-
Page 2: Table Of Contents
4.1. Display Layout and Alarms 1.General 4.2. Time Alarm 1.1. Diving Safety 4.3. Depth Alarm 1.2. Button Function 4.4. Stopwatch 1.3. Power On/Off 4.5. Advanced Setting 1.4. Charging 1.5. APP Pairing 5. Gauge Mode 1.6. Unpair 5.1. Display Layout and Alarms 1.7. -
Page 3: General
Do not expose MISSION ONE under the sunlight 1.General or left it in a car under sunlight. ● Do not bring MISSION ONE into hot spring pool 1.1. Diving Safety or sauna. ● All dive gears will fall. It is not whether it will ●... -
Page 4: Power On/Off
1.6. Unpair 1. MISSION ONE SETTING → CONNECT → 1.5. APP Pairing UNPAIR: YES 2. ATMOS App : S elect, or swipe left to delete the Use ATMOS App to sync dive log. paired MISSION ONE. 1. Download ATMOS App: 3. -
Page 5: Sync Log
2. Via ATMOS App (OTA): 1.8. Sync Log a. Select your device in the ATMOS App. b. The upgrade button will show if there’s a Sync the dive logs in MISSION ONE to ATMOS new version of firmware. App. c. Press Upgrade button. -
Page 6: Stopwatch
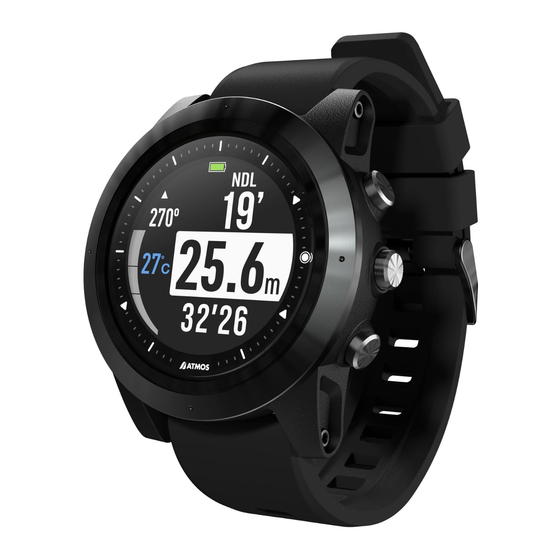
MISSION ONE shows the sunrise/ sunset time in the Bottom: D efault dive mode ( Scuba with air mix/ watch mode by pressing button C to scroll the button ※ freedive / gauge) information after GPS signal is acquired. - Page 7 During the dive Upper-left: Compass heading Mark Compass Hold button B: Enter mark Left: Ascent rate bar R ed = compass heading function. Heading faster than 10m(33ft)/min. Left: Water temperature Press button B : Mark heading Upper-right: N DL (...
- Page 8 Time Alarm Notify when exceed the dive Safety Stop Pause Ascend above 3m or descend time limit. below 7m during a safety stop. Safety pause will show and the countdown will be paused. Depth Alarm Notify when exceed the dive time limit.
-
Page 9: Nitrox
Decompression Stop Decompression stops are MOD is the maximum mandatory stops that allowable depth of the current Needed must be followed in order to breathing gas as determined minimize the risk of decompression illness (DCI). PPO2 limits. The “ 6m” indicates the ceiling ※... -
Page 10: Dive Planner
and P PO2 (1.2-1.6) s etting. !!! D o not change conservatism setting until you understand the effects. !!! Always check the oxygen percentage, Conservatism ● HIGH (More conservative) PPO2 and corresponded MOD before each ● NORMAL (Default setting) dive. -
Page 11: Freedive Mode
Water Type Salt or freshwater. This setting 4.1. Display Layout and Alarms affects depth readings because salt water is denser. Press button B: View time Predive Start Depth The depth of beginning a dive. alarm settings. End Dive The dive ends when passed this Press button C: View depth Delay time after surfaced. - Page 12 Surface Rest Upper-left: D ive count Rest Finished Mid-left: M ax depth of last dive Dive depth < 30m ( 100ft) Bottom-left: Water temp Notify user when the Surface Upper-right: D ive time of last time reaches 2 times of the dive dive time of last dive.
-
Page 13: Time Alarm
4.2. Time Alarm 4.5. Advanced Setting Press button B to access advanced setting in Freedive On Freedive mode prior to a dive, press button B can mode to set Time alarms. enter advanced setting. D o not change any setting until you understand 4.3. -
Page 14: Gauge Mode
During The Dive Upper-left: Compass 5. Gauge Mode heading. Mid-left: Max depth. Bottom-left: Water On gauge mode MISSION ONE functions as a depth temperature. and time indicator. Decompression calculation is Upper-right: Dive time. disabled. Right: Dive depth. Bottom-right : Bottom ... -
Page 15: Bottom Timer
button B: Return. 5.2. Bottom Timer button C: Unmark. During a dive: press button C to reset the bottom timer. 5.3. Advanced Setting On gauge mode prior to a dive, press button B can enter advanced setting. D o not change any setting until you understand the effects. -
Page 16: Gps And E-Compass
6. GPS and E-Compass (4) Acquired The satellite will stop blinking and the MISSION ONE will vibrate when GPS coordinates are acquired. 6.1. Acquire the GPS signal 6.2. Mark Entry/Exit GPS Coordinates T he GPS function is designed to mark the... -
Page 17: Compass Calibration
Calibrate : MENU → COMPASS → Moving MISSION ONE in an “∞”pattern. As same as other instruments. Do not throw, press, collide MISSION ONE. Do not expose it to sunlight or vehicles exposed under sunlight. -
Page 18: Warranty
3) The problem is caused by improper repair or For storage, fully charge it then turn the MISSION ONE adjustments made by anyone other than an off. Store it in a box and avoid collision. Place it in a cool ATMOS service center. -
Page 19: Specification
WARRANTY. NOTHING IN THIS WARRANTY 240 x 240 pixels resolution AFFECTS YOUR STATUTORY RIGHTS. Button material Stainless steel 316L THANK YOU FOR CHOOSING ATMOS. Watch Strap ✔ (24 mm) 7.5. Specification Dive mode: Up to 40 hours (backlight off) Backlight on: U p to 1 5 Hours... - Page 20 Alarm clock ✔ Notification 12/24 hour clock ✔ Smartphone iPhone®, Android™ compatibility Backlight active ✔ on wrist raise Compatible with ATMOS™ ✔ Mobile App Sensors Diving Features ✔ Barometric Dive activity ✔ altimeter maximum 10 ATM, 100 meters operating depth Compass ✔...
- Page 21 Deco Stop Ceiling Violation| Time alarm|Depth alarm| ✔ (configurable time and Backlight Low battey|MOD|CNS intensity; auto-on at depth) E-Compass ✔ What's in the box? Lock compass ✔ ATMOS MISSION ONE with index What's in the box Silicone strap Charging Cable...
-
Page 22: Fcc Statement
RF exposure compliance. Reorient or relocate the receiving antenna. ➢ w ww.atmos.app Increase the separation between the equipment and receiver. Connect the equipment into an outlet on a circuit ➢info@atmos.app different from that to which the receiver is connected.
Need help?
Do you have a question about the MISSION ONE and is the answer not in the manual?
Questions and answers