Table of Contents
Advertisement
Installation and Operation Manual
EPU-D
Light Commercial Steam Cycling Control
WARNING
This Heat-Timer control is strictly an operating control; it should never be used as a primary limit or safety
control. All equipment must have its own certified limit and safety controls required by local codes. The installer
must verify proper operation and correct any safety problems prior to the installation of this Heat-Timer control.
059840‐00 Rev. A
Advertisement
Table of Contents

Summary of Contents for heat-timer EPU-D
- Page 1 Light Commercial Steam Cycling Control WARNING This Heat-Timer control is strictly an operating control; it should never be used as a primary limit or safety control. All equipment must have its own certified limit and safety controls required by local codes. The installer must verify proper operation and correct any safety problems prior to the installation of this Heat-Timer control.
-
Page 2: Table Of Contents
2 Table of Contents Controls, Indicators, and Connections . . . . . . . . . . . .3 EPU‐D Menus . . . . . . . . . . . . . . . . . . . . . . . . . . . . 26 Detailed Operation. . . . . . . . . . . . . . . . . . . . . . . . . . . .4 Main Menu. . . . . . . . . . . . . . . . . . . . . . . . . . . . 26 Overview. . . . . . . . . . . . . . . . . . . . . . . . . . . . . . . . . .4 System Settings Menu. . . . . . . . . . . . . . . . . . . 29 The “Cycle” Concept . . . . . . . . . . . . . . . . . . . . . . . .4 Schedules Menu. . . . . . . . . . . . . . . . . . . . . . . . 33 Cycle Length Based on Outdoor Temperature .4 Maintenance Menu . . . . . . . . . . . . . . . . . . . . . 35 Cycle Length . . . . . . . . . . . . . . . . . . . . . . . . . . . .5 Piping Diagrams. . . . . . . . . . . . . . . . . . . . . . . . . . . . . 38 Available Heat Levels . . . . . . . . . . . . . . . . . . . . . 7 Troubleshooting . . . . . . . . . . . . . . . . . . . . . . . . . . . . 41 Sequence of Operation . . . . . . . . . . . . . . . . . . . . . .7 Typical Configurations . . . . . . . . . . . . . . . . . . . . . . .8 EPU‐D Inputs. . . . . . . . . . . . . . . . . . . . . . . . . . . . . . .8 Heating System Sensor . . . . . . . . . . . . . . . . . . . .8 Pressuretrol Sensor. . . . . . . . . . . . . . . . . . . . . . .8 Outdoor Temperature Sensor . . . . . . . . . . . . . .8 Remote Shutdown / TSTAT Enable . . . . . . . . . .9 EPU‐D Outputs . . . . . . . . . . . . . . . . . . . . . . . . . . . . .9 Valve Actuator. . . . . . . . . . . . . . . . . . . . . . . . . . .9... -
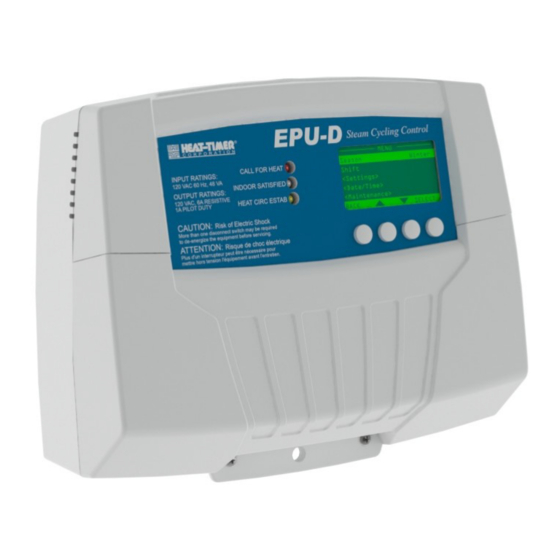
Page 3: Controls, Indicators, And Connections
Controls, Indicators, and Connections 3 Controls, Indicators, and Connections Figure 1: EPU‐D Controls, Indicators, and Connections Item Description Item Description Status LEDs Prgm/Run Switch See “EPU‐D Control Module Status LEDs” on Places the EPU‐D in programming mode or run page 23. (normal operation) mode. NOTE: Programming mode may be password protected. Digital Display Output Connections See “Display and Variable‐Function Buttons” on • Terminals 4 & 5 – not used page 23. • Terminals 6, 7, & 8 – Output to Boiler Burner or a Motorized Valve Variable‐Function Buttons 120Vac Power Input Connection See “Display and Variable‐Function Buttons” on • Terminal 1 – Input Line Voltage page 23. • Terminal 2 – Neutral • Terminal 3 – Ground Input Connections • Terminals 9 & 10 – Heating System Sensor •... -
Page 4: Detailed Operation
4 EPU‐D Installation and Operation Manual Detailed Operation Overview The EPU‐D is a microprocessor‐based control designed to manage a low‐pressure steam heating system. The control can operate a steam boiler or a two‐way steam valve using a “cycle” concept to provide the desired amount of heat to the building. The “Cycle” Concept The “cycle” concept was created by Heat‐Timer specifically to allow steam heating systems to overcome the inabilities of standard thermostatic controls to cope with the unique challenges of low‐pressure steam heating. Unlike water and air systems, steam systems take time to build up a “head of steam”. Moreover, after the system starts heating up, it has momentum that takes time to dissipate. This makes it difficult to control its temperature. Cycle Length Based on Outdoor Temperature By monitoring the outdoor temperature, the EPU‐D is able to anticipate the building heating needs. Each cycle period (usually 60 minutes long, but adjustable depending on the type of radiation units) consists of a Cycle‐ON segment and a Cycle‐OFF segment. The length of the Cycle‐ON segment will vary with the outdoor temperature. The colder it is outdoor, the longer the Cycle‐ON segment. Figure 2: Example 60 Minute Cycle The EPU‐D constantly checks the outdoor temperature by means of a solid‐state sensor located on the exterior of the building. At the same time, it monitors the heating system of the building by means of either a heating system sensor or reverse‐acting pressuretrol. These sensors tell the control when steam has reached the furthest location in the building (or the hardest to heat area, see “Piping Diagrams” on page 38). Based on this combined data, the EPU‐D sends instructions to the heating plant to control the heat level in the building. The EPU‐D also provides two adjustable outdoor temperature cutoff settings, one for daytime operation and one for nighttime operation. When the outdoor temperature rises above one of the cutoff settings, the EPU‐D will not call for any heat. 059840‐00 Rev. A Heat‐Timer Corp. -
Page 5: Cycle Length
Detailed Operation 5 When the outdoor temperature drops below the cutoff, the EPU‐D will automatically begin controlling the heating cycle. After the heating system is active, the heating system sensor will register when heat has reached throughout the building. The combined effect of these two sensors is to provide an even, comfortable level of heat throughout the building. Figure 3: Example Cycles Based on Weather Conditions Cycle Length The duration of the Cycle‐ON period (when the heat source is activated) depends on four factors: • Outdoor temperature • Outdoor Cutoff temperature • Heat Adjustment setting • Cycle length When the outdoor temperature is above the Outdoor Cutoff, the EPU‐D will not call for heat. When the outdoor temperature is below the Outdoor Cutoff, the length of the Cycle‐ON segment is adjusted by the day and night Heat Adjustment settings. “A” is the shortest heat duration, “P” is the longest duration. Heat‐Timer Corp. 059840‐00 Rev. A... - Page 6 6 EPU‐D Installation and Operation Manual Table 1: Cycle Length Table Outdoor Cutoff Minus Outdoor Temperature (All Temperatures in °F) Minutes ON (Based on 60 Minute Cycle Length) C = Continuous Operation * Heat Adjustment Setting – See “Day Adjustment” on page 30 and “Night Adjustment” on page 30. Example To determine the cycle length, use the example values below: • Outdoor temperature = 30°F • Outdoor Cutoff = 55°F • Heat Adjustment = G 1. Subtract the outdoor temperature from the Outdoor Cutoff (55–30 = 25°F) 2. Refer to Table 1 where the Heat Adjustment row “G” intersects with the 25°F column. The Cycle‐ON time is 14 minutes (for a 60 minute cycle). NOTE: For different cycle lengths, refer to the table below: Cycle Length Divide by Cycle‐ON 059840‐00 Rev. A Heat‐Timer Corp.
-
Page 7: Available Heat Levels
Detailed Operation 7 Available Heat Levels The EPU‐D is able to maintain two different heat levels: • Day heat level provides comfortable temperatures when the building tenants are active during the day. This requires a higher level of heat. • Night heat level provides lower heat and conserves energy when the building is empty or when tenants are asleep. Both heat levels rely on the identical cycle concept, but the lower Night settings provide less heat given the same outdoor temperature. Sequence of Operation This section describes the typical sequence of operation for the EPU‐D. 1. The EPU‐D activates the steam source when the outdoor temperature falls below the outdoor sensor cutoff. The cutoff is factory set at 55°F (13°C) for Day or Night, but is fully adjustable. 2. The EPU‐D continues to call for heat, keeping the steam source active, until the heating system sensor reaches its adjustable Set Point. This indicates that steam has gotten entirely through the system, or that "heat is established". 3. After "heat is established", the Cycle‐ON segment of the cycle begins. 4. During the Cycle‐ON segment, the EPU‐D keeps the steam source activated. The length of the Cycle‐ON segment is dependent on the outdoor temperature, the Day/Night setting, and several user‐selectable adjustments that can be tuned to the specific heat loss characteristics of the building. 5. After the Cycle‐ON segment has ended, the Cycle‐OFF segment of the cycle begins. The EPU‐D turns off the boiler or closes the steam valve for the remainder of this segment. 6. After the Cycle‐OFF segment has ended, the EPU‐D once again activates the steam source unless either the outdoor temperature has risen above the cutoff or the thermal lockout is active. With the thermal lockout, the heating system sensor temperature must fall below the Set Point minus a 25°F differential before the heating source can be reactivated. This allows residual heat in the pipes to continue to heat the building. After the pipes have cooled sufficiently, a new cycle can begin. Heat‐Timer Corp. 059840‐00 Rev. A... -
Page 8: Typical Configurations
8 EPU‐D Installation and Operation Manual Typical Configurations The EPU‐D works with virtually any non‐vacuum one or two‐pipe steam‐heated system. The EPU‐D can control the boiler directly to create steam or, for systems where a central plant provides steam, the EPU‐D controls a motorized valve to allow or prevent steam from entering the heating system. Based upon the specific layout of the steam heating system, there are several differences in locating the heating system sensor and in the output wiring to the boiler or motorized valve that must be considered. It is important to carefully check the piping diagram to determine which of the following layouts matches your heating system: • One Pipe Steam ‐ Direct Burner Operation (see Figure 7 on page 38) • Two‐Pipe Steam ‐ Direct Burner Operation (see Figure 8 on page 39) • Two‐Pipe Steam ‐ Motorized Valve Operation (see Figure 9 on page 40) EPU‐D Inputs Heating System Sensor The EPU‐D is designed to connect to the provided Heat‐Timer heating system sensor (p/n 904220‐00). The heating system sensor is located where it will show that heat has reached the furthest location in the building. The EPU‐D uses the temperature information from the heating system sensor combined with the outdoor temperature sensor to control the heat level in the building. Pressuretrol Sensor The EPU‐D can optionally connect to a pressuretrol sensor instead of the system temperature sensor. The pressuretrol sensor must be a reverse‐acting pressuretrol that indicates when to start the heating cycle based on a specified pressure setting. Outdoor Temperature Sensor The EPU‐D is designed to connect to the provided Heat‐Timer temperature sensor (p/n 904220‐00). The outdoor temperature sensor is a solid‐state sensor located on the exterior of the building. The EPU‐D uses the temperature information from the outdoor temperature sensor combined with the system temperature sensor to control the heat level in the building. 059840‐00 Rev. A Heat‐Timer Corp. -
Page 9: Remote Shutdown / Tstat Enable
Detailed Operation 9 Remote Shutdown / TSTAT Enable The remote shutdown / TSTAT enable feature sets the signal (open or short) on the EPU‐D Shutdown terminals (17 and 18) that allows the control to operate. • For Shutdown, an “open” signal allows the control to operate and provide heat. When shorted, the control is disabled. • For TSTAT Enable, a “short” signal allows the control to operate and provide heat. When open, the control is disabled. When the control is disabled, the Burner and Motorized Valve output relays are de‐energized, turning off the boiler or closing the motorized valve. This feature can be used when it is desirable to deactivate the EPU‐D from a remote location or with another controller, such as a Building Management System (BMS). CAUTION The Shutdown signal must be dry‐contact only. DO NOT place voltage across the Shutdown terminals. EPU‐D Outputs Valve Actuator The EPU‐D is designed to connect to a motorized valve actuator. Using the inputs from the outdoor temperature sensor and the system temperature sensor, the EPU‐D controls the heating system by opening and closing the motorized valve actuator. Boiler Burner The EPU‐D is designed to connect to the boiler burner. Using the inputs from the outdoor temperature sensor and the system temperature sensor, the EPU‐D controls the heating system by turning the boiler burner on or off. Heat‐Timer Corp. 059840‐00 Rev. A... -
Page 10: Specifications
10 EPU‐D Installation and Operation Manual Specifications EPU‐D Control Module Voltage Input: . . . . . . . . . . . . . . . . . . . . . . . . . . . . . . . . . . . . . . . . . . . . . . . . . . . . . . . . . . . . . . . . . . . . . . .120Vac 60Hz Maximum Input Rating:. . . . . . . . . . . . . . . . . . . . . . . . . . . . . . . . . . . . . . . . . . . . . . . . . . . . . . . . . . . . . . . . . 48VA max Dimensions (W x H x D): . . . . . . . . . . . . . . . . . . . . . . . . . . . . . . 11” x 9” x 3 ¾” (279.4mm x 228.6mm x 95.25mm) Weight: . . . . . . . . . . . . . . . . . . . . . . . . . . . . . . . . . . . . . . . . . . . . . . . . . . . . . . . . . . . . . . . . . . . . . . . . . . 2.5lbs (1.13kg) Output Relays: . . . . . . . . . . . . . . . . . . . . . . . . . . . . . . . . . . . . . . . . . . . . . . . . . . . . . . . . . . . . . . . . . . .1 Burner Output 1 Valve Output Output Relay Rating: . . . . . . . . . . . . . . . . . . . . . . . . . . . . . . . . . . . . . .Burner Output: 1A pilot duty at 120Vac 60Hz Valve Output: 6A resistive at 120Vac 60Hz Inputs: . . . . . . . . . . . . . . . . . . . . . . . . . . . . . . . . . . . . . . . . . . . . . . . . . . . . . . . . . . . . . . . . . . . . . . System Temperature Outdoor Temperature Remote Shutdown User Interface:. . . . . . . . . . . . . . . . . . . . . . . . . . . . . . . . . . . . . . . . . . . . . . . . . . . . . . . . . . . . . . . . . . . . . Digital Display Display Units: Temperature (°F and °C) Status Indicators (3 LEDs) Variable‐Function Buttons (4) 059840‐00 Rev. A Heat‐Timer Corp. -
Page 11: Installation Instructions
Installation Instructions 11 Installation Instructions The EPU‐D installation process consists of the following basic steps: 1. Initial installation (see “Design Considerations” on page 11). • Locating and installing the sensors. 2. Mounting the EPU‐D Module (see page 14). 3. Connecting the EPU‐D wiring (see “Wiring the EPU‐D” on page 16). • Power wiring • Output wiring • Input wiring 4. Completing initial programming of the EPU‐D (see page 20). Supplied Materials The following materials are supplied with the control module: • EPU‐D Control Module (p/n 926840‐00) • Two Sensors with Enclosures (p/n 904220‐00) • Wall Anchors and Screws • Installation and Operation Manual (p/n 059840‐00) • Warranty Card (p/n 059115‐00) Required Materials (Not Supplied) The following materials/tools are required for installation, but are not supplied: • General tool kit (screwdrivers, wire strippers, power drill, etc.) • 18 AWG cable (Heat‐Timer p/n 703001‐01 or equivalent #18/2 cable) – used for EPU‐D wiring Design Considerations When installing the system, certain design considerations must be taken into account. These include: •... -
Page 12: Outdoor Temperature Sensor Installation
12 EPU‐D Installation and Operation Manual Outdoor Temperature Sensor Installation Consider the following when installing the outdoor temperature sensor: CAUTION Determining the proper location for the outdoor sensor is very important. The EPU‐D bases the heat on the outdoor temperature information it receives from this location. If the sensor is in the sun or covered with ice, its reading will differ from the actual outdoor temperature. • Only use the sensor provided with the control. • Locate the sensor in the shade on the north side of the building. The sensor should never be in direct sunlight. • Be sure the location is away from doors, windows, exhaust fans, vents, or other possible heat or cold sources. • The sensor should be mounted approximately 10 feet (3 meters) above ground level. • Adhere the provided outdoor label to the back of the sensor base. • Use the enclosure base bottom knockout for the conduit. Use the locknut to hold the conduit and enclosure base together. Screw the cover to the base. • Make sure to seal around the sensor enclosure and wall, except from the bottom of the enclosure. • The sensor wires can be extended up to 500 feet (152.4 meters) using shielded 2‐conductor (#18/2) cable (Heat Timer p/n 703001‐01). • Do not connect the shield at the sensor. However, connect the shield at the control. See “Wiring the Outdoor Temperature Sensor” on page 19. 059840‐00 Rev. A Heat‐Timer Corp. -
Page 13: Heating System Sensor Installation
Installation Instructions 13 Heating System Sensor Installation Consider the following when installing the heating system sensor: CAUTION Determining the proper location for the heating system sensor is very important. If the heating system sensor cannot sense the system is full of steam, the EPU‐D will not provide comfortable heat levels. Be sure the heating system sensor is located on a properly vented pipe that cannot easily be isolated from the system. NEVER install the heating system sensor between the condensate receiver and the boiler. • Only use the sensor provided with the control. • The ideal location for the heating system sensor is on the furthest radiator in the system. This radiator is usually the hardest to heat. • The sensor may be located on the furthest return riser. However, the sensor MUST be above the boiler water line (on a dry return). See “Piping Diagrams” on page 38. • Strap the heating system sensor to the pipe using the tie‐wraps provided with the sensor. Then wrap insulation around the sensor and pipe to achieve the highest accuracy. • The sensor wires can be extended up to 500 feet (152.4 meters) using shielded 2‐conductor (#18/2) cable (Heat Timer p/n 703001‐01). • Do not connect the shield at the sensor. However, connect the shield at the control. See “Wiring the Heating System Sensor” on page 18. Heat‐Timer Corp. 059840‐00 Rev. A... -
Page 14: Mounting The Epu-D Module
14 EPU‐D Installation and Operation Manual Mounting the EPU‐D Module Mounting the Enclosure 1. Select an appropriate location to mount the EPU‐D. The location must meet the following minimum requirements: • The mounting surface should be flat and strong enough to hold the weight of the device. • The device can be mounted a maximum of 500 feet (152.4 meters) from the sensor location, but should be mounted as near as possible to avoid excessive wire runs. • DO NOT mount the device in a location where it will be exposed to extreme heat, cold, humidity, or moisture. 2. Remove the Enclosure Wiring Cover (1) by removing the two lower screws (2) holding it to the base (3), and then remove the Display Module (4) by removing the two middle screws (5) holding it to the base. Figure 4: EPU‐D Control Module Parts Diagram 059840‐00 Rev. A Heat‐Timer Corp. -
Page 15: Mounting The Display Module
Installation Instructions 15 3. Position the Enclosure base in the desired location, and then secure the base in place using four screws (provided) through the mounting holes (1) on the back of the Enclosure base. Figure 5: EPU‐D Enclosure Base Mounting the Display Module 1. Turn the EPU‐D display module (1) over to reveal the battery (2). Remove the plastic tab to activate the battery. Figure 6: EPU‐D Display Module Battery Location NOTE: The battery is a coin lithium battery (CR2032 ‐ Heat Timer p/n 020002‐00) that is used to maintain the control’s date and time during power outages. The battery can maintain the clock for up to a total of 100 days. CAUTION Do not activate the battery unless you plan to keep the control continuously powered. If the control has no power, the battery will lose its charge in 100 days. 2. Position the Display Module into the base and secure it in place using the middle screws removed in Step 2 above. NOTE: Do not replace the Enclosure Wiring Cover until all wiring is completed. 3. Continue with “Wiring the EPU‐D” on page 16. Heat‐Timer Corp. 059840‐00 Rev. A... -
Page 16: Wiring The Epu-D
16 EPU‐D Installation and Operation Manual Wiring the EPU‐D Power Input Wiring WARNING ELECTRICAL SHOCK HAZARD! Disconnect electrical power to the device before servicing or making any electrical connections. Failure to do so may result in severe personal injury or death. Use a separate circuit breaker for the control. Do not share the control power with other major equipment, pumps, or motors. Heat‐Timer recommends the installation of a surge suppressor and a power switch before the power line connection. Follow all local and state electrical codes when installing this unit. All wiring must meet or exceed local, state, or federal codes and requirements. 1. De‐energize the circuit that will provide power to the EPU‐D by turning off the appropriate circuit breaker. 2. Run the 120Vac power wiring through one of the knockouts located on the bottom of the EPU‐D enclosure. CAUTION The input power wires must be N.E.C. Class 1. Class 1 voltage wiring must use a different enclosure knockout and conduit than any sensor wiring. 3. Connect the hot line to terminal 1 on the EPU‐D. 4. Connect the neutral line to terminal 2 on the EPU‐D. 5. Connect terminal 3 on the EPU‐D to earth ground. DO NOT use the neutral line as the earth ground! WARNING ELECTRICAL SHOCK HAZARD! To avoid the risk of electric shock, DO NOT re‐connect electrical power until ALL wiring to the EPU‐D is completed. Failure to do so may result in severe personal injury or death. Output Wiring NOTE: The EPU‐D outputs do not source power. If power is needed at a specific output, a separate power source must be wired in series with the output. Each output relay can switch a 6A resistive load at 120Vac or a 1A inductive load. CAUTION Class 2 voltage wiring (low‐voltage sensor wires) must use a different enclosure knockout and conduit than any Class 1 voltage wiring. 059840‐00 Rev. A Heat‐Timer Corp. - Page 17 Installation Instructions 17 Wiring to a Motorized Valve NOTE: The EPU‐D does not source power to the motorized valve terminals. An external 24Vdc power source is required and must be connected in series, as shown in the diagram. 1. Run the motorized valve signal wiring through a knockout located on the bottom of the EPU‐D enclosure. 2. Connect the motorized valve Close terminal to terminal 6 on the EPU‐D. 3. Connect the motorized valve Open terminal to terminal 8 on the EPU‐D. 4. Connect a 24Vac transformer power source. a. Run a transformer wire through a knockout located on the bottom of the EPU‐D enclosure and connect terminal 7 on the EPU‐D to a transformer 24Vac terminal. b. Connect the motorized valve Common terminal to a transformer 24Vac terminal. Wiring to a Boiler NOTE: The EPU‐D does not source power to the boiler terminals. Wire the burner output in series with the boiler limit circuit. 1. Run the burner enable signal wires through a knockout located on the bottom of the EPU‐D enclosure. 2. Connect a burner enable terminals to terminals 7 and 8 on the EPU‐D. Heat‐Timer Corp. 059840‐00 Rev. A...
-
Page 18: Input Wiring
18 EPU‐D Installation and Operation Manual Input Wiring CAUTION To avoid damage to the EPU‐D, NO VOLTAGE can be applied to the EPU‐D input terminals. Class 2 voltage wiring (low‐voltage sensor and communication wires) must use a different enclosure knockout and conduit than any Class 1 voltage wiring. Wiring the Heating System Sensor NOTES: • Use only the provided Heat‐Timer heating system sensor (p/n 904220‐00). See page 8 for a description of the sensor. • For acceptable sensor locations, see “Piping Diagrams” on page 38. 1. Run the System Temperature Sensor wires through a knockout located on the bottom of the EPU‐D enclosure. NOTE: The sensor wires can be extended up to 500 feet (152.5 meters) using an 18 AWG shielded 2‐conductor cable (Heat‐Timer p/n 703001‐01 or equivalent #18/2 cable). 2. Connect the System Temperature Sensor wires to terminals 9 and 10 on the EPU‐D. 3. Connect the shield to terminal 10 on the EPU‐D. NOTE: Do not connect the shield at the sensor end. Wiring an Optional Pressuretrol Sensor NOTES: • Heat‐Timer does not provide a Pressuretrol sensor. • The optional Pressuretrol sensor must be a reverse‐acting sensor. See page 8 for a description of the sensor. • For acceptable sensor locations, see “Piping Diagrams” on page 38. 1. Connect wires to the Pressuretrol normally‐closed terminals. 2. Run the wires from the Pressuretrol through a knockout located on the bottom of the EPU‐D enclosure. -
Page 19: Powering-On The Epu-D
Installation Instructions 19 Wiring the Outdoor Temperature Sensor NOTES: • Use only the provided Heat‐Timer temperature sensor (p/n 904220‐00). • For acceptable sensor locations, see “Outdoor Temperature Sensor” on page 8. 1. Run the Outdoor Temperature Sensor wires through a knockout located on the bottom of the EPU‐D enclosure. NOTE: The sensor wires can be extended up to 500 feet (152.5 meters) using an 18 AWG shielded 2‐conductor cable (Heat‐Timer p/n 703001‐01 or equivalent #18/2 cable). 2. Connect the Outdoor Temperature Sensor wires to terminals 11 and 12 on the EPU‐D. 3. Connect the shield to terminal 12 on the EPU‐D. NOTE: Do not connect the shield at the sensor end. Wiring the Optional Remote Shutdown / TSTAT 1. Run the Remote Shutdown wires through a knockout located on the bottom of the EPU‐D enclosure. 2. Connect the Remote Shutdown dry‐contact wires to terminals 17 and 18 on the EPU‐D. NOTE: The terminals can be configured as normally‐open or normally‐closed. If connected to a remote shutdown, the terminals need an “open” signal. If connected to a TSTAT, the terminals need a “closed” (short) signal. Powering‐On the EPU‐D 1. Apply power to the EPU‐D. 2. Place the PRGM / RUN switch (1) on the EPU‐D in the PRGM position. 3. Perform initial programming of the EPU‐D (see “Initial Programming of the EPU‐D” on page 20). Completing the Installation After the EPU‐D is powered‐on and the initial programming is complete: 1. Place the PRGM / RUN switch (1) on the EPU‐D in the RUN position. 2. Replace the EPU‐D enclosure wiring cover and secure it in place with two screws. 3. -
Page 20: Initial Programming Of The Epu-D
20 EPU‐D Installation and Operation Manual Initial Programming of the EPU‐D When the EPU‐D is first powered‐on and initialization is complete, the System Startup menu screens appear. NOTE: If the System Startup menu screens do not appear, the EPU‐D has already been configured. To check the configuration or to make changes, select System Startup from the Main menu. To initially program the EPU‐D: 1. Follow the System Startup menu screens to program the unit (see below). 2. Configure the system settings, including: day/night heat adjustment, day/night cutoff temperature, boost, system setpoint, and thermal lockout (see “System Settings Menu” on page 29). 3. Set the day/night schedule times (see “Schedules Menu” on page 33). System Startup Menu The System Startup menu provides the options used to configure basic settings for the EPU‐D. This includes: display units, sensor type, cycle length, and date/time settings. Display Unit Selections: °F, °C Default: °F Menu Path: /System Startup > Display Unit Description: Sets the display of all temperature settings to Fahrenheit or Celsius. 059840‐00 Rev. A Heat‐Timer Corp. - Page 21 Installation Instructions 21 System Sensor Type Selections: Heating System Sensor Default: Heating System Pressuretrol Sensor Menu Path: /System Startup > Display Unit > System Sensor Type Description: Sets the type of indoor sensor used in the system. When Pressuretrol is selected, the Sensor Fault setting is not used. Shutdown/TSTAT Selections: Shutdown/Disable Default: Shutdown/Disable Tstat/Enable Menu Path: /System Startup > Display Unit > System Sensor Type > Shutdown/TSTAT Description: Sets the expected signal (open or short) on the EPU‐D control Shutdown terminals (17 and 18) that allows the control to operate. When Shutdown/Disable is selected, the control requires an “open” to operate and provide heat. When shorted, the control is disabled. When Tstat/Enable is selected, the control requires a “short” to operate and provide heat. When open, the control is disabled. Cycle Length Default: 60 min Selections: 10 to 240 minutes Menu Path: /System Startup > Display Unit > System Sensor Type > Shutdown/TSTAT > Cycle Length Description: Sets the length of the heating cycle. Each cycle consists of a Cycle‐ON and Cycle‐Off segment. Heat‐Timer Corp. 059840‐00 Rev. A...
- Page 22 22 EPU‐D Installation and Operation Manual Sensor Fault Selections: Output On Default: Output On Output Off Menu Path: /System Startup > Display Unit > System Sensor Type > Shutdown/TSTAT > Cycle Length > Sensor Fault Description: Sets the action the system will take if the outdoor sensor has a fault condition (open or short). Selecting Output On causes the system to turn on the output relay when the sensor fault condition is detected. This energizes the boiler burner or maintains the motorized valve actuator open, providing continuous heat until the sensor problem is corrected. This option will help prevent system freeze‐up. Selecting Output Off causes the system to turn off the output relay. No heat is provided until the sensor problem is corrected. Set Present Date and Time Selections: Numerical values for Month, Day, Year, and Time Menu Path: /System Startup > Display Unit > System Sensor Type > Shutdown/TSTAT > Cycle Length > Sensor Fault > Set Present Date > Set Present Time Description: Sets the present date and time on the control. The date and time are used to regulate the Schedule. The EPU‐D battery is used to maintain the date and time during power outages. Daylight Saving Selections: Enable, Disable Default: Enable Menu Path: /System Startup > Display Unit > System Sensor Type > Shutdown/TSTAT > Cycle Length > Sensor Fault > Set Present Date > Set Present Time > Daylight Saving Description: Enables or disables Daylight Saving mode. When enabled, the present time on the control will be automatically adjusted for Daylight Savings Time. 059840‐00 Rev. A Heat‐Timer Corp.
-
Page 23: Epu-D Display And Programming
EPU‐D Display and Programming 23 EPU‐D Display and Programming EPU‐D Control Module Status LEDs The EPU‐D has three status LEDs: Description Call for Heat Red LED that indicates the outdoor temperature sensor calls for heat. Indoor Satisfied Green LED that indicates the system is in cycle. Heat Circ Estab Amber LED that indicates heat circulation has been established. The following table describes the various status LED combinations. Description Amber Green The outdoor temperature sensor calls for heat, but heat established / heating system sensor temperature has not been reached. Heat circulation has been established. The Cycle‐ON segment is being timed. The Cycle‐OFF segment is being timed. Heat is still established. FLASH The EPU‐D is in thermal lockout. The control will not call for heat until the temperature of the return pipe drops to 25°F below the system setpoint setting. The system is in cycle. Indicates the control season is set to Winter and the outdoor temperature is above the setting of the outdoor temperature sensor. Display and Variable‐Function Buttons The EPU‐D display shows the system sensor temperature (when Sensor Type = Heating System Sensor) or the outdoor temperature (when Sensor Type = Pressuretrol) and appropriate operation messages. See “Display Icons and Messages” on page 24 for more information. The area above the variable‐function buttons displays the current function for each button. Heat‐Timer Corp. 059840‐00 Rev. A... -
Page 24: Default Display
24 EPU‐D Installation and Operation Manual The display button functions vary based on the current screen displayed, as described in the following table: Button Screen ▲ ▼ Left Right MENU Default Has no function Has no function Enters the menu mode. BACK SELECT Menu Scrolls through the menu. Goes back one menu step. Selects current menu item. SAVE Setting Changes the current setting value. Saves current setting. NEXT or EXIT Configuration Jumps to next view or exits. Default Display The EPU‐D default display varies depending on selected Sensor Type. Sensor Type = Heating System Sensor Sensor Type = Pressuretrol Display Icons and Messages The following icons and messages may be displayed by the EPU‐D. # Sensor Type Message Description 1 All The battery icon blinks when the battery is weak. 2 HSS Temperature When Heating System Sensor is selected as the Sensor Type, the system ... -
Page 25: Setting The Display Contrast
EPU‐D Display and Programming 25 Setting the Display Contrast 1. At the default screen, press and hold the left‐most button for 3 seconds or more. Continue to hold the button while making adjustments. 2. Use the up and down buttons to change the contrast setting (0–30, default = 20). 3. Release the left‐most button when the desired setting is reached. Resetting to Factory Default To set the EPU‐D back to its original factory default settings: 1. Remove power from the EPU‐D. 2. Press and hold the two right‐most buttons on the EPU‐D while powering the control on. 3. Release the buttons when instructed to do so on the display. A message displays stating the operating parameters are reset, and then the EPU‐D will go to the Startup menu (see “System Startup Menu” on page 20). Heat‐Timer Corp. 059840‐00 Rev. A... - Page 26 26 EPU‐D Installation and Operation Manual EPU‐D Menus Main Menu The main Menu is used to set the system season, temporarily shift Day or Night schedules to another schedule, cancel Fast Cycle Test, and provides access to other system, schedule, and maintenance settings. Season Selections: Winter, Summer Default: Winter Menu Path: /Menu > Season Description: Sets the current season. When Winter is selected, the EPU‐D will operate the building heat whenever the outdoor temperature falls below the Cutoff temperature (see “Day Cutoff” on page 30 and “Night Cutoff” on page 31). When Summer is selected, the EPU‐D will not energize the boiler burner or motorized valve actuator. NOTE: The Season setting is also located in the /System Settings menu. 059840‐00 Rev. A Heat‐Timer Corp.
- Page 27 EPU‐D Display and Programming 27 Shift From Day To Selections: Night, Extend Day, Default: Night Schedule Menu Path: /Menu > Shift From Day Description: Manually shifts the EPU‐D from the Day schedule to the selected setting without having to change the program schedule. The schedule shift takes place immediately. When Night is selected, the schedule shift remains in effect until the EPU‐D clock advances to the next setting on the schedule. For example, if the control is shifted from Day to Night on Friday at 3 pm, and the next Day setting on the schedule is not until Monday at 6 am, the control will remain in Night mode until Monday at 6 am. When Extend Day is selected, the EPU‐D will extend the Day heat schedule by the amount of time specified in the Extend Day Time setting (see page 28). When Schedule is selected, the EPU‐D checks its schedule and sets the heat level accordingly. Shift From Night To Selections: Day, Extend Day Sched Default: Day Menu Path: /Menu > Shift From Night Description: Manually shifts the EPU‐D from the Night schedule to the selected setting without having to change the program schedule. The schedule shift takes place immediately. When Day is selected, the schedule shift remains in effect until the EPU‐D clock advances to the next setting on the schedule. For example, if the control is shifted from Night to Day on Saturday at 6 am, and the next Night setting on the schedule is not until Sunday at 3 pm, the control will remain in Day mode until Sunday at 3 pm. When Extend Day Sched is selected, the EPU‐D will shift from Night to Day schedule for the amount of time specified in the Extend Day Time setting (see page 28). The control automatically returns to Night after the time has elapsed.
- Page 28 28 EPU‐D Installation and Operation Manual Extend Day Time Selections: 60 to 240 minutes Default: 90 Menu Path: /Menu > Shift From Day > Extend Day /Menu > Shift From Night > Extend Day Sched Description: Sets the length of time the control will extend the Day schedule when using the Shift feature (see “Shift From Day To” or “Shift From Night To” on page 27). Cancel Fast Cycle Selections: None Menu Path: /Menu > Cancel Fast Cycle Description: Cancels the Fast Cycle Test (see “Fast Cycle Test” on page 36). NOTE: This menu option is used for testing purposes only, and is only displayed if a Fast Cycle Test is active. 059840‐00 Rev. A Heat‐Timer Corp.
- Page 29 EPU‐D Display and Programming 29 System Settings Menu The System Settings menu is used to set the system season, day/night settings, boost adjust, system setpoint, and thermal lockout settings. Season Selections: Winter, Summer Default: Winter Menu Path: /System Settings > Season Description: Sets the current operating season. When Winter is selected, the EPU‐D will operate the building heat whenever the outdoor temperature falls below the Cutoff temperature (see “Day Cutoff” on page 30 and “Night Cutoff” on page 31). When Summer is selected, the EPU‐D will not energize the boiler burner or motorized valve actuator. NOTE: When Season = Summer, the Season setting is located in the /Menu > Season menu. Heat‐Timer Corp. 059840‐00 Rev. A...
- Page 30 30 EPU‐D Installation and Operation Manual Day Adjustment Selections: A through P Default: E Menu Path: /System Settings > Day Heat Adjust Description: Controls the length of the Cycle‐ON segment based on the outdoor temperature as compared to the Day Cutoff setting (see “Day Cutoff” on page 30) during daytime operation. Setting “A” is the lowest setting (less heat), “P” is the highest setting (most heat). During daytime operation, if the building is too cold, set the Day Adjustment one letter higher, if the building is too hot, set the Day Adjustment one letter lower. Wait 24 hours to evaluate the new setting before making any additional adjustments. See “Cycle Length” on page 5 for more information. Night Adjustment Selections: A through P Default: D Menu Path: /System Settings > Night Heat Adjust Description: Controls the length of the Cycle‐ON segment based on the outdoor temperature as compared to the Night Cutoff setting (see “Night Cutoff” on page 31) during nighttime operation. Setting “A” is the lowest setting (less heat), “P” is the highest setting (most heat). During nighttime operation, if the building is too cold, set the Night Adjustment one letter higher, if the building is too hot, set the Night Adjustment one letter lower. Wait 24 hours to evaluate the new setting before making any additional adjustments. See “Cycle Length” on page 5 for more information. Day Cutoff Selections: 20°F/-7°C (on) Default: 55°F/13°C 100°F/38°C (off) Menu Path: /System Settings > Day Cutoff Description: Sets the outdoor daytime temperature cutoff for when the EPU‐D calls for heat. When the outdoor temperature falls below the cutoff, the control begins running cycles and providing steam to the heating system. When the outdoor temperature rises to 2°F above the cutoff, the control stops providing steam to the heating system. 059840‐00 Rev. A Heat‐Timer Corp.
- Page 31 EPU‐D Display and Programming 31 Night Cutoff Selections: 20°F/-7°C (on) Default: 40°F/4°C 100°F/38°C (off) Menu Path: /System Settings > Night Cutoff Description: Sets the outdoor nighttime temperature cutoff for when the EPU‐D calls for heat. When the outdoor temperature falls below the cutoff, the control begins running cycles and providing steam to the heating system. When the outdoor temperature rises to 2°F above the cutoff, the control stops providing steam to the heating system. System Setpoint Selections: 70°F/21°C to 250°F/121°C Default: 150°F/66°C Menu Path: /System Settings > More Settings > Sys Setpoint Available When: System Sensor Type = Heating System Sensor Description: Sets the temperature at which the heat has gotten all the way through the building heating system. All radiators in the building are hot when above this temperature. To determine the System Setpoint (two people recommended): 1. Turn off the heating system and wait until all radiators are cool. 2. Position someone near the farthest radiator (in terms of piping distance) or to a radiator known to get heat last. 3. Switch the EPU‐D to Bypass (see “Bypass Mode” on page 35). 4. When the last radiator is getting warm, record the System temperature shown on the EPU‐D display. 5. Set the System Setpoint to the temperature recorded in the previous step. 6. Switch the EPU‐D back to Auto. Heat‐Timer Corp. 059840‐00 Rev. A...
- Page 32 32 EPU‐D Installation and Operation Manual Thermal Lockout Selections: On, Off Default: On Menu Path: /System Settings > More Settings > Thermal Lockout Available When: System Sensor Type = Heating System Sensor Description: When a cycle has completed, the pipes and radiators may still be very warm and continue to heat the ambient air. If more steam is added, the space will begin to overheat. When On is selected, the EPU‐D will not start another heating cycle until the system temperature falls 25°F below the set point setting. NOTE: Thermal Lockout should be set to On unless the system dissipates heat very quickly. When Off is selected, the EPU‐D will start the next heating cycle regardless of the current system temperature. Boost Adjustment Selections: 0 to 120 minutes Default: 0 Menu Path: System Sensor Type = Pressuretrol /System Settings > Boost Adjust System Sensor Type = Heating System Sensor /System Settings > More Settings > Boost Adjust Description: This option quickly returns the building to a comfortable ambient temperature after the cooler Night period. Boost begins at the #1 Day schedule start time. The EPU‐D runs the boiler burner at its limits or opens the motorized valve for the Boost Adjustment time setting. After the Boost Adjustment time expires, the control returns to normal automatic operation. NOTE: Cycles are not run during the Boost period. Boost time does not adjust with the outdoor temperature. 059840‐00 Rev. A Heat‐Timer Corp.
- Page 33 EPU‐D Display and Programming 33 Schedules Menu The Schedules menu is used to set the current system date and time, and to configure schedules that specify the time day and night operation will begin. Up to two day/night schedules can be configured. Set Present Date Selections: Numerical values for Month, Day, and Year Menu Path: /Schedules > Date Description: Sets the present date on the control. The date and time are used to regulate the Schedule. The EPU‐D battery is used to maintain the date and time during power outages. Heat‐Timer Corp. 059840‐00 Rev. A...
- Page 34 34 EPU‐D Installation and Operation Manual Set Present Time Selections: Numerical values for Time Menu Path: /Schedules > Time Description: Sets the present time on the control. The date and time are used to regulate the Schedule. The EPU‐D battery is used to maintain the date and time during power outages. Day/Night Sch #1 and Day/Night Sch #2 Selections: Numerical values for Time Menu Path: /Schedules > Day/Night Sch #1 /Schedules > Day/Night Sch #2 Description: Displays the currently selected start times for the Day Time and Night Time schedules for each day of the week. Up to two day/night schedules may be configured. The EPU‐D ignores any time setting that reads **:** (time not set). Set Sch Day Time Selections: Numerical values for Time Default: 6:00Am Menu Path: /Schedules > Day/Night Sch #1 > Day Time /Schedules > Day/Night Sch #2 > Day Time Description: Sets the start time for the selected Day Time schedule. To clear the current setting, press the Prev (Del) button on the EPU‐D display. The cleared setting displays as **:**. Set Sch Night Time Selections: Numerical values for Time Default: 10:00Pm Menu Path: /Schedules > Day/Night Sch #1 > Night Time /Schedules > Day/Night Sch #2 > Night Time Description: Sets the start time for the selected Night Time schedule. To clear the current setting, press the Prev (Del) button on the EPU‐D display. The cleared setting displays as **:**. 059840‐00 Rev. A Heat‐Timer Corp.
- Page 35 EPU‐D Display and Programming 35 Maintenance Menu The Maintenance menu is used to perform maintenance activities on the system. It should only be used by system installers. Bypass Mode Selections: Auto, Bypass Default: Auto Menu Path: /Maintenance > Bypass Mode Description: This option overrides the automatic operation of the heating system. When Bypass is selected, the EPU‐D output relays are activated. The boiler burner is turned on and the boiler will run constantly on its own limits, or the motorized valve is fully opened. NOTE: When Bypass is selected, a warning screen displays. When Auto is selected, the EPU‐D controls the heating system automatically according to its programming. Heat‐Timer Corp. 059840‐00 Rev. A...
- Page 36 36 EPU‐D Installation and Operation Manual System Trim Selections: -5°F/-20°C to 5°F/-15°C Default: 0°F/-18°C Menu Path: /Maintenance > System Trim Available When: System Sensor Type = Heating System Sensor Description: This option allows fine adjustments to be made to the displayed value of the heating system sensor temperature reading. Outdoor Trim Selections: -5°F/-20°C to 5°F/-15°C Default: 0°F/-18°C Menu Path: /Maintenance > Outdoor Trim Description: This option allows fine adjustments to be made to the displayed value of the outdoor sensor temperature reading. NOTE: Only trim the outdoor sensor based on an accurate thermometer reading taken where the sensor is located. Fast Cycle Test Selections: Off, On Default: Off Menu Path: /Maintenance > Fast Cycle Description: This option allows for testing the boiler burner or motorized valve. If Thermal Lockout is not active, the control will turn on the boiler burner or open the motorized valve. NOTE: Fast Cycle will only function when the EPU‐D is in a cycle. It will not override the Heat Established function or prevent Thermal Lockout. When On is selected, the control changes cycle minutes to cycle seconds, allowing a 60 minute cycle to be viewed in 60 seconds. NOTE: Be sure to turn off the Fast Cycle either using the Fast Cycle Test menu, or Cancel Fast Cycle menu (see page 28). 059840‐00 Rev. A Heat‐Timer Corp.
- Page 37 EPU‐D Display and Programming 37 Info Selections: None Menu Path: /Maintenance > Info Description: The Info menu provides access to screens that display the current configuration of the EPU‐D. Available information includes: software version, serial number, system sensor type, sensor fault setting, and battery level. Press the Next button to advance to the Heat‐Timer contact information screen. Heat‐Timer Corp. 059840‐00 Rev. A...
- Page 38 38 EPU‐D Installation and Operation Manual Piping Diagrams Figure 7: EPU‐D Operating a Boiler in a One‐Pipe Steam System 059840‐00 Rev. A Heat‐Timer Corp.
- Page 39 Piping Diagrams 39 Figure 8: EPU‐D Operating a Boiler in a Two‐Pipe Steam System Heat‐Timer Corp. 059840‐00 Rev. A...
- Page 40 40 EPU‐D Installation and Operation Manual Figure 9: EPU‐D Operating a Motorized Valve in a Two‐Pipe Steam System 059840‐00 Rev. A Heat‐Timer Corp.
- Page 41 Troubleshooting 41 Troubleshooting Symptom Possible Cause Recommended Action(s) No display or No power to the EPU‐D Verify the EPU‐D Control Module is receiving power, all power distorted display. Control Module, incorrect wiring is in good condition and connected. or defective wiring. The EPU‐D Control Module requires 120Vac power to terminal 1 and 2, and earth ground wiring to terminal 3. Turn power to the EPU‐D Control Module off then back on. See “Power Input Wiring” on page 16. Display shows Sensor disconnected. Verify the sensor is properly connected to the EPU‐D Control sensor “Open”. Module. Defective sensor, wires, or Disconnect the sensor input wires from the control and use an EPU‐D Control Module. Ohm meter to measure the resistance between the sensor wires. Refer to Table 2 on page 43. • If the readings are out of range, the sensor or the wiring may be defective. Replace the sensor/wiring. Connect the sensor wires to the control and disconnect the wires from the sensor terminals. Short the wires together. • If the display still reads “Open”, the control is defective. Replace the EPU‐D Control Module. Display shows Defective sensor, wires, or Remove the wires from the sensor terminals. The display sensor “Short”.
- Page 42 42 EPU‐D Installation and Operation Manual Symptom Possible Cause Recommended Action(s) Too much heat. Incorrect programming. Verify the following settings: • Ensure the control is not in Bypass mode. See “Bypass Mode” on page 35. • Ensure the Day and/or Night Heat Adjustment is not set too high. See “Day Adjustment” on page 30 and “Night Adjustment” on page 30. • If excess heat is only in the morning, ensure the Boost Adjustment is not set too high. See “Boost Adjustment” on page 32. • Ensure the Outdoor Cutoff is not set too high. See “Day Cutoff” on page 30 and “Night Cutoff” on page 31. • Ensure the system Setpoint is set correctly. See “System Setpoint” on page 31. • Ensure Thermal Lockout is not disabled. See “Thermal Lockout” on page 32. Too little heat. Incorrect programming. Verify the following settings: • Ensure the Day/Night Schedules are set correctly. See “Day/Night Sch #1 and Day/Night Sch #2” on page 34.
- Page 43 Troubleshooting 43 Table 2: Temperature Sensor Chart Temperature Value (Ohms) °F °C OPEN 150000 ‐30 ‐34 117720 ‐20 ‐29 82823 ‐10 ‐23 59076 ‐18 42683 ‐12 31215 ‐7 23089 ‐4 19939 ‐1 17264 14985 13040 11374 9944 8714 7653 5941 4649 3667 2914 2332 1879 1524 1243 1021 SHORT...
- Page 44 Heat-Timer Corporation shall not be responsible for any maladjustments of any control installed by Heat-Timer Corporation. It is the user’s responsibility to adjust the settings of the control to provide the proper amount of heat or cooling required in the premises and for proper operation of the heating or cooling system. Heat-Timer Corporation...
Need help?
Do you have a question about the EPU-D and is the answer not in the manual?
Questions and answers