
Related Manuals for SUN ANGEL DUO 1400

Summary of Contents for SUN ANGEL DUO 1400
- Page 1 Operating instructions Model-No.: JK 127 / SA 52-4 TT 1400 SUN ANGEL DUO 1013754-03A / us-en / 10.2019...
- Page 2 Contact information Contact information Customer Service JK Products & Services 411 West Washington Avenue Suite B Jonesboro, Arkansas 72401 800-445-0624 870-935-9046 http://support.jkamerica.com Manufacturer JK-Products GmbH Rottbitzer Str. 69 53604 Bad Honnef GERMANY Tel.: +49 (0) 22 24 / 818-140 Fax: +49 (0) 22 24 / 818-166 WARNING! Read these operating instructions.
-
Page 3: Table Of Contents
Table of Contents Table of Contents What certain words and signs mean (Glossary) ......6 Definitions ..................6 Warning signs ................. 7 Symbols on the device ..............9 What this device is ..............11 Guidelines ..................11 Export .................... 11 Scope of delivery ................ - Page 4 Table of Contents Vibra Shape (vibration plate) ............39 Foreseeable misuse ..............39 Obligations of the studio operator..........40 Staff training .................. 40 Risks of using this device ............41 Benefits of using this device ............42 How to decide to use this device ..........43 What to do before the treatment ..........
- Page 5 Where you can find out more ............. 94 How we studied this device ............95 Appendix ..................96 16.1 SUN ANGEL DUO 1400: EMC information ........96 16.1.1 Table 201: Guidelines and manufacturer's declaration – Electromagnetic emissions ............96 16.1.2 Table 202: Guidelines and manufacturer's declaration –...
-
Page 6: What Certain Words And Signs Mean (Glossary)
What certain words and signs mean (Glossary) What certain words and signs mean (Glossary) Definitions Studio operator People who provide tanning devices to users on a commercial basis. The studio operator is trained to operate and maintain the device and is responsi- ble for the orderly operation of the device as well as compliance with the maintenance intervals. -
Page 7: Warning Signs
What certain words and signs mean (Glossary) Warning signs Danger notices, nonobservance will lead to death or serious injury: DANGER! Type and source of danger, e.g. 'DANGER – High volt- age!' Description of the consequences, e.g. 'You can be killed or injured by an electric shock!' Countermeasures: –... - Page 8 What certain words and signs mean (Glossary) Caution notices, nonobservance can lead to less than serious injury or damage of property. CAUTION! Unauthorized lamps! The word 'Caution' together with the warning sign points out that less than serious injury can be expected here. Countermeasures: –...
-
Page 9: Symbols On The Device
What certain words and signs mean (Glossary) Symbols on the device The following symbols are displayed on the device or on the packaging: Manufacturer, company address Type BF applied part Read and comply with the manufacturer's documentation Therefore you must never fill the AQUA SYSTEM canister with tap water or other liquids. - Page 10 What certain words and signs mean (Glossary) Temperature limitations. The temperature limits are noted next to the upper and lower horizontal line. Recyclable material. Production year, month and day Quantity Article Number/Reference Number Serial Number Unique Device Identification Healthcare Barcode Polystyrene Cardboard Mixed paper...
-
Page 11: What This Device Is
What this device is What this device is Guidelines This product is in conformity with the performance standards for sunlamp products under 21 CFR 1040.20, FDA and listed with ETL to UL 482 and CAN/CSA 22.2 No. 224. Export This device is exclusively intended for use in the USA, Canada and Central America, and may not be exported to other countries and operated there! The manufacturer assumes no liability whatsoever in the event of non-compliance. -
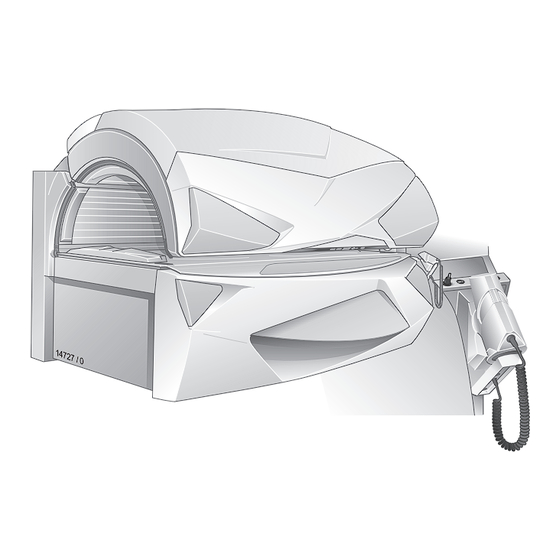
Page 12: Device Description
What this device is Device description 1. Facial tanner (high pressure lamps + low pressure lamps) 2. Shoulder tanner with audio system 3. Acrylic panel base 4. Partition 5. Headphones and AUX connection 6. Adjustable air nozzles – Facial cooling 7. -
Page 13: Options
What this device is Options 1. Central exhaust air socket Exhaust option As an optional comfort feature, your device can be equipped with an exhaust duct which allows the warm air from the device to be ducted outside of the room or building. -
Page 14: Function Description
What this device is Function description Tanning system The primary technical components of a tanning device are an artificial source of UV radiation and a mechanical structure with a defined active surface. The users can choose between Essential Sunshine and Styling Sunshine. ESSENTIAL SUNSHINE Tan exclusively with type B UV lamps. -
Page 15: Transport
What this device is Transport Installation location This sunlamp product is suitable for tanning salons, fitness studios or similar installation locations. You may find detailed information on installation and setting up in the Installa- tion Instructions (see folder Technical Documentation). 3.8.1 Ventilation NOTICE... -
Page 16: Setup Location
What this device is 3.8.2 Setup location WARNING! Sudden movements and malfunctions! Crushing hazard. – The device is not suitable for operation in mobile facili- ties (ships, buses, trains). CAUTION! Danger of overheating by obstruction of the air routing! Any liability is excluded in case of damage or injury proven to be the result of the use of non-genuine spare parts. -
Page 17: Commissioning
What this device is NOTICE Damage to the device possible! The device is not to be used outdoors. Strong Radio Frequency (RF) emitters! Please do not install or operate the device in close proximity to strong Radio Frequency (RF) emitters such as metal detectors or electromagnetic anti-theft systems. -
Page 18: Signs And Stickers On The Device
What this device is Signs and stickers on the device Signs which warn of danger areas or give important information on compo- nents are attached to the device. Ensure that the instruction signs are always clearly recognizable and easily legible. Any missing instruction signs or stick- ers must be replaced. - Page 19 What this device is 1: Name plate (example) The name plate is attached to the interior side of the canopy. It contains im- portant information for identifying the device (e. g. the serial number = Serial- No.) and the conformity mark. 2: UDI plate (example) 3: Standards 4: Sticker 'Follow Operating Instructions' (1014232-..)
- Page 20 What this device is 5: Warning sticker UV radiation (801140-..) 6: Sticker (1014367-..) 7: Sticker (843319-..) The sticker is mounted on the rear panel. 20/108...
- Page 21 What this device is 8: Exposure label The sticker is mounted on the lamp cover foot end. 9: Lamp cover base sticker (801139-..) The sticker is mounted on the lamp cover foot end. 10/2019 1013754-03A Operating instructions – 21/108...
- Page 22 What this device is 10: Sticker partition (1002317-..) 11: Age warning label (1508746-..) The sticker is mounted on the front panel. 12: OEM parts sticker (801138-..) The sticker is mounted on the bottom of the bed base. 22/108...
- Page 23 What this device is 13: AQUA FRESH sticker (800839-..) The sticker is mounted under the tray. 14: Air conditioning sticker (1002243-..) 13435 / 0 The sticker is mounted on the air conditioning. 10/2019 1013754-03A Operating instructions – 23/108...
- Page 24 What this device is 15: Strap sticker (1000707-..) The sticker is attached to the ground strap. 24/108...
- Page 25 What this device is 16: Ballast support warning sticker (1003399-..) 17483 / 0 The sticker is mounted on the power unit support. 10/2019 1013754-03A Operating instructions – 25/108...
- Page 26 What this device is 17: Controller connections sticker (843147-..) The sticker is mounted on the controller support. 26/108...
- Page 27 What this device is 18: Sticker ESD/Aquamist (100791-..) The sticker is mounted on the AROMA canister. 19: Sticker ESD (85662-..) The sticker is mounted on several places in the device. 20: USA mains connection sticker (801046-..) 14480 / 1 The sticker is mounted on the left side panel. 10/2019 1013754-03A Operating instructions –...
- Page 28 What this device is 21: Canada warning sticker (801371-..) The sticker is mounted on the rear panel. 22: Sticker Chip card (843148-..) The sticker is mounted on the controller support. 23: Warning sticker sensor base station (1009643-..) The sticker is mounted on the sensor base station. 28/108...
-
Page 29: Technical Data
What this device is 3.10 Technical data 3.10.1 Power rating, electrical specifications and noise level SUN ANGEL DUO 1400 Power consumption rating: 18,500 W Rated frequency: 60 Hz Rated voltage: 230 V 3 phase 230 V 1 phase Rated overcurrent protection device:... -
Page 30: Dimensions
What this device is 3.10.2 Dimensions B + = 60 13/16 in 1,545 mm 58 11/16 in 1,491 mm 59 14/16 in 1,521 mm H1 = 76 15/16 in 1,955 mm B - = 59 11/16 in 1,516 mm H2 = 43 9/16 in 1,106 mm B 1 =... -
Page 31: Lamp Configuration
What this device is 3.10.3 Lamp configuration NOTICE The use of other lamps and filter panels voids the operating license! SUN ANGEL DUO 1400 Lamp set Number Description Length Power Control Order-no. UV high pressure lamps 520 W 420 W / 360 W / 12645-.. -
Page 32: Accent Lighting
What this device is 3.10.4 Accent lighting Not applicable for this device. 3.10.5 Spare parts Number Description Order-no. Partition 1500339-.. Filters 52104-.. Filter mat – Filter 51937-.. Filter 55567-.. AQUA SYSTEM, 1.59 gal (6 l) 1010506-.. AROMA, 3.38 fl oz (100 ml) HEAVEN 1004695-.. -
Page 33: Why You Use It
Why you use it Why you use it Intended use This sunlamp product is intended exclusively for cosmetic tanning of the hu- man skin, for one person at a time, at the age of 18 or above. Skin condition You may benefit from the use of this device if you tan in natural sunlight (skin types III, IV and V), ... -
Page 34: Who Cannot Use It
Who cannot use it Who cannot use it Prohibited usage 5.1.1 Tanning system WARNING! UV radiation Danger of skin and eye injuries or skin diseases! The following people must not use the device: People under 18 years of age People with skin lesions or open wounds ... -
Page 35: What You Must Do To Avoid Serious Harm
What you must do to avoid serious harm What you must do to avoid serious harm General DANGER – HIGH VOLTAGE! You can be killed or injured by an electric shock! Assembly and electrical connection must comply with na- tional and local regulations. –... - Page 36 What you must do to avoid serious harm WARNING! Danger of ultraviolet radiation. Ultraviolet radiation - follow instructions. Failure to use protective eyewear may result in severe burns or other eye injury - if discomfort develops, discontinue use and consult a physician. –...
-
Page 37: Sensor
What you must do to avoid serious harm Sensor To ensure correct measurements, the sensor may not be used on the follow- ing parts of the body: Moles, liver spots and veins Wounds, scars and pimples Reddened areas (rosacea, sunburn) ... -
Page 38: What You Must Do To Avoid Other Harm
What you must do to avoid other harm What you must do to avoid other harm General WARNING! Infections can be transferred through skin contact. All items/equipment components, with which the user can come into contact during tanning, must be cleaned and disinfected after every tanning session: –... -
Page 39: Sensor
What you must do to avoid other harm Sensor To ensure correct measurements, the sensor may not be used on the follow- ing parts of the body: Moles, liver spots and veins Wounds, scars and pimples Reddened areas (rosacea, sunburn) ... -
Page 40: Obligations Of The Studio Operator
What you must do to avoid other harm Obligations of the studio operator As the studio operator you are responsible for informing users on possi- ble risks of tanning. All danger and safety labels attached to the device must be observed! Do ... -
Page 41: Risks Of Using This Device
Risks of using this device Risks of using this device WARNING! Danger through ultraviolet radiation! Danger of skin and eye injuries or skin diseases! This sunlamp product must not be used on individuals who have had skin cancer or have a family history of skin cancer. Persons repeatedly exposed to ultraviolet sunlamp products must be ... -
Page 42: Benefits Of Using This Device
Benefits of using this device Benefits of using this device This device serves the purpose of aesthetic tanning for one adult person with skin suitable for tanning. Different tanning results can be achieved in varying strength tanning devices. This is due to the different strength UV lamps and the different UV-A and UV- B proportions of the UV radiation. -
Page 43: How To Decide To Use This Device
How to decide to use this device How to decide to use this device This device is intended only for commercial use and not for private use. Some people are not permitted to use the device, see chapter 5. The device may not be used by people with reduced physical, sensory or mental capabilities or who have insufficient experience and/or knowledge without supervision. -
Page 44: What To Do Before The Treatment
What to do before the treatment What to do before the treatment Please check for any conditions that may prohibit the use of this device – see chapters 5, 6, 8, 10. Make-up in the tanning device Please do not wear make-up. Clean skin absorbs UV light better. A wide variety of materials is found in cosmetics. -
Page 45: How To Use This Device
How to use this device How to use this device 12.1 How to set this device up After commissioning and cleaning/disinfection, the device is ready for opera- tion. Via the Control Center the most important settings can be made before start- ing the device. -
Page 46: Tanning Times
How to use this device 12.4.2 Tanning times NOTE: The tanning times given in the table must not be exceeded! The sticker is mounted on the lamp cover foot end. 46/108... -
Page 47: How To Operate The Device
How to use this device 12.5 How to operate the device 12.5.2 12.6.1 12.5.1 Control Center 1. NFC Connect 2. OK button (not always visible) 3. Feature selection 4. Display – Functions ... 5. Application STYLING SUNSHINE 6. Application ESSENTIAL SUNSHINE 10/2019 1013754-03A Operating instructions –... -
Page 48: User Settings Overview
How to use this device 12.5.2 User settings overview All of a device's available functions can be pre-set on the control panel. Fine adjustment is carried out during use. NOTE: Pressing and holding for 3 seconds opens the 'User set- tings' overview. - Page 49 How to use this device Navigation unit – operating handle The tanning device is operated using the buttons mounted in the operating handle in the canopy. Switch tanning on and off, pause. Confirm function. This button's availability is displayed on the screen, depend- ing on the function that has been selected.
-
Page 50: Functions
How to use this device 12.6 Functions 14796 / 2 1. START/STOP button 2. Feature selection 3. Temptronic pictogram 4. Body fan pictogram 5. Facial fan pictogram 6. Display – Functions ... 7. Facial tanner pictogram 8. AROMA SYSTEM pictogram 9. -
Page 51: Navigation
How to use this device 12.6.1 Navigation Via the Control Center the most important settings can be made before start- ing the device. During the tanning session, functions may be activated or deactivated via the control panel inside the device. Navigation unit - Control Center The Control Center enables comfortable access to special functions. -
Page 52: Description
How to use this device 12.6.2 Description Function Pictogram selection / Description / Display Information Button sequence Lamps START/STOP The tanning time continues to Switches the lamps on / off during run if the lamps are switched the tanning session off during tanning session. - Page 53 How to use this device Function Pictogram selection / Description / Display Information Button sequence Audio-System Select audio system: Selecting an audio system A: Own music, MP3 player, automatically deactivates the smartphone others. B: Select title, 'Music' SD-card C: Studio channels, externally connected system (e.g.
-
Page 54: Operating Display Of The Sensor
How to use this device 12.7 Operating display of the sensor The operating statuses of the sensors are also indicated by different colours of the LED. The different colours also provide the user with direct feedback during measuring. Colour of the LED Behaviour of the LED Status Next step... -
Page 55: Selection Of The Application
How to use this device 12.8 Selection of the application Before the session begins, the desired application type must be selected. There are 2 possible selections: ESSENTIAL SUNSHINE: Only the UV-B lamps are switched on. STYLING SUNSHINE: UV-A lamps and UV-B lamps are switched on. ... -
Page 56: Measurement Failed 4X
How to use this device Display Description Sun Angel devices are also capable of reading a customer card or the application type can be selected manually as described above. After selecting the application type the sensor must be removed from the station in au- tomatic mode. -
Page 57: Connections
How to use this device 12.11 Connections MP3 player and smartphone WARNING! Danger of hearing damage! Using earphones or headphones at high volume can result in permanent hearing damage. – Do not set the volume too high. CAUTION! The heat might damage your MP3 player or smartphone! –... -
Page 58: How To Use
How to use this device 12.12 How to use NOTE: Before use the device must always be cleaned and disinfect- ed! See chapter 12.15 How to clean/disinfect. 12.12.1 How to start The device is started automatically with an internal or external timer. NOTE: See separate document 'Timer Control Module' #1008370-.. -
Page 59: How To Stop
How to use this device 12.12.3 How to stop The tanning session ends automatically after the preset time has run down. The internal body cooling fan continues to run for approx. three (3) minutes to sufficiently cool the device. – To interrupt a tanning session, press and hold button START/STOP any- time during a session. -
Page 60: Safety Instructions For Cleaning/Disinfection And Maintenance
How to use this device 12.14 Safety instructions for clean- ing/disinfection and maintenance DANGER – HIGH VOLTAGE! You can be killed or injured by an electric shock! During maintenance and service work there is a risk of touching live parts and receiving a fatal electric shock. –... - Page 61 How to use this device WARNING! Injuries and damage due to improper maintenance! If the maintenance intervals for the UV lamps are exceeded or incompatible UV lamps are installed, the share of harmful UV radiation may increase. Sunburn and other skin damage may result.
-
Page 62: How To Clean/Disinfect
How to use this device Over the course of time the acrylic panel will become discolored as a result of usage and must be replaced by customer-service personnel on a regular basis. The optional partition (only for devices with an air conditioning unit) works as a UV filter and must be replaced by customer-service personnel on a regular basis. -
Page 63: Cleaning And Disinfection Of Surfaces
How to use this device 12.15.1 Cleaning and disinfection of surfaces Acrylic panel NOTICE! Do not rub with a dry cloth – danger of scratching! – Failure to observe this voids all warranty claims. Acrylic panels (9) & (11) & (16) referenced in section 12.15.2 'Clean- ing/disinfection plan' These panels are not in direct contact with the user, however they can become soiled if the user inadvertently touches them. -
Page 64: Cleaning/Disinfection Plan
How to use this device 12.15.2 Cleaning/disinfection plan Component Interval Activity See page Adjustable air nozzles Cleaning and disinfection Acrylic panel Cleaning and disinfection Operating handle Cleaning and disinfection Display unit Cleaning and disinfection Sensor and base station Cleaning and disinfection Handle Cleaning and disinfection Protective goggles... -
Page 65: How To Maintain
How to use this device NOTE: If desired, you may set the unit to require that clean- ing/disinfection be confirmed after each tanning session by pressing the START/STOP button (when the cool-down time for the main fan has finished). 12.16 How to maintain 12.16.1 Technical modifications... - Page 66 How to use this device Maintenance performed by the studio operator or a JK Factory Certified Technician 10 2 x 14801 / 2 Component Interval Activity See page AQUA SYSTEM Replace 88, 89 6a-6b AROMA canister Replace 88, 88 Shoulder tanner high pressure Replace lamps Facial tanner low pressure lamps...
- Page 67 How to use this device Component Interval Activity See page Lamps canopy Replace low pressure lamps (TYPE A) low pressure lamps (TYPE B) Starter facial tanner low pressure Replace lamps Facial tanner filter panels Visual 78, 79 control Facial tanner filter panels Replace 78, 79 Shoulder tanner filter panels...
- Page 68 How to use this device Maintenance performed by authorized, trained and qualified staff WARNING! Danger to persons from maintenance work that has not been carried out! If maintenance work is not carried out, it can lead to material damage or personal injuries! –...
-
Page 69: Cleaning And Maintenance Work Preparation
How to use this device 12.16.3 Cleaning and maintenance work preparation Service kit 1. Allen key 2. Suction cup for filter panels, acrylic panel and canopy panel 3. Scratch prevention for the entry area (support cushion for the canopy) The service kit is fitted on the inside of the front panel. –... - Page 70 How to use this device – Use the cushion as scratch prevention when opening the canopy panel. Lift up the acrylic panel and remove the partition – Lift up the acrylic panel. The acrylic panel will be held in place automatically by the gas springs. –...
- Page 71 How to use this device – Lift the acrylic up slightly and then close it. Remove the canopy panel – Turn the locks through 90°: first the outer locks, then the lock in the mid- dle. – Support the canopy panel with one hand so that it does not fall down. –...
- Page 72 How to use this device – Open the panel and lay it down carefully. When assembling the device please note: – Refit and retighten the screws. Open the bed base – Raise the acrylic panel and grasp the recessed grip. –...
-
Page 73: Instructions For Replacing The Lamps
How to use this device 12.16.4 Instructions for replacing the lamps WARNING! Danger of being burned by an over-powered lamp! If the old chip card is left in the device, the new lamp set will be run at too high power and the user may suffer heavy burns! –... - Page 74 How to use this device – Remove the chip card belonging to the old lamp set. – Insert the new chip card with the text facing downwards and the arrow pointing forwards. – Close the bed base. You should hear the bed base click into place. Low pressure lamps WARNING! Danger of burns from hot lamps and device parts!
- Page 75 How to use this device – Push the pins vertically into the socket from above. – Turn the lamp 90°. The lettering must be oriented towards the outside (i.e. towards the tan- ning room or towards the user). Makrolon tubes Not applicable for this device.
- Page 76 How to use this device High pressure lamps and filter panels WARNING! Danger of burns from hot lamps and device parts! If the tanning device was operated before being switched off and opened, lamps and housing parts may be hot. –...
-
Page 77: Cleaning And Disinfection Of The Sensor
How to use this device – Only touch new lamps in the handling zone. – Test the safety switch to ensure that it works. The safety switch ensures that the device switches off in the event of a faulty filter panel or when a filter panel is missing. –... -
Page 78: Cleaning Or Replacing Lamps In The Base
How to use this device 12.16.6 Cleaning or replacing lamps in the base – Lift up the acrylic panel and then remove the lamp covers and the parti- tion: see page 70. Replacing lamps: see page 74. Changing the chip card: see page 73. –... -
Page 79: Cleaning Or Replacing Lamps And Filter Panels In The Canopy
How to use this device – Remove the lamp cover. Replacing lamps: Low pressure lamps: see page 74. High pressure lamps and filter panels: see page 76. Changing the chip card: see page 74. – When fitting the lamps, ensure that they are in the correct sequence. When assembling the device please note: –... - Page 80 How to use this device The facial tanner's low pressure lamps must be removed first so that the high pressure lamps and the filter panels can be changed. – Remove the lamps. – Remove the ninth low pressure lamp in the canopy so that you can then access the facial tanner's low pressure lamp starter.
-
Page 81: Cleaning Or Replacing The Lamps And Filter Panels In The Shoulder Tanner
How to use this device 12.16.9 Cleaning or replacing the lamps and filter panels in the shoulder tanner WARNING! Danger of burns from hot lamps and device parts! If the tanning device was operated before being switched off and opened, lamps and housing parts may be hot. –... -
Page 82: Cleaning Or Replacing The Interior Lights
How to use this device – Use the suction cup to lift the upper filter panel. – Pull out the holder. – Use the suction cup to remove the two filter panels. NOTICE The shoulder tanner is fitted with different filter panels. a) Ultra Performance 912 (blue), order no. -
Page 83: Cleaning Or Replacing The Front Panel Accent Lighting
How to use this device 12.16.12 Cleaning or replacing the front panel accent lighting Not applicable for this device. 12.16.13 Cleaning the filters in the base – Opening the bed base: see page 72. – Remove the filters. – Clean the filters wet or dry. Dry cleaning: Vacuum cleaner (depending on the degree of soiling) Wet cleaning: Use water and detergent or put in a dish-washer NOTICE! -
Page 84: Cleaning The Canopy Filter Mats
How to use this device 12.16.14 Cleaning the canopy filter mats – If necessary, cover the canopy in order to prevent the paint from being scratched. – Remove the filter mats fitted at the back of the canopy. – Dry or moist clean the filter mats or replace with new ones. Dry cleaning: Vacuum cleaner (depending on the degree of soiling) Moist cleaning: Water and detergent –... -
Page 85: Air Conditioning: Empty The Condensation Tank And Clean The Filter
How to use this device 12.16.16 Air conditioning: Empty the condensation tank and clean the filter NOTICE Damage to the device through soiled filters and cooling fins! Regularly check the filter grill and cooling fins on the air conditioning system and clean if necessary. We recommend using the specially manufactured fin comb, art-no. - Page 86 How to use this device – Clean the filter moist or dry: Dry cleaning: Vacuum cleaner (depending on the degree of soiling) Moist cleaning: Water and detergent – Do not clean in the dish-washer! – Remove the filter from the holder. –...
- Page 87 How to use this device – Attach the cover. – Connect the condensation tank to the hose. – Replace the condensation tank. – Close the bed base. You should hear the bed base click into place. 10/2019 1013754-03A Operating instructions – 87/108...
-
Page 88: Aqua / Aroma System Maintenance
How to use this device 12.16.17 AQUA / AROMA SYSTEM maintenance The AQUA SYSTEM function sprays a fine mist of AQUA SOLAR WITH SKIN+ ADDITIVE into the interior of the device for body cooling (see 'AQUA SYSTEM PRODUCT INFORMATION', order no. 1011201-..). WARNING! Customer health hazard! Water that has been contaminated with bacteria can cause... - Page 89 How to use this device – Unscrew the lid on the new canister. – Write the date on the canister. – Fit the new canister in the holder. – Close the bed base. You should hear the bed base click into place. Replacing the AQUA SYSTEM canister –...
-
Page 90: Cleaning The Air Intake Openings
How to use this device Venting NOTE: To ventilate, access to the Professional Setup Manager in the Control Center is required. – Go to the Professional Setup Manager. – Activate the fill mode in the AQUA MIST & AROMA menu. –... -
Page 91: How To Store The Device
How to use this device 12.17 How to store the device 12.17.1 Decommissioning The device must be disconnected from the power supply in order to tempo- rarily or permanently decommission it. You must abide by the legal disposal requirements when permanently de- commissioning the device. -
Page 92: What To Do When Things Go Wrong
What to do when things go wrong What to do when things go wrong WARNING! Follow instructions! Failure to use protective eyewear may result in severe burns or other eye injury. If discomfort develops, discontinue use and consult a physician. –... -
Page 93: Troubleshooting
What to do when things go wrong NOTE: Occasionally, persons using the tanning device will experi- ence a slight reddening of the skin – usually in small patches – after the second or third session. This redness is often accompanied by an itching sensation. This may be nothing more than a very limited heat 'rash' caused by heat from the lamps within the device. -
Page 94: Where You Can Find Out More
Where you can find out more Where you can find out more If you have any questions, please contact Customer Service (see page 2). 94/108... -
Page 95: How We Studied This Device
How we studied this device How we studied this device The system is built to the state of the art and the applicable safety regulations. We reserve the right to make technical changes which are necessary to im- prove the system or a system component even if they deviate from pictures and information in these instructions. -
Page 96: Appendix
Electromagnetic environment – Guidelines HF emissions as per CISPR 11 Group 1 SUN ANGEL DUO 1400 uses HF power mostly for in- ternal functions and Bluetooth®. Therefore the HF emissions are very low and it is highly unlikely that it will cause any interference to adjacent electronic equip- ment. -
Page 97: Table 202: Guidelines And Manufacturer's Declaration Electromagnetic Interference
Appendix 16.1.2 Table 202: Guidelines and manufacturer's declaration – Electromagnetic interference The tanning system has been designed for use in the electromagnetic envi- ronment specified below. The device operator must ensure that it is used in such an environment. Interference IEC 60601 - Defined Electromagnetic... -
Page 98: Table 204: Guidelines And Manufacturer's Declaration Electromagnetic Interference
Portable and mobile radios are not to be used at shorter distanc- noise outside the ISM band, 6 V RMS outside the ISM band, 6 V es to the Model-No.: SUN ANGEL DUO 1400 and its cables IEC 61000-4-6 in the ISM and amateur radio RMS in the ISM and ama-... -
Page 99: Sun Angel Duo 1400
SUN ANGEL DUO 1400 SUN ANGEL DUO 1400 has been designed for use in an electromagnetic environment in which the radiated HF interference is controlled. The operator of the device can help to reduce electromagnetic interference by maintaining... -
Page 100: Jk-Products, Inc. - Limited Warranty
JK-Products, Inc. – Limited Warranty JK-Products, Inc. – Limited Warranty JK-Products, Inc. warrants its products to be free from defects in materials and workmanship under intended normal use as described in the unit's Oper- ation and Instruction Manual, for a period of three (3) years from date of sale. This Limited Warranty applies only to the original purchaser of the equipment through JK-Products, Inc. -
Page 101: Limited Acrylic Warranty
JK-Products, Inc. – Limited Warranty 17.1 Limited Acrylic Warranty JK Products, Inc. warrants its acrylic sheets to be free from defects in material and workmanship, under intended normal use, for a period of one (1) year from date of sale of the tanning bed or 1,200 hours of operation whichever comes first. -
Page 102: Labor Warranty Claim/Credit Procedures
JK-Products, Inc. – Limited Warranty Therefore, in order for you to properly file a Warranty Claim, you must locate the name and phone number of the dealer/distributor through whom you pur- chased your unit. Normally this information can be easily located either on your paid invoice or other proof of purchase documentation that you received when taking delivery of the unit. -
Page 103: Quality Inspection And Acceptance Form
JK-Products, Inc. – Limited Warranty 17.2.3 Quality inspection and acceptance form The form can be found in the separate document ‘Quality inspection and acceptance form’ (#1014113-..) which is provided in the Technical Documen- tation folder. 17.3 Limited Lifetime Warranty Global Service USA warrants specific individual components of the tanning system against defects in materials and workmanship for the life of the prod- uct. - Page 104 JK-Products, Inc. – Limited Warranty The remedies provided in this limited warranty are the exclusive remedies provided to the purchaser by Global Service USA and are provided in substi- tution of all other remedies. Consequential and incidental damages are ex- cluded.
-
Page 105: Index
Index Index Acrylic panel ....................70 Load ......................29 Air conditioning Filter ......................85 Air intake openings ..................90 Air routing ....................... 15 Application tips ....................58 AQUA / AROMA SYSTEM maintenance ............88 AQUA SYSTEM canister ................89 AROMA canister .................... 88 Bed base ...................... - Page 106 Index Electrical specifications ................. 29 EMC information ................... 96 Export ......................11 Facial tanner Cleaning/replacing ................... 79 Maintenance intervals ................65 Filter Cleaning .................... 83, 84 Filter panels ..................... 76, 78 Cleaning/replacing ................79, 81 Maintenance intervals ................65 Foreseeable misuse ..................39 Functions .......................
- Page 107 Index Obligations of the studio operator ..............40 Operating altitude ................... 16 Operating display of the sensor ..............54 Order numbers ..................31, 32 Packaging ...................... 91 Plastic surfaces (care) ................... 63 Power rating ....................29 Prohibited usage .................... 34 Recycling .......................
- Page 108 Index 108/108...
Need help?
Do you have a question about the DUO 1400 and is the answer not in the manual?
Questions and answers