Table of Contents
Advertisement
User Manual
Washer-Disinfector
HD 450 / HD 450 Injection
Dear User,
We thank you for the trust you have placed in us in choosing to purchase this cleaning and
disinfection unit.
Like our other products, this cleaning and disinfection unit was manufactured and certified
according to the strictest quality standards. However, please read this user manual thoroughly
before operating this unit.
Careful handling and care of the cleaning and disinfection unit helps increase its useful lifespan
as well as preserve its value.
IC Medical GmbH
Advertisement
Table of Contents

Related Manuals for IC Medical HD 450

Summary of Contents for IC Medical HD 450
-
Page 1: User Manual
User Manual Washer-Disinfector HD 450 / HD 450 Injection Dear User, We thank you for the trust you have placed in us in choosing to purchase this cleaning and disinfection unit. Like our other products, this cleaning and disinfection unit was manufactured and certified according to the strictest quality standards. -
Page 2: General Information
General information Please read this user manual before operating the HD 450 / HD 450 Injection. The user manual contains important operating and safety instructions. In order to ensure that your device continues to function properly, it is essential that you observe the following points: •... - Page 3 User Manual This user manual contains important safety instructions and information you need to operate the HD 450 / HD 450 Injection. Read the user manual before using the washer-disinfector for the first time. It gives you important information on the safety, use, care and maintenance of the unit.
-
Page 4: Safety Instructions
Safety instructions When operating the HD 450 / HD 450 Injection, observe the safety instructions listed below and those contained in the individual chapters. ▪ Determination Use the HD 450 / HD 450 Injection only for the purpose specified in the user manual. - Page 5 This is due to the different ambient temperatures and no device error. ▪ Never operate the device without supervision. Unauthorized operation may result in damage to the unit or its equipment and is at your own risk. IC Medical accepts no liability in this case. ▪...
-
Page 6: Table Of Contents
Read transfer data ............38 Scope of delivery ............8 Read transfer data ............38 Device overview of the HD 450 / HD 450 Injection ..9 Firmware update ............39 The HD 450 / HD 450 Injection has the following features Service program ............ -
Page 7: Chapter 1 - Performance Description
HD 450 / HD 450 Injection Intended use Purpose of use The HD 450 / HD 450 Injection is a washer-disinfector intended for use in the medical field, e.g. in clinics and medical officies. Universal Use In this washer-disinfector, also called washer-disinfector, reprocessable medical devices can be cleaned and thermally disinfected. -
Page 8: Chapter 2 - Device Description
In this chapter you learn ▪ what is included in the standard scope of delivery ▪ what the HD 450 / HD 450 Injection has to offer ▪ which components and safety devices the device has Scope of delivery Standard-Scope of delivery... -
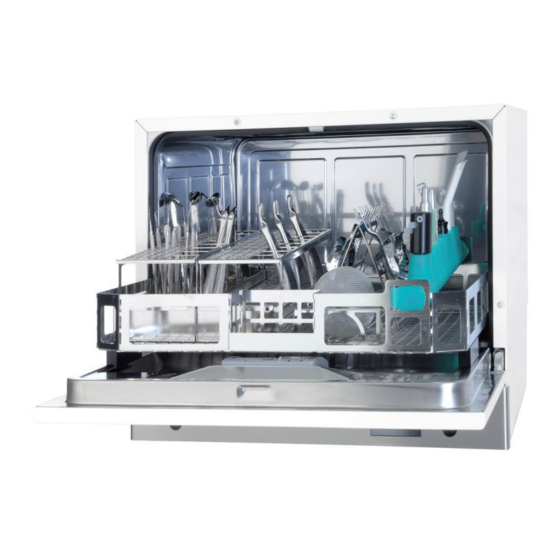
Page 9: Device Overview Of The Hd 450 / Hd 450 Injection
Door handle Push buttons (On/Off) Control and display panel (touch display) USB interface Figure 1 - Front side HD 450 / HD 450 Injection Back side 1 Mains connection cable 2 External connection control element (optional) 3 Ethernet network connection (RJ45) 4 Connection for cold water ¾... -
Page 10: The Hd 450 / Hd 450 Injection Has The Following Features
Malfunction (error) Decalcifying system The HD 450 / HD 450 Injection requires soft water to function properly. The Thermo Tabs (Art. No. 100 921) process chemistry used guarantees this basic water quality up to a hardness of 15°dH. If the water hardness exceeds 15°dH, the built-in decalcifying system must be activated and IRA salt used. -
Page 11: Automatic Door Lock
3-digit user code. Emergency release In the event of a power failure, the door of the HD 450 / HD 450 Injection cannot be opened for instrument removal. In this case, you can activate the emergency door release. It is located on the right-hand side in the lower part of the device. -
Page 12: Chapter 3 - Installation And Start-Up
▪ Only allow the HD 450 / HD 450 Injection to be set up, installed and put into operation by persons who have a professional qualification or are operators in the field. The installation requirements of the HD 450 / HD 450 Injection must be observed. -
Page 13: Device Connections
Chapter 3 – Installation and Start-up NOTE ▪ With all variants of the HD 450 series, no installations may be located in the area of the rear wall. ▪ When setting up or installing the unit, ensure that adjacent base cabinets or other furniture are resistant to condensation. -
Page 14: Switch Device On / Off
Switch on the HD 450 / HD 450 Injection by briefly pressing the push button. ▪ Switch off the device You can switch off the HD 450 / HD 450 Injection by pressing and holding the button for 3 seconds. Push button switch (on/off) -
Page 15: Symbols Touch Display
The upper toolbar of the touch display provides users a quick overview of the status and configuration of the device. Figure 5 - Start-up screen HD 450 / HD 450 Injection - toolbar marked red Meaning Display icons Cleaning cycle (batch) - number of cycles to date... - Page 16 After you have filled the IRA salt into the salt container, decalcification must be activated manually in the admin menu. ▪ Activation Start the device with the push button (On/Off) and operate the menu on the touch descaling system display. Figure 7 - Home screen HD 450 / HD 450 Injection...
- Page 17 Chapter 3 – Installation and Start-up ▪ Enter your 6-digit administrator code and confirm with OK. Figure 8 – Enter administrator code ▪ In the admin menu, go to the item „Deliming“ Figure 9 - Activating / deactivating descaling ▪ Select descaling „ON“...
-
Page 18: Fill In Rinse Aid / Refill (Operation Without Ve System)
Chapter 3- Installation and Start-up Fill in rinse aid / refill (operation without VE system) Only fill in rinse aid if you notice stains on the instruments. If this is not the case, do not use rinse aid. NOTE ▪ Check the suitability of the instruments to be cleaned with regard to the use of rinse aid! ▪... -
Page 19: Requirements For Initial Commissioning
Chapter 3 – Installation and Start-up Insert Thermo Tab Figure 14 - Place the Thermo Tab in the dry left chamber Close process media flap (Watch the clicking sound) Figure 15 - Close process media flap Requirements for initial commissioning ▪... -
Page 20: Chapter 4 - Cleaning And Disinfection
Type of loading You can clean and disinfect the following items in the HD 450 / HD 450 Injection: ▪ solid instruments up to a total of max. 6 kg ▪... -
Page 21: Classify Medical Instruments
Non-observance can lead to injuries due to chemicals and to program interruptions! NOTE The HD 450 Injection can be equipped with an injection bar for hollow instruments in addition to the basic basket. Always make sure that the loading of the injection rail, the basic basket, the tray holders and the instrument baskets is not carried out on the open outer door. -
Page 22: Sample Loading
Chapter 4 – Cleaning and disinfection ▪ The flushing arm must rotate freely and must not be blocked by downward projecting instruments. ▪ A good cleaning result depends on the correct arrangement of the instruments. Spray shadows must therefore be avoided. ▪... -
Page 23: Before Starting The Program, Note The Following
▪ Switch on the HD 450 / HD 450 Injection by briefly pressing the push button. Switch on the device ▪ A message appears on the display. Wait until the HD 450 / HD 450 Injection is Device ready ready. -
Page 24: Start Time Preselection
Start time preselection Start program The washer-disinfectors of the HD 450 series have a freely programmable time preselection. To optimise the time of your reprocessing processes, you can preselect the start time between 1 and 99 hours at hourly intervals. The unit then starts fully automatically at the desired time. -
Page 25: Program Is Running
Chapter 4 – Cleaning and disinfection Set any number of hours for a delayed process start with the arrow key. Figure 20 - Adapt START TIME After selecting the start time, confirm the entry with OK and enter your 3-digit user code. -
Page 26: Remove Instruments After End Of Program
Chapter 4 – Cleaning and disinfection Tracking the program You can follow the current progress on the display and see the previous process sequence on the displa running time. Figure 21 – Process step „WASHUP“ Remove instruments after end of program The display message and a beep will tell you when and whether the program was successfully completed. - Page 27 Chapter 4 – Cleaning and disinfection ▪ Door unlocked The door can be opened as soon as the temperature of the washing chamber has reached <88°C. Figure 23 - Note on door opening ▪ Restart device A restart can only take place at a temperature of <45°C. Figure 24 - Restart only possible at temp.
- Page 28 Chapter 4 – Cleaning and disinfection Manual program termination CAUTION When interrupting the program and removing the medical instruments, observe the following: ▪ There is a risk of contamination after a program termination without prior successful disinfection. Therefore, special care must be taken when handling the instruments.
-
Page 29: Chapter 5 - Setup Menu
▪ the difference between user and admin menu Menu levels The HD 450 / HD 450 Injection offers you 2 user levels. User For daily routine work, users must be instructed and regularly trained in the simple functions and loading of the equipment. They need to know how to machine reprocess medical devices. -
Page 30: User Menu
Chapter 5 –SETUP-MENU User Menu Structure user menu Structure and menu items of the user menu ▪ Read memory ▪ Set date & time ▪ Set language ▪ Example User Menu ▪ Read memory USB stick must be plugged into the USB interface. Select whether you want to read ALL or only NEW logs. -
Page 31: Admin Menu
Chapter 5 –SETUP-MENU Device information All relevant device information can be displayed by pressing the button display INFORMATION Note that the language can be set individually for each user profile! Admin Menu ▪ Structure and menu items Create user ▪ Delete user ▪... -
Page 32: Create User
Chapter 5 –SETUP-MENU Create user ▪ Create user Enter the new user name using the display keyboard and confirm with ▪ Define the 3-digit user code for the new user and confirm with OK. ▪ User successfully created in the system. INFORMATION Note that each user must be assigned with a personal 3-digit user code. -
Page 33: Edit Administrator
Chapter 5 –SETUP-MENU ▪ Confirm deletion of the user with OK. ▪ User was successfully removed from the system. Edit Administrator ▪ Edit Administrator Enter the administrator name using the display keyboard and confirm with OK. ▪ Set the 6-digit administrator code for the administrator and confirm with OK. ▪... -
Page 34: Read Memory
Chapter 5 –SETUP-MENU Read memory ▪ Read memory USB stick must be plugged into the USB interface Select whether you want to read ALL or only NEW logs. ▪ The selected protocols are transferred to the USB stick. Format memory NOTE Before you format the memory, all batch records must be read out. -
Page 35: Network Settings
Chapter 5 –SETUP-MENU Network settings ▪ Obtain IP address At delivery, DHCP (Dynamic Host Configuration Protocol, a procedure that automatically assigns configuration data to devices in a network) is enabled. If the device is connected to the network via the Ethernet socket, it automatically obtains an IP address from the server. -
Page 36: Manual Filter Cleaning
Chapter 5 –SETUP-MENU Manual filter cleaning ▪ Manual filter cleaning of the longLife filter is only necessary if a filter is cleaned Manual filter cleaning outside the normal cleaning cycle. performed How to clean a longLife filter and what you have to pay attention to can be found in the Chapter 6 - Maintenance on page 44. -
Page 37: Deliming
Chapter 5 –SETUP-MENU Deliming Deliming In the menu Deliming you can switch the decalcification system on / off depending switch on/off on the hardness of your water. INFORMATION For further information on the decalcification system please refer to Chapter 2 – Device description on page 8 DI monitoring Activate DI monitoring... -
Page 38: Read Transfer Data
Chapter 5 –SETUP-MENU Read transfer data Read transfer data In the Read out transfer data menu you can read out and save the basic settings, user and administrator data using a USB stick. If the device must be reset to factory settings or after a firmware update, the data can be restored in this way. -
Page 39: Firmware Update
Chapter 5 –SETUP-MENU Firmware update Firmware update If necessary, an update of the firmware can be uploaded to the device in the menu Update Firmware. ▪ Insert the USB stick with the new firmware into the USB interface of your device. ▪... -
Page 40: Chapter 6 - Maintenance
Chapter 6 – Maintenance Chapter 6 - Maintenance In this chapter you learn ▪ what you should check and clean regularly on the HD 450 / HD 450 Injection ▪ which cleaning agents are suitable for it ▪ how to avoid staining ▪... - Page 41 Chapter 6 – Maintenance 3 Micro sieve Figure 27 – Sieves can be easily removed and cleaned if necessary. NOTE If the coarse, fine and/or micro sieve is missing, residues can get into the flushing circuit of the device and impair its function! ▪...
- Page 42 ▪ Check the outside front of the Clean the operating unit and the plastic front of the HD 450 / HD 450 Injection only unit with a damp cloth or a suitable plastic cleaner. Please check the material compatibility before use! Never use solvents or benzine for cleaning.
-
Page 43: Avoid Staining
Avoid staining Stain formation due to poor Stains on the instruments or in the HD 450 / HD 450 Injection can occur due to poor water quality water quality. Heavy metal and chloride contamination in tap water in particular can lead to stains and rust formation. -
Page 44: Clean Longlife Filter (Only For Hd 450 Injection)
Chapter 6 – Maintenance Clean longLife filter (only for HD 450 Injection) NOTE ▪ The longLife filter MUST be cleaned every 20 cycles as it may clog with dirt particles after some time! ▪ Once a year the longLife filter MUST be replaced! ▪... - Page 45 Chapter 6 – Maintenance ▪ Remove the silicone coupling (at the back of the splint). ▪ Remove the silicone plug (at the front of the bar). Overview components injection bar 1 Silicone plug 2 Silicone coupling 3 Injection bar 4 longLife filter ▪...
- Page 46 Chapter 6 – Maintenance ▪ Firmly press on the silicone plug and check that the position is correct. ▪ Insert the filter completely into the rail. The seam of the filler must be at the bottom.. ▪ Check the position of the filter. ▪...
-
Page 47: Di Water
Chapter 6 – Maintenance ▪ The guide of the silicone coupling must be positioned appropriately on the frame of the filter. ▪ Visually check that the filter is correctly positioned. DI water NOTE ▪ To avoid damage / damage to the device and the instruments to be cleaned, we strongly recommend the use of deionised water. -
Page 48: Maintenance
The reproducible cleaning and disinfection result can be checked and ensured by the use of batch, routine and / or periodic checks, e.g. by validation. The process validation may only be carried out by qualified personnel. If you have any questions, please contact IC Medical's Validation Department. -
Page 49: Chapter 7 - Recording
(MPBetreibV). The internal log memory of the HD 450 / HD 450 Injection records and stores the data of the cleaning and disinfection cycles, e.g. program type, batch and process parameters of the expired cleaning program. -
Page 50: Computer As Output Medium
Computer as output medium You can access the device directly from a PC or via the medical network. The HD 450 / HD 450 Injection must be connected to the network (RJ45). - Page 51 Figure 34 – Output of logs by printing Transmission Network If the HD 450 / HD 450 Injection is integrated in the practice network, it is possible to load the protocols via the network. The prerequisite is that you have selected your device in the network via the options.
- Page 52 Chapter 7 – Recording Confirm network setting By selecting the device, the password (1234) and the port (7260) are automatically transferred to the network setting. Confirm the settings with OK. Figure 38 – Netzwerkeinstellungen definieren Download protocol via The "Download" area is now active. Via the button you can now read in the protocols. network Figure 39 –...
- Page 53 Chapter 7 – Recording Example Batch Record...
-
Page 54: Chapter 8 - Operating Breaks
A program start is possible again when the device temperature has fallen below 45°C. Decommissioning If you want to shut down the HD 450 / HD 450 Injection for a longer period of time, e.g. holidays, proceed as follows: ▪... -
Page 55: Recommissioning After Change Of Location
▪ Strong vibrations are to be avoided. Frost protection The HD 450 / HD 450 Injection can generally be operated, stored and transported frost-free. ▪ If residual liquids remaining in the unit are nevertheless frozen, the unit must be left at room temperature for at least 3 hours before restarting to ensure that any residual liquids (e.g. -
Page 56: Chapter 9 - Functional Testing
Chapter 9 – Functional testing Chapter 9 – Functional testing In this chapter you learn ▪ how the HD 450 / HD 450 Injection automatically carries out the function test ▪ which options you have for manual function checks ▪... -
Page 57: Chapter 10 - Malfunctions
Chapter 10 – Malfunctions Chapter 10 – Malfunctions In this chapter you learn ▪ what types of messages there are ▪ how you should behave in the event of malfunctions ▪ what you can do before you report a support incident Notifications A message is not a fault. - Page 58 Chapter 10 – Malfunctions General Event Possible cause What you can do Knocking or rattling noises in Flushing arm strikes instruments and Abort program, the washing chamber vessels or is blocked Re-sort wash ware and restart program White coating on instruments The descaling system is not Check the water hardness of the tap water programmed.
-
Page 59: Malfunction Messages
The year 1899 is displayed on the HD450Printer - Software obsolete Updating the batch record. Documentation software required. Download from IC Medical website Batch record display: HD450Printer - Software obsolete Updating the Error during cleaning and HD450Printer documentation software disinfection phase required. - Page 60 Chapter 10 – Malfunctions Incident Malfunction/Warning Possible cause What you can do notice No processing media It was forgotten to insert the process Insert the Thermo Tab into the device found chemistry and restart. Tab flap or tab opening is blocked, Check loading and restart program thus no ejection of the process chemical...
- Page 61 If you do not find the incident in the table above, or if your efforts are unsuccessful, contact authorized personnel such as IC Medical Customer Service, preferably using the service form on our homepage. In order to be able to help you, the serial number of your device as well as a detailed description of the fault message and, if necessary, a contact person are required.
-
Page 62: Operating Data
Operating data Program Partial cycle Partial cycle Partial cycle Partial cycle Partial cycle Partial cycle Partial cycle Intermediate Swamp flushing Pre-cleaning 1 Pre-cleaning 2 Cleaning Disinfection Drying rinsing Amount of water [l] Hold time [min.] Temperature [°C] 53 - 56 +/- 90 <... -
Page 63: Technical Data
CE label 0297 Note: To operate the HD 450 series washer-disinfectors, a separate circuit with its own overload fuse (rated 16A) is required. An additional residual current circuit breaker (FI-switch) with 30mA nominal value is recommended. No adapters, extensions or multiple sockets may be interposed. Deviations from these specifications lead to the... -
Page 64: Components And Accessories
Flexio universal holder for 8 Specula or 21 pliers 105 034 Flexio tray holder 7 105 015 External control unit - HD 450/HD 450 Injection 105 005 Flexio adapter for ZEG tips 105 023 Flexio adapter for hollow bodies with 22 mm Ø... - Page 65 Base cabinet 105 040 Protective tub 105 082 All listed items are available as components of the washer-disinfectors HD 450 / HD 450 Injection approved. The current prices are available on request from our sales department: info@icmedical.de +49 (0)7181-7060 - 70.
- Page 66 Symbols on the device Each device is equipped with a type plate at the factory. This is Type label located in the left door rebate of the unit and contains the following information: The device must not be disposed of with household waste. It must be disposed of properly by the manufacturer.
Need help?
Do you have a question about the HD 450 and is the answer not in the manual?
Questions and answers