LG Cinema 3D Sound Blu-ray BH9630TW Simple Manual
Hide thumbs
Also See for Cinema 3D Sound Blu-ray BH9630TW:
- Owner's manual (82 pages) ,
- Owner's manual (82 pages)
Table of Contents
Advertisement
SIMPLE MANUAL
Cinema 3D Sound Blu-ray™
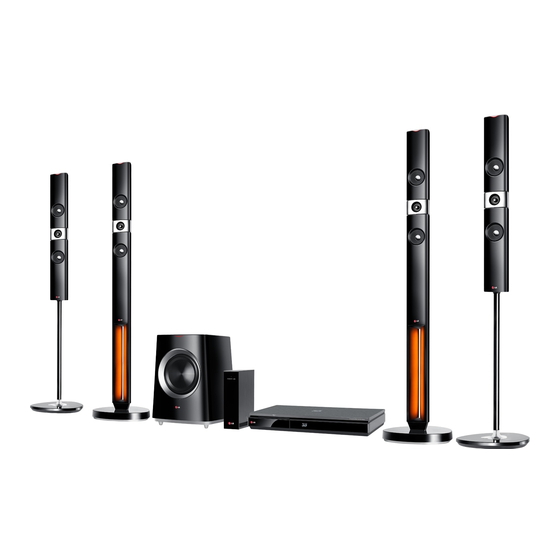
Home Theater System
Please read this manual carefully before operating
your set and retain it for future reference.
BH9630TW (BH9630TW, S93T2-FL/FR/S, S93T2-W, T2, W3-2)
BH9630TW (BH9630TW, S93T4-FL/FR/S, S93T2-W, T2, W3-2)
BH9630WY (BH9630WY, S93T4-FL/FR/S, S93T2-W, T2, W3-2)
BH9630TW-MX.BPERLLK_BPANLLK_SIMPLE_ENG.indd 1
13. 4. 16.
10:38
Advertisement
Table of Contents
Troubleshooting

Related Manuals for LG Cinema 3D Sound Blu-ray BH9630TW


Summary of Contents for LG Cinema 3D Sound Blu-ray BH9630TW
-
Page 1: Home Theater System
SIMPLE MANUAL Cinema 3D Sound Blu-ray™ Home Theater System Please read this manual carefully before operating your set and retain it for future reference. BH9630TW (BH9630TW, S93T2-FL/FR/S, S93T2-W, T2, W3-2) BH9630TW (BH9630TW, S93T4-FL/FR/S, S93T2-W, T2, W3-2) BH9630WY (BH9630WY, S93T4-FL/FR/S, S93T2-W, T2, W3-2) BH9630TW-MX.BPERLLK_BPANLLK_SIMPLE_ENG.indd 1 13. - Page 2 Getting Started Safety Information CAUTION concerning the Power Cord To disconnect power from the mains, pull out the mains cord plug. When installing the product, CAUTION ensure that the plug is easily accessible. This device is equipped with a portable battery or RISK OF ELECTRIC SHOCK DO NOT OPEN accumulator.
- Page 3 Getting Started IMPORTANT SAFETY Network Software Update INSTRUCTIONS 1. Read these instructions. 2. Keep these instructions. Network update notification 3. Heed all warnings. From time to time, performance improvements 4. Follow all instructions. and/or additional features or services may be 5.
-
Page 4: Table Of Contents
Table of Contents Table of Contents – Wired network setup – Wireless network connection – Wireless network setup Getting Started System Setting Safety Information Initial Setup Network Software Update Settings – Network update notification – Adjust the setup settings Introduction –... -
Page 5: Getting Started
Getting Started Introduction Playable discs and symbols used in this manual Media/Term Logo Symbol Description y Discs such as movies that can be purchased or rented. y “Blu-ray 3D” discs and “Blu-ray 3D ONLY” discs. y BD-R/RE discs that are recorded in BDAV format. Blu-ray y BD-R/RE discs that contain Movie, Music or Photo files. -
Page 6: File Requirement
Getting Started File requirement Video files File File Audio Codec Format Subtitle Location Extension Format “.avi”, “.mpg”, “.divx”, DIVX 3.11, DIVX4, Dolby SubRip (.srt / .txt), SAMI “.mpeg”, “.mkv”, “.mp4”, (.smi), SubStation Alpha DIVX5. DIVX6 (standard Digital, “.asf”, “.wmv”, “.m4v” (.ssa/.txt), MicroDVD playback only) DTS, MP3,... -
Page 7: Remote Control
Getting Started Remote Control ENTER (b): Acknowledges menu • • • • • • a • • • • • • selection. 1 (POWER): Switches the player ON or OFF. BACK ( ): Exits the menu or returns to the previous screen. B (OPEN/CLOSE): Ejects a disc. -
Page 8: Front Panel
Getting Started Front Panel > Caution a Disc Slot Precautions in using the touch buttons b Operation buttons R (OPEN/CLOSE) y Use the touch buttons with clean and dry T (PLAY / PAUSE) hands. I (STOP) - In a humid environment, wipe out any F (Function) moisture on the touch buttons before Changes the input source or function. -
Page 9: Rear Panel
Getting Started Rear Panel a AC power cord f USB Port (for connecting an USB keyboard or mouse) b AUX (L/R) INPUT g HDMI IN 1/2 c OPTICAL IN h HDMI OUT TO TV d WIRELESS connector i LAN port e Antenna Connector BH9630TW-MX.BPERLLK_BPANLLK_SIMPLE_ENG.indd 9 13. -
Page 10: Assembling The Speaker (Rear)
Getting Started Assembling the 2. Draw the speaker wire through the inside of the pole. speaker (Rear) Step 2 Preparation Pole Base Screw Cable 3. Attach the speaker to the pole, then secure the Speaker connection with a supplied screw. Step 3 1. - Page 11 Getting Started > Caution 4. Insert the connector to the bottom of the base. Connect the speaker wire to the terminal on the Be careful that the speaker bsae. does not fall down. Otherwise it may result in Make sure the wire marked black goes in to the the speaker malfunctioning terminal marked “–”...
-
Page 12: Connecting
Connecting > Caution Positioning the system y Be careful to make sure children not to put their hands or any objects into the *speaker The following illustration shows an example of duct. positioning the system. Note that the illustrations *Speaker duct: A hole for plentiful bass in these instructions differ from the actual unit for sound on speaker cabinet (enclosure). -
Page 13: Connecting The System
Connecting Connecting the System Attaching the rear speakers to the wireless receiver Connect the rear speakers to the wireless receiver with the speaker cords. Make sure the wire marked black goes in to the terminal marked “–” (minus) and the other wire goes in to the terminal marked “+”... -
Page 14: Wireless Speakers Connection
Connecting Note Wireless speakers y Do not insert other than the Wireless TX connection dedicated for this unit into the WIRELESS connector. This unit might be damaged or it may not be removed easily. 1. Insert the Wireless TX till the marked line into y If there is a strong electromagnetic wave the WIRELESS connector on the rear of the unit. -
Page 15: Connecting To Your Tv
Connecting Connecting to your TV Antenna connection If you have a HDMI TV or monitor, you can connect Connect the supplied antenna for listening to the it to this player using a HDMI cable (Type A, High radio. Speed HDMI™ Cable). Connect the HDMI jack on the player to the HDMI jack on a HDMI compatible TV or monitor. -
Page 16: Connections With External Device
Connecting Connections with OPTICAL IN connection external device You can enjoy the sound from your component with a digital optical connection through the speakers of this system. Connect the optical output jack of your component AUX Connection into the OPTICAL IN jack on the unit. And then select the [OPTICAL] option by pressing FUNCTION. -
Page 17: Hdmi In 1/2 Connection
Connecting HDMI IN 1/2 connection You can enjoy the pictures and sound from your component through this connection. Connect the HDMI OUT jack of your component into the HDMI IN 1 or 2 jack on this unit. And then select the [HDMI IN 1/2] option by pressing FUNCTION. -
Page 18: Connecting To Your Home Network
Connecting Connecting to your Broadband Home Network service This player can be connected to a local area network (LAN) via the LAN port on the rear panel or the internal wireless module. By connecting the unit to a broadband home Router network, you have access to services such as software updates, BD-Live interactivity and online... -
Page 19: Wired Network Setup
Connecting Wired network setup Advanced Setting If you want to set the network settings manually, If there is a DHCP server on the local area network use W/S to select [Advanced Setting] on the (LAN) via wired connection, this player will [Network Setting] menu and press ENTER (b). -
Page 20: Wireless Network Connection
Connecting Wireless network connection Preparation Another connection option is to use an Access Point Before setting the wireless network, you need or a wireless router. The network configuration and connection method may vary depending on the - connect the broadband internet to the equipment in use and the network environment. -
Page 21: Advanced Setting
Connecting Advanced Setting If you want to set the network settings manually, use W/S to select [Advanced Setting] on the [Network Setting] menu and press ENTER (b). 1. Use W/S to select [Wireless] and press ENTER (b). Note y WEP security mode generally have 4 keys available on an access point setting. -
Page 22: System Setting
System Setting Initial Setup 5. Use W/S/A/D to select the IP mode between [Dynamic] and [Static]. Normally, select [Dynamic] to allocate an IP When you turn on the unit for the first time, the address automatically. initial setup wizard appears on the screen. Set the display language and network settings on the initial setup wizard. - Page 23 System Setting 9. Press ENTER (b) to verify the test tone signals of the speakers. After verifying the test tone signals, press ENTER (b) while [Stop] is highlighted. Select [Next] and press ENTER (b). 10. You can listen to TV sound through this unit’s speaker automatically when TV is turned on.
-
Page 24: Settings
System Setting Settings Resolution setting The player provides several output resolutions for HDMI OUT jack. You can change the resolution using [Settings] menu. Adjust the setup settings 1. Press HOME ( ). You can change the settings of the player in the 2. -
Page 25: Operating
[Smart Share] - Displays Smart Share menu. b [Premium] - Displays the Premium home screen. c [LG Smart World] - Displays LG Apps titles provided to the unit. d [My Apps] - Displays the [My Apps] screen. e [Input] - Changes input mode. -
Page 26: Playing The Linked Devices
Operating Playing the Linked Playing a file on disc/USB device Devices This player can play video, audio and photo files Playing a disc contained in the disc or USB device. 1. Insert a data disc in the disc slot or connect an erot USB device. -
Page 27: Basic Operations For Video And Audio Content
Operating On-Screen Display Basic operations for video and audio content You can display and adjust various information and To stop playback settings about the content. Press Z (STOP) during playback. To control video playback To pause playback eroy Press M (PAUSE) during playback. You can control playback and set options while Press d (PLAY) to resume playback. -
Page 28: Troubleshooting
Troubleshooting Troubleshooting Troubleshooting Symptom Cause & Solution The Power does not turned on. y Plug the power cord into the wall outlet securely. The unit does not start y Insert a playable disc. (Check the disc type, color system, and regional playback. -
Page 29: Troubleshooting
Troubleshooting Symptom Cause & Solution Picture noise appears y You are playing a disc recorded in a colour system that is different from your TV. y Set the resolution which your TV accepts. Blu-ray 3D disc playback does y Connect the player to your TV with HDMI cable (Type A, High Speed not output 3D views. -
Page 30: Customer Support
You can update the Player using the latest software to enhance the products operation and/or add new features. To obtain the latest software for this player (if updates have been made), please visit http://www.lg.com or contact LG Electronics customer care center. Open Source Software Notice To obtain the corresponding source code under GPL, LGPL and other open source licenses, please visit http://opensource.lge.com. -
Page 31: Appendix
Appendix Specifications General Power requirements Refer to main label on the rear panel. Power consumption Refer to main label on the rear panel. Dimensions (W x H x D) Approx. 444 mm x 65 mm X 292.5 mm Net Weight (Approx.) 2.9 kg Operating temperature 5 °C to 35 °C (41 °F to 95 °F) - Page 32 Appendix Speakers (BH9630TW) Front speaker (Left/ Right) (S93T2-FL/S93T2-FR) 480 W Type 2 Way 3 speaker Max. Input power Net Dimensions 300 mm X 1350 mm X 300 mm Impedance Rated 3 Ω (W x H x D) 6 kg Input Power 240 W Net Weight Rear speaker (Left/ Right) (S93T2-S)
- Page 33 Appendix Speakers (BH9630WY) Front speaker (Left/ Right) (S93T4-FL/S93T4-FR) 480 W Type 2 Way 3 speaker Max. Input power Net Dimensions 300 mm X 1350 mm X 300 mm Impedance Rated 3 Ω (W x H x D) 6 kg Input Power 240 W Net Weight Rear speaker (Left/ Right) (S93T4-S)
-
Page 34: Maintenance
Appendix Maintenance Notes on discs Handling discs Handling the unit Do not touch the playback side of the disc. Hold the disc by the edges so that fingerprints do not get on the surface. Never stick paper or tape on the When shipping the unit disc. - Page 35 BH9630TW-MX.BPERLLK_BPANLLK_SIMPLE_ENG.indd 35 13. 4. 16. 10:39...
- Page 36 An extended Owner's Manual that contains information on the advanced features is located on the CD-ROM provided in an electronic version. To read these files, you will need to use a Personal Computer (PC) equipped with a CD-ROM drive. BH9630TW-MX.BPERLLK_BPANLLK_SIMPLE_ENG.indd 36 13.
Need help?
Do you have a question about the Cinema 3D Sound Blu-ray BH9630TW and is the answer not in the manual?
Questions and answers