
Subscribe to Our Youtube Channel
Related Manuals for Prexiso PR500HV


Summary of Contents for Prexiso PR500HV
- Page 1 IMPORTANT: Read before Using PR500HV SELF-LEVELING ROTARY LASER LIMITED www.prexiso-eu.com WARRANTY YEARS...
-
Page 2: Important Safety Instructions
IMPORTANT SAFETY INSTRUCTIONS Do not use the product before you have studied the Safety instructions and the User Manual on the enclosed CD or on our Homepage. If you have no such manual, or it is in the wrong language, please ask your agency for an appropriate copy. -
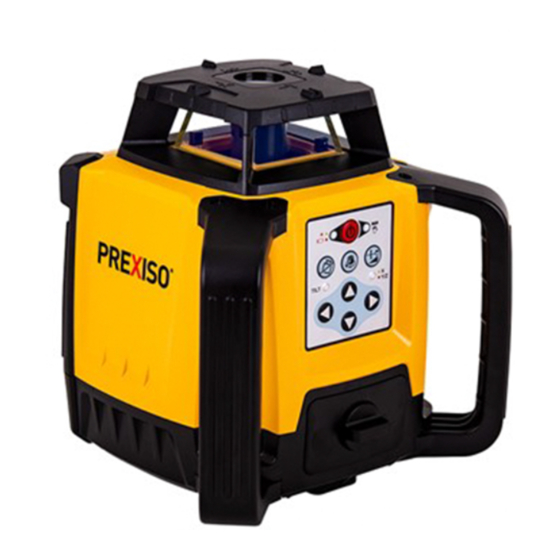
Page 3: Product Overview
PRODUCT OVERVIEW PARTS DESCRIPTION PARTS DESCRIPTION Alignment Sight 5/8" insert Vertical Up Beam Window Vertical Down Beam Rotary Laser / Glass Enclosed Mains unit/charger Keypad Plug(EU, China) Charging Plug(US, Japan, China) Power Adapter Plug Jack Plug(Australia) Vertical support dot Plug(UK) - Page 4 KEYPAD AND LED On/Off Tilt warning on/off Scan mode Slope /Speed Down Left Right LEDs POWER-LED • Blinking Green: Laser Tool is Auto-Leveling In Calibration and / or Default Tilt Warning Set Up • Solid Green: Auto-Leveling Complete • Blinking Red: Low Battery •...
- Page 5 RC300 REMOTE CONTROL RC300 1. Light indicator 2. Speed switch button(Press this button to switch the laser beam rotating speed from 300rpm->600rpm->0rpm->300rpm). 3. Laser dot moving button (Press this button to clockwise move the laser dot). 4. Speed switch button(Press this button to switch the laser beam rotating speed from 300rmp->0rpm->600rpm->300rpm.
-
Page 6: Batteries And Power
BATTERIES AND POWER Battery Installation / Removal Li-Ion Battery version WARNING: • Use charging / power adapter only with Li-Ion battery pack supplied. Charging any other type of battery may result in damage and/or personal harm. • The battery and charging / power adapter can be damaged if damp. Always store and charge the tool in a dry and covered place. -
Page 7: Horizontal Position
SET UP Horizontal Position Vertical Position • Place laser tool down on its bottom. • Place laser tool down on its side, Be sure surface is near level. handle facing up. Be sure surface • Press to power ON. is near level. •... -
Page 8: Operation In Manual Mode
Operation in Manual Mode • Press and hold for 3 seconds to turn on Manual Mode when the instrument is in Auto Mode or TILT Mode. Green LED is solid green, and Red LED is solid red. • The Auto-leveling function is off, the instrument can place at any less than 50°angle. -
Page 9: Scan Mode
Scan Mode • Turn on the Scan Mode: (1) Short press to turn on scan function, the default angle is 15° (2) Short press again to turn off scan function. • Scan angle switch: (1) Short press to switch the scan angle, followed by loop from 15°->30°->60°->15°. - Page 10 Press the laser will raise at +X direction of the instrument. Press the laser will lower at +X direct of the instrument. *A single short press the laser will tile 20". *Press and hold > 1 second, the laser will tile 15'/second. *Press and hold >...
- Page 11 Accuracy Check and Calibration...
- Page 12 20 m 20 m 20 m 20 m...
- Page 13 NOTE: • See Feature Set to reference which models offer specific functions. • The laser tools are sealed and calibrated at the factory to the accuracies specified. • It is recommended to perform a calibration check prior to its first use and then periodically during future use.
-
Page 14: Specifications
SPECIFICATIONS ±1.5 mm @ 30 m Horizontal Rotary Accuracy: ±3 mm @ 30 m Vertical Rotary Accuracy: ±3 mm @ 30 m Vertical Up Beam Accuracy: ±5° Compensation Range: ±10% Slope Range: 0.01% Minimum Increment: Scan Range: 15°, 30°, 60° Working range with Detector (φ) 0.5m ~ 500m Leveling Time:... -
Page 15: Maintenance And Care
• Do not use solvent to clean the laser. • Only transport the laser in its original case. Do not leave the Prexiso laser in direct sunlight. Do not expose the laser to high temperatures. The laser body and some internal parts are made of plastic and can warp at high temperatures. -
Page 16: Rohs Compliance
LASERS ARE DESIGNED TO CARRY OUT ALL TYPES OF WORK REQUIRING HORIZONTAL OR VERTICAL ALIGNMENTS. ALL DEVICES ARE CHECKED AND THEN SHIPPED WITH PERFECT SETTINGS, BUT SHOULD ANY IMPACT OCCUR, A DEVICE MAY LOSE PRECISION OR EVEN COMPLETELY LOSE ITS SETTINGS. THE USER MUST CHECK THE DEVICE REGULARLY AND BEFORE CARRYING OUT SUBSTANTIAL WORK.
Need help?
Do you have a question about the PR500HV and is the answer not in the manual?
Questions and answers