Advertisement
Advertisement
Table of Contents

Related Manuals for Aqualisa Aquatique Thermo Series


Summary of Contents for Aqualisa Aquatique Thermo Series
- Page 1 Aquatique ® Thermo shower valve Aquatique Thermo installation instuctions page 1...
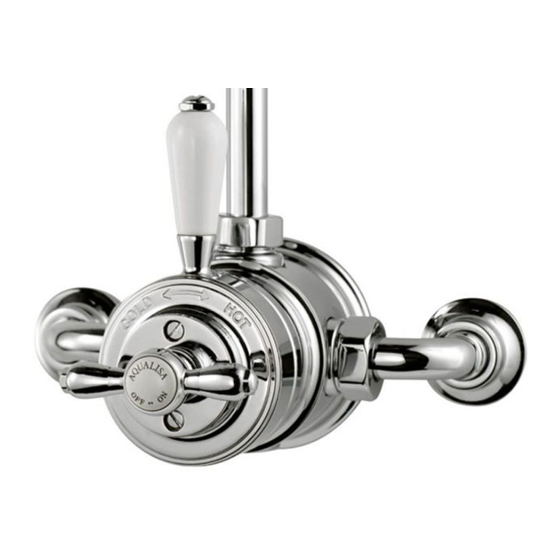
- Page 2 Shower systems Aquatique Thermo Aquatique Thermo Exposed valve Concealed valve Chrome Chrome 500.10.01 500.00.01 Gold Gold 500.10.04 500.00.04 Aquatique Thermo installation instuctions page 2...
- Page 3 Components Exposed Literature not shown Concealed Literature not shown Aquatique Thermo installation instuctions page 3...
-
Page 4: Safety Information
Flexible and 5” and 8” drencher heads are available to complement the Aquatique Thermo valves, dependent on your water system, and should be purchased separately. If you have any questions at any stage during installation please contact the Aqualisa customer helpline on 01959 560010 for advice. Safety information This product must be installed by a competent person in accordance with all relevant current Water Supply Regulations. - Page 5 9 litres (2 gallons) per minute to the shower valve. This is sufficient to operate one outlet point at a time. The Aqualisa Thermo cartridge is designed to operate from the mains at a maximum pressure of 10 bar. If the mains pressure exceeds 10 bar a ‘drop tight’...
- Page 6 Step -by-step instructions In addition to the guide below it is essential that the written instructions overleaf are read and understood and that you have all the necessary components (shown overleaf) before commencing installation. Failure to install the product in accordance with these instructions may adversely affect the warranty terms and conditions.
- Page 7 Remove the fixing template. Using a rotary type cutter cut the inlet pipes to length and drill and prepare the fixings for the mounting ring. Fix the mounting ring to the wall using the screws provided. Briefly run the hot and cold supplies to flush out any debris that may be present in the system.
- Page 8 Tighten the elbow locking screws using 2.5mm key provided. Slide the dummy nuts into position and rotate them so the locking screw is out of site before securing them using the 2.5mm key. Tighten the inlet compression unions sufficiently to ensure a watertight seal. Push the cover plates over the unions flush to the wall surface.
- Page 9 Concealed valve In addition to the guide below it is essential that the written instructions overleaf are read and understood and that you have all the necessary components (shown overleaf) before commencing installation. Failure to install the product in accordance with these instructions may adversely affect the warranty terms and conditions.
- Page 10 Suitable non-setting infill material such as paper, polystyrene etc. should be wrapped around the components and a plaster finish applied. Aqualisa reserves the right to revoke the terms of the warranty should access to service connections be denied by the use of solid setting infill material.
- Page 11 After installation... Reversed supplies The Aquatique Thermo is designed for conventional supplies with HOT on the Left and COLD on the Right as viewed from the front. However, the Aquatique Thermo can be adapted for use with reversed supplies, adopting the following procedure. 1 Set the temperature lever to the vertical position and remove the temperature screws and temperature lever/on/off assembly.
-
Page 12: After Installation
After installation Run through the valve operation with the purchaser and hand them this guide. Complete and post the Aquatique Thermo guarantee card or register online at www.aqualisa.co.uk. Cleaning Your Aquatique Thermo shower valve should be cleaned using only a soft cloth and washing up liquid. -
Page 13: Typical Installations
Typical installations Typical gravity system installation Typical Thermal storage unit system installation Supply Underside of cistern Vent and draw-off pipe to hot water Highest point Cold feed must be 1m below to cylinder underside of cistern Connect ‘A’ or ‘B’ Supply Hot water Hot water... - Page 14 Brochure Hotline: 0800 652 3669 Website: www.aqualisa.co.uk Email: enquiries@aqualisa.co.uk Please note that calls may be recorded for training and quality purposes The company reserves the right to alter, change or modify the product specifications without prior warning ® Registered Trademark Aqualisa Products Limited...
- Page 15 Digital Showers Mixer Showers Power Showers Smart Showers Shower Towers From Top Shower Brands Mira Showers Aqualisa Showers Triton Showers Gainsborough Showers Shower Pumps can upgrade your showering experience even more Stuart Turner Shower Pumps Salamander Shower Pumps Grundfos Shower Pumps...
Need help?
Do you have a question about the Aquatique Thermo Series and is the answer not in the manual?
Questions and answers