Table of Contents
Advertisement
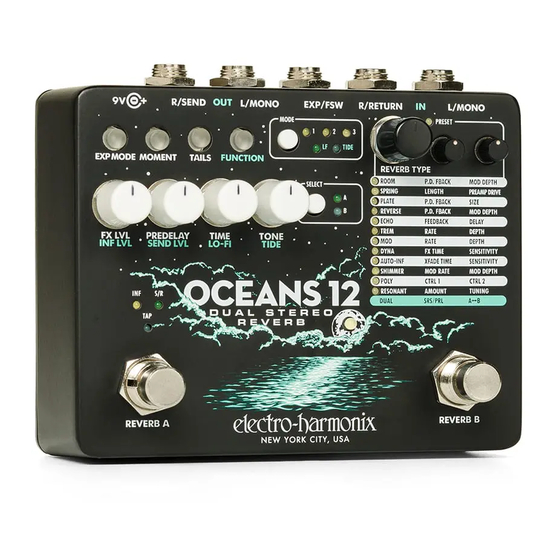
Multifunction Dual Stereo Reverb
Congratulations on your purchase of the Oceans 12, our dual stereo reverb tour-
de-force. Dive into uncharted sonic depths with its myriad features: two
simultaneous, independent, stereo reverb engines, series and parallel control for
the dual reverbs, 24 presets, external expression and footswitch input, and more.
Plus, with an array of new controls like Tide for stereo image alteration, Lo-fi for
diffusion reduction, infinite attenuation, send level for FX LOOPs, and split reverbs,
your customization options are nearly limitless. The Oceans 12 is the reverb pedal
to end all reverbs!
WARNING: Your Oceans 12 comes equipped with an Electro-Harmonix 9.6DC-200BI
power supply. The Oceans 12 requires 150mA at 9VDC with a center negative plug. Use
of the wrong adapter or a plug with the wrong polarity may damage your Oceans 12 and
void the warranty. Do not exceed 10.5VDC on the power plug. Power supplies rated for
less than 150mA will cause the Oceans 12 to act unreliably.
• Two simultaneous, independent, stereo reverb engines
• Series or parallel dual reverb configurations
• 12 Reverb Types per engine yield a multitude of reverb effects
• Multiple modes available for each Reverb Type, including new modes exclusive
to the Oceans 12
• Easy pushbutton access to extra features like reverb tails, momentary effect
mode, and alternate knob functions
• 24 presets may be saved and recalled: one preset for each Reverb Type of
each reverb engine
• Two-in-one expression/external-footswitch jack: control any combination of
the Oceans 12's knobs with an external expression pedal, or connect an
external 1-, 2- or 3-button footswitch for augmented pedal control
• Infinite hold, 1-second global pre-delay, tap tempo for Echo reverb
• Additional send/return signal routing option for mono setups
• High quality buffered analog bypass and soft switching
OCEANS 12
- FEATURES -
1
Advertisement
Table of Contents

Related Manuals for Electro-Harmonix OCEANS 12


Summary of Contents for Electro-Harmonix OCEANS 12
- Page 1 The Oceans 12 requires 150mA at 9VDC with a center negative plug. Use of the wrong adapter or a plug with the wrong polarity may damage your Oceans 12 and void the warranty. Do not exceed 10.5VDC on the power plug. Power supplies rated for less than 150mA will cause the Oceans 12 to act unreliably.
-
Page 2: Table Of Contents
Mode Button and LEDs Footswitches and LEDs Connections Reverb Type and Mini Knob Details Dual Reverb External Footswitch Functionality Expression Pedal Use and Setup Tap Tempo on the Oceans 12 Preset Use and Setup Restoring Factory Settings Warranty Information and Compliance... -
Page 3: Notes And Specifications
OTES AND PECIFICATIONS Audio input impedance for mono left input: 1M • Audio input impedance for stereo left input: 2M • Audio input impedance for right input: 2M • Audio output impedance for each output: 550 • Current draw: 150mA •... -
Page 4: Quick Start Guide
3. For stereo operation, connect R OUT to another amp. DIALING IN A STANDARD REVERB EFFECT 1. Ensure none of the buttons at the top left of the Oceans 12, like TAILS, are lit. If any of the buttons are lit or blinking, press the button once to disable it. - Page 5 USING DUAL REVERB 1. At any given time on the Oceans 12, only one of the reverb engines is selected for editing. The SELECT LED indicates which reverb engine this is. In general, reverb-editing controls affect only the selected reverb engine.
- Page 6 1. Connect your expression pedal to the EXP/FSW jack. 2. While the EXP MODE button is off, the expression pedal acts like a volume control for your dry signal before it enters the Oceans 12. 3. While the EXP MODE button is enabled, the expression pedal sweeps all parameters that are assigned to it for the current Reverb Type of the selected dual reverb.
-
Page 7: Controls And Leds
30 for more details on external footswitches. If dual reverbs are engaged, the Oceans 12 will slowly blink one of the SELECT LEDs to indicate which of the reverb engines is the current selection. -
Page 8: Control Knobs
- CONTROL KNOBS - The four knobs on the left side of the Oceans 12 control the main parameters of the reverb effects. These knobs have different functions depending on the status of the illuminated FUNCTION button (see the section about Illuminated Buttons on page 13 for details on FUNCTION). - Page 9 LO-FI effect is increased as the knob is turned clockwise. TIDE – Controls the amount of TIDE effect applied to the reverb output. When stereo outputs are used on the Oceans 12, TIDE subtly modulates the pan of the stereo output to gradually evolve the sound stage. When the knob is turned fully counter-clockwise, TIDE turns off.
-
Page 10: Summary Chart
MODE Reverb Type MODE Effect PREDELAY TIME Descriptions 1. Room ROOM Space type 2. Hall 1. 6G15 Algorithm SPRING select 2. Holy Grail 1. Original PLATE Plate type 2. Dark Plate 1. Swoosh Swoosh time Algorithm REVERSE select 2. Rev. echo Reverse time 1. - Page 11 Mini Knob 1 Mini Knob 2 Infinite Sustain? Tap tempo? Predel. feedback Mod. depth Spring length Preamp drive Predel. feedback Plate size Predel. feedback Mod. depth Echo feedback Echo delay LFO rate LFO depth Mod rate Depth Rate Feedback Blend Swell time Release time Threshold...
-
Page 12: Reverb Type Knob, Preset Led, And Mini Knobs
- REVERB TYPE KNOB, PRESET LED, AND MINI KNOBS - REVERB TYPE Knob This knob is a rotary encoder that selects which of the Oceans 12’s Reverb Types is active. The list ranges from ROOM at the top to RESONANT at the bottom. -
Page 13: Illuminated Buttons
EXP MODE Button – When this button is lit, EXP MODE is enabled. When an external expression pedal or control voltage is connected to the EXP/FSW jack on the rear of the Oceans 12, you can control any combination of knob parameters with your foot. When the EXP MODE button is disabled (button is not lit), the external expression pedal acts as a volume pedal for the dry signal and the signal into the reverb effect. - Page 14 If the FUNCTION button is held down for 2 seconds while the FUNCTION mode is not already on, all of the Oceans 12’s blue and green LEDs will start to blink rapidly, indicating that the two signals of the two reverb engines are now being split into L and R outputs.
-
Page 15: Send/Return Fx Loop
- SEND/RETURN FX LOOP - The Oceans 12 has the ability to create a special, wet, mono FX LOOP either before or after the reverb block. See the following diagram: The SEND is output through the R/SEND OUT jack. The return is Tip: useful for when you’d like an... - Page 16 To toggle SEND/RETURN, power-cycle the Oceans 12 while holding down the FUNCTION button. If the SEND/RETURN status was post-reverb OFF, pre-reverb. previously it will now be Similarly, if the pre-reverb, SEND/RETURN status was previously it will now be turned OFF.
-
Page 17: Mode Button And Leds
- MODE BUTTON AND LEDS - Each Reverb Type on the Oceans 12 has either two or three unique modes of operation. Pressing the MODE button cycles through these available modes. The LED labels 1, 2, or 3 show the current mode. When you switch Reverb Types, the Oceans 12 will recall the last mode you were using in that Reverb Type. -
Page 18: Footswitches And Leds
MOMENT button is not lit: press and release to toggle between bypass and effect modes. When the center white LED in the Oceans 12 graphic is lit, at least one of the reverb engines is engaged and the unit is in effect mode. - Page 19 (TAILS must still be on). This will send a loud bouncy jolt through the OCEANS 12, as it would a real spring reverb unit. This action can be performed when...
-
Page 20: Connections
– Connect an expression pedal with a TRS plug to this jack to allow external control over any of the Oceans 12’s knobs, or use it like a volume pedal on the dry signal before it hits the reverb effects. See page 31 for a description on how to set up and control the Oceans 12 with an external expression pedal. - Page 21 See page 30 for a description of all functions available on the external footswitches. 9V Power Jack – Plug the output of the Oceans 12’s supplied EHX9.6DC 200mA AC adapter to the 9V power jack located at the top of the pedal.
-
Page 22: Reverb Type And Mini Knob Details
EVERB YPE AND ETAILS Note: for every Reverb Type, the values of the mini knobs are “sticky”: they’re remembered for each mode when switching between them. For example, for the ROOM Reverb Type, you can dial in distinct Predelay Feedback and Mod Depth settings for Mode 1 and Mode 2. ROOM –... - Page 23 SPRING – MODE: Selects between our new renowned Fender 6G15 emulation ® (Mode 1) and the classic spring reverb algorithm from the Holy Grail (Mode 2). LENGTH: This knob selects spring length. The knob travel is divided into thirds, with each third selecting successively longer springs as the knob is turned clockwise.
- Page 24 ECHO – MODE: Cycles through the tempo subdivisions of the current echo time: quarter-note (Mode 1), dotted-eighth-note (Mode 2), and eighth-note (Mode 3). FEEDBACK: Controls the number of repeats of the delayed signal. As this knob is turned clockwise, the number of repeats increases. DELAY: Controls the delay time of the echoes.
- Page 25 In Mode 3, a ducking algorithm is applied which reduces the volume of the reverb while notes are being played. TIME behaves normally and controls the reverb decay. FX TIME: Sets the main time-based parameter of the effect. For Swell (Mode 1), this is the swell time. As FX TIME turns clockwise, the length of the swell will increase.
- Page 26 POLY – MODE: The mode button cycles through two sets of controls for the mini knobs CTRL 1 and CTRL 2. In mode 1, POLY reverb is in Interval Edit mode. In mode 2, POLY Reverb is in Mix Edit mode. See the mini knob details below for descriptions of their functions.
- Page 27 semitones until reaching G#6 (1661Hz) minor pentatonic at fully clockwise. In Mode 2, this knob selects the center frequency of the resonant filter. As TUNING is turned clockwise, the center frequency gets higher. DUAL REVERB When the illuminated FUNCTION button is blinking, the two mini knobs change their function to provide alternate controls over the dual reverb configuration.
-
Page 28: Dual Reverb
The wet mix of the first reverb engine is sent to the input of the second reverb engine. The output of the second one then becomes the output of the Oceans 12:... - Page 29 The factory default configuration is PARALLEL. You can select which configuration is active with the mini knobs after turning on the illuminated FUNCTION button. On the Oceans 12, the teal-highlighted bottom row of the Reverb Type table is labeled DUAL. When the FUNCTION button is lit, the two mini knobs change their function to these teal-highlighted alternate parameters, labeled SRS/PRL and A→B.
-
Page 30: External Footswitch Functionality
(with TRS plug) at its FSW jack. After inserting a footswitch, the Oceans 12 should rapidly blink the A/B SELECT and INF LEDs for one second. If other LEDs are blinking, the Oceans 12 mistakenly thinks an expression pedal is inserted, so re-insert the footswitch until you observe the correct confirmation. -
Page 31: Expression Pedal Use And Setup
Please see page 20 for specifications on acceptable expression pedals and voltage range for the Oceans 12. An expression pedal has one function when the EXP MODE Button is off, and a different one when the button is on. - Page 32 3. Once the other buttons stop blinking, release the EXP MODE button. EXP MODE will now be blinking. 4. Set any of the Oceans 12’s six knobs to the position you want them to have at the expression pedal’s heel position. If you do not want a knob to be swept by the expression pedal, do not move it at this point.
- Page 33 9. Once you have set the knobs for the toe-down position, press and release the EXP MODE button to save the toe settings. 10. The EXP MODE button will light solid and your custom Expression Setting for the currently selected Reverb Type is now saved and ready to use.
-
Page 34: Tap Tempo On The Oceans
EMPO ON THE CEANS For ECHO reverb, the Oceans 12’s echo time can be set with tap tempo using either of the built-in footswitches or by using an external momentary switch. With either method, you can achieve three different echo times all in sync with your tap tempo using the MODE button. - Page 35 12 is mistaking your footswitch for an expression pedal. Re-insert the external footswitch jack until you get the correct LED confirmation. 3. Select ECHO reverb on the desired reverb engine. Tap the corresponding connection (RING for Reverb A, TIP+RING for Reverb B) of the external footswitch at least two times at a steady tempo.
-
Page 36: Preset Use And Setup
RESET SE AND ETUP The Oceans 12 can save and recall one preset per Reverb Type for both Reverb A and Reverb B. Each preset saves all current knob settings (including all alternate FUNCTION knobs, except DUAL and FX LOOP... - Page 37 SAVING ALTERED PRESETS If you would like to save an altered preset to the current Reverb Type, press and hold the REVERB TYPE knob for about 2.5 seconds. Release Note: altered once the PRESET LED stops blinking and is lit solid. Expression Settings are automatically saved to presets.
-
Page 38: Restoring Factory Settings
ESTORING ACTORY ETTINGS To restore the Oceans 12 to factory default settings, press and hold the REVERB TYPE knob while plugging power into the Oceans 12. 1. Unplug the power supply from the Oceans 12. 2. Press and hold the REVERB TYPE knob while plugging power back in to the Oceans 12. -
Page 39: Warranty Information And Compliance
OMPLIANCE This equipment has been tested and found to comply with the limits for a Class B digital device, Note: pursuant to part 15 of the FCC Rules. These limits are designed to provide reasonable protection against harmful interference in a residential installation. This equipment generates, uses and can radiate radio frequency energy and, if not installed and used in accordance with the instructions, may cause harmful interference to radio communications. - Page 40 ARRANTY NFORMATION Please register online at http://www.ehx.com/product-registration or complete and return the enclosed warranty card within 10 days of purchase. Electro-Harmonix will repair or replace, at its discretion, a product that fails to operate due to defects in materials or workmanship for a period of one year from date of purchase.
Need help?
Do you have a question about the OCEANS 12 and is the answer not in the manual?
Questions and answers