
Subscribe to Our Youtube Channel
Related Manuals for DMTech IR-7000

Summary of Contents for DMTech IR-7000
- Page 1 N S T R U C T I A N U A L W i F i I n t e r n e t R a d i o w i t h A u d i o M e d i a S t r e a m i n g...
-
Page 2: Safety Information
Safety Information polarized plug has two blades with one wider than the other. A grounding type plug has two blades and a third grounding prong. The wide blade or the third prong are provided for your safety. If the provided plug does not fit into your outlet, consult an electrician for replacement of the obsolete outlet. -
Page 3: Table Of Contents
Contents Safety Information Package Content Internet Radio Quick start Guide Front Overview ........................4 Side and Back Overview ...................... 5 Connecting to Network ......................6 Choosing a Station ....................... 8 Searching and Adding Radio Stations ................. 9 Station Updates ........................9 Scan Programs ........................ -
Page 4: Package Content
Package Content Main unit Adapter Instruction manual... -
Page 5: Internet Radio Quick Start Guide
Internet Radio Quick start Guide Thanks for your buying! We are sure that it will provide you with years of enjoyment and reliable service. What you need before you can use your Internet radio? A broadband Internet connection. ... -
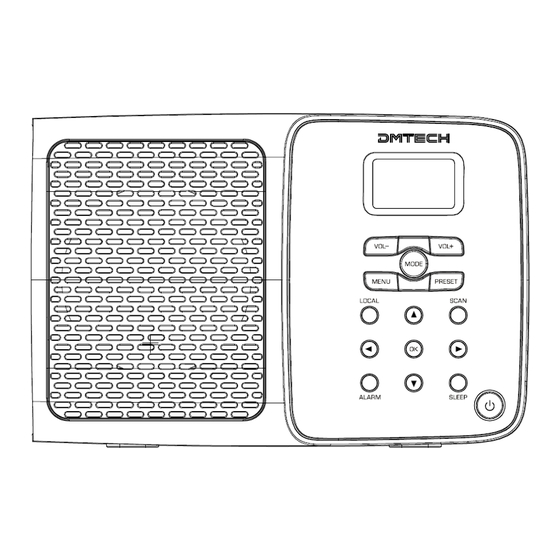
Page 6: Front Overview
Front Overview Control All mode Press to turn on/off radio Press to directly enter local programs list Internet radio mode use only: unique designed for you enjoying programs, each program play 30 seconds only and then turn to next, this function only can be activated under program lists or while playing a station program of internet radio mode by pressing this button Press to directly enter alarm settings... -
Page 7: Side And Back Overview
Side and Back Overview Side Overview Socket Description Earphone Connects to the headphone socket: Power cord It also call DC jack, connect to power socket: adapter Back Overview... -
Page 8: Connecting To Network
Connecting to Network Step 1 - Power up Radio Connect the power adapter to connect the DC Jack on the side of the unit. After this connection is made, insert the power adapter into the wall outlet, in use, radio can be switched on or off by pressing Later, it will say: Step 2 –... - Page 9 Your radio will ask you to input the WEP/WPA code and display the password entry screen. a. Press to pick the character you‟ve desired, if you want quick run to number, you can press directly reach 9-0. b. While your target character shows up, press to select it, simultaneously, the cursor will forward to next character for your selection.
-
Page 10: Choosing A Station
Choosing a Station Note: If a wrong operation being conducted, you always can have it move back by pressing 1. After your radio connect to network, press to enter while cursor point to <Internet Radio>. 2. Press to enter while cursor point to <Radio station/Music>. 3. -
Page 11: Searching And Adding Radio Stations
Local stations Note: a. If a wrong operation being conducted, you always can have it move back by pressing b. make sure your radio already connect to network, you can directly set Local stations by pressing the scan button. 1. -
Page 12: Scan Programs
Scan Programs Note: Internet radio mode use only, it is unique designed for you enjoying programs, each program play 30 seconds only and then turn to next. 1. While your radio shows program lists or while playing a station program under internet radio mode, press the SCAN button to activated scan programs function. -
Page 13: My Mediau
My mediaU My mediaU enables your radio programs synchronization with the web, before execute this order, you need below 4 steps: Go to www.mediayou.net, click „join now‟ to create a new account. Note: please save your registered „E-mail address‟ and „Password‟. Using you registered account log in, click the column of „my mediaU‟, and then make a search through Continent, Location, Genre or station name, add programs to „My Favorite Station‟, „Favourite Location/Genre‟... -
Page 14: Upnp
UPnP Step 1: Set Up Media Sharing in WMP 11 Note: After you download and install Windows Media Player 11 for Windows XP/vista/7, and connect your Radio to the network, you need to set up media sharing so that you can share music with your Radio. The following steps describe how to set up media sharing in Windows Media Player 11. -
Page 15: Step 2: Play Music On The Internet Radio
Step 2: Play Music on the Internet Radio After installing and configuring your Radio and Windows Media Player 11, you are now ready to play music via a wireless connection. The following steps describe how to play music with your Radio. 1. -
Page 16: General Operations
General Operations Browse Weather Information 1. Press , and then press to <Information Center>, press to confirm. 2. While cursor point to <Weather Information>, press to confirm. 3. Press to the region you wanted, press to confirm. 4. Press to the country you wanted, press to confirm. -
Page 17: Configuration
Configuration Network Settings Note: Doing this order will allow you: a. Wireless Network Configuration choose Router it will suggest you: “Please press the WPS button on your router within 120 Wireless Network [WPS PBC] Secs.” c. Manual Configuration Setting wireless parameters, such as DHCP, Enter SSID and Manage. -
Page 18: Setting Clock
Setting Clock 1. Press , and then press to <Configuration>, press to confirm. 2. Press to <Date &Time>, press to confirm. Note: before you set Date and time, welcome to setting below items according to your personal preference. Set Time Format 12/24 Hour ... -
Page 19: Setting Alarm
Setting Alarm A. Setting Alarm 1 or Alarm 2 1. To get alarm setting mode, you can press the ALARM button directly, or follow below 2 steps: a) Press , and then press to <Configuration>, press to confirm. b) Press to <Alarm>, press to confirm. - Page 20 8. Press to update the hour, and then press to update minute. 9. Using the same method to set minutes and AM/PM in turn, after the setting have completed, press to confirm. 10. Press to <Sound: Melody>, press to confirm. 11.
-
Page 21: Language
Language 1. Press , and then press to <Configuration>, press to confirm. 2. Press to <Language>, press to confirm. 3. Press to your selecting one, press to confirm. Dimmer 1. Press , and then press to <Configuration>, press to confirm. 2. -
Page 22: Sleep Timer
Sleep Timer Note: you might want your radio turn it off automatically after a certain time, you can do it through set sleep timer. Except press the SLEEP button repeatedly to directly set it, you also can follow below steps: Press , and then press to <Configuration>, press... -
Page 23: Weather
Weather A. Set to ----------- Show on Standby 1. Press , and then press to <Configuration>, press to confirm. Press to < Weather >, press to confirm. 3. While cursor point to <Show on Standby>, press to confirm. 4. Press to <On>, press to confirm. -
Page 24: Software Updates
Software Updates 1. Press , and then press to <Configuration>, press to confirm. Press to <Software Update>, press to confirm, and then step by step to set it. Note: this may take several minutes, so do not switch off the radio until this procedure has been completed. Otherwise, it may cause permanently damaged. -
Page 25: Troubleshooting
Troubleshooting If you experience any trouble with your wireless Internet Radio, then you may find it useful to visit the help section on our webpage: www.mediayou.net If you have trouble connecting the Radio to your wireless network, these steps may help to resolve the problem: 1. -
Page 26: Specification
Specification ITEMS DESCRIPTION Specifications: WiFi Internet Radio with Audio Media Streaming Input: 230Vac, 50Hz Power Requirements: Power adapter output: 9V/600mA Rated Output Power: 2Wrms Speaker: 4ohm Headphone Jack: 32ohm Dimension: 190x 58 x 126mm This symbol on the product or in the instructions means that your electrical and electronic equipment should be disposed at the end of its life separately from your household waste.
Need help?
Do you have a question about the IR-7000 and is the answer not in the manual?
Questions and answers