Table of Contents
Advertisement
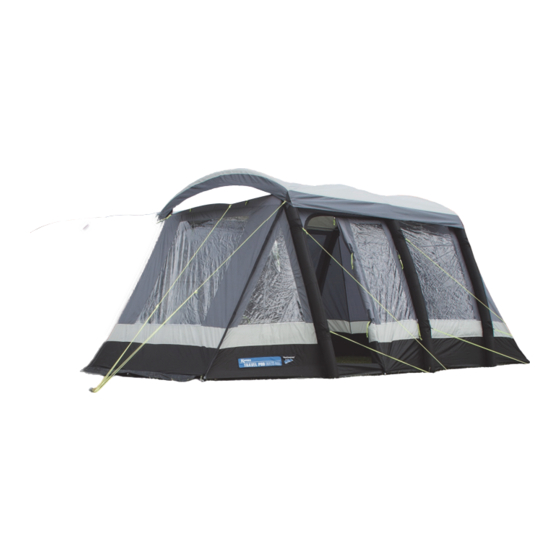
Travel Pod Maxi AIR
Instructions & care manual
The Travel Pod Maxi AIR is a universal fit awning designed to fit camper vans and
motorhomes.
The fit is universal and is not tailored to any one vehicle.
Therefore, you should be aware that this awning will fit some vehicles better than
others and Kampa do not guarantee a perfect fit.
Advertisement
Table of Contents

Related Manuals for Kampa Travel Pod Maxi AIR


Summary of Contents for Kampa Travel Pod Maxi AIR
- Page 1 Travel Pod Maxi AIR Instructions & care manual The Travel Pod Maxi AIR is a universal fit awning designed to fit camper vans and motorhomes. The fit is universal and is not tailored to any one vehicle. Therefore, you should be aware that this awning will fit some vehicles better than...
- Page 2 WELCOME Thank you for purchasing your Kampa AirFrame awning. Please read these instructions carefully before attempting to set up your awning and retain for future reference. If used properly, your awning should give you years of trouble free use. We recommend that your awning is insured against accidental and storm damage as this is not covered by the warranty.
- Page 3 The tunnel also has Keder beading sewn to its top edge. The beading can be threaded into ‘figure of 8’ extrusion (not supplied) and the figure of 8 clipped to the gutter on the side of the camper. Kampa Figure of 8 extrusion is available from your supplying dealer.
- Page 4 SET UP Unpack the awning and separate and identify the different parts. Unroll and lay the awning out in the required position (1). Peg each corner of the awning ensuring that you tension the awning between the pegs and making sure that the awning keeps it’s shape.
- Page 5 Starting from one end of the awning, unscrew the top cap, of the inflation valve and attach the pump nozzle (4). Pump up each AirPole (5). The pump has a pressure gauge and each AirPole should be inflated to 7 psi (0.482 bar). As each AirPole is inflated the awning will lift.
- Page 6 If you are using the inner tent, take it inside the awning and suspend from the colour coded buckles (8). Attach the remaining suspension points. Attach the base of the inners to the corresponding buckles on the groundsheet (9). It will be easier to attach the rear points before fully suspending the inner tent.
- Page 7 PEGS The awning comes complete with general purpose pegs. These will be suitable for many sites but there will be some instances where different pegs will be necessary. Your dealer will stock a range of pegs suitable for different types of ground. For maximum effectiveness, pegs should be driven into the ground at a 45º...
- Page 8 AirPoles. Repairs to the awning should be made by a company recommended by Kampa or your supplying dealer. Repairs and alterations made by an unauthorised company may invalidate your warranty.
- Page 10 Once located the tube can be repaired using repair tape. We recommend Kampa Tent & Awning Repair Tape - available from your dealer. The repair can be enhanced by using a combination of the tape with Kampa Repair Solution. Follow the manufacturers instructions to repair.
- Page 11 OPTIONAL EXTRAS AVAILABLE FOR YOUR AWNING WINDBREAK matches the awning and provides privacy and protection from the wind.
- Page 12 Kampa produce a superb range of camping accessories that are available from your dealer Kampa UK Limited Witham, CM8 3EU See the whole range at www.kampa.co.uk © mol/Kampa/2016...
Need help?
Do you have a question about the Travel Pod Maxi AIR and is the answer not in the manual?
Questions and answers