
Subscribe to Our Youtube Channel
Related Manuals for Grainfather Glycol Chiller


Summary of Contents for Grainfather Glycol Chiller
- Page 1 Glycol Chiller INSTRUCTIONS IMPORTANT: BEFORE OPERATING PLEASE SEE INSTRUCTIONS ON PAGE 5...
-
Page 2: Table Of Contents
CONTENTS Key features ......................p.1 Product contents ....................p.1 Safety information ....................p.2 Maintenance ......................p.2 How it works ......................p.5 Priming pump before first time use ..............p.5 Topping up the glycol tank ...................p.6 Air filter cleaning ....................p.7 Pumping out existing glycol mixture ..............p.7 Refilling with new glycol mixture ...............p.7 Preparing cooling connections ................p.8 Connecting the chiller to a fermenter ..............p.8 Operating and using the chiller................p.9... -
Page 3: Key Features
• LED & Touch Display • 6 L (1.6 US Gal) glycol tank. • Cools a Grainfather Conical Fermenter to a minimum temperature of 4 - 6°C (39 - 43°F)*. • Connect up to four fermenters and ferment each one at a different temperature. -
Page 4: Safety Information
6. Regularly check the glycol mixture level to make sure it is not too low. For optimal performance it is recommended to replace the glycol mixture every 6 months. PRODUCT NAME: Glycol Chiller Rated: 300W 220-240V ~ 50Hz (NZ, AU, UK, EU, SA) - Page 6 With the ability to individually control the temperature of up to four Grainfather Conical Fermenters, each with their own fermenting schedules, the Grainfather Glycol Chiller is the perfect addition to your brewery to ensure superior results.
-
Page 7: How It Works
Make sure the Glycol Chiller has been standing upright for 24 hours before use. 1. Begin with the Glycol Chiller off, and ensure that the glycol filter cap is screwed on tightly. 2. Open the cap on the top of the Glycol Chiller. Using the included Grainfather glycol funnel with mesh filter, pour 4 L (1.06 US Gal) of water into the tank. -
Page 8: Topping Up The Glycol Tank
Your Glycol Chiller is now ready for use. Enjoy your new Grainfather Glycol Chiller! TOPPING UP THE GLYCOL TANK NOTE: If this is the first time adding glycol into your Glycol Chiller, please refer to the Priming Pump Before First Time Use sub-section instead (page 5). -
Page 9: Air Filter Cleaning
NOTE: Follow the instructions below on replacing existing glycol mixture with new glycol mixture. AIR FILTER CLEANING: For optimal performance of your Glycol Chiller, it is recommended to clean the air filter every 6 months. If the Glycol Chiller is operated in a dusty environment, cleaning will need to occur more often. -
Page 10: Preparing Cooling Connections
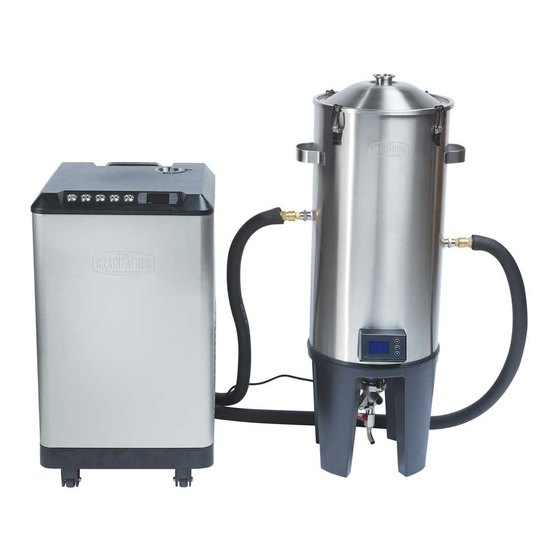
CONNECTING THE CHILLER TO A FERMENTER On the back panel of the Glycol Chiller are the connections for the hoses. You can connect up to four fermenters to the chiller. The outlet connections from the chiller are silver in colour and the return connections are gold. -
Page 11: Operating And Using The Chiller
OPERATING AND USING THE CHILLER 1. Plug the power cord into the back of the Glycol Chiller and the other end into a wall socket. 2. Connect the M12 power cord from your Grainfather Conical Fermenter to the connection under number 1. -
Page 12: Connecting More Than One Fermenter
CONNECTING MORE THAN ONE FERMENTER The Glycol Chiller can allow up to four 30 L (8 US Gal) Grainfather Conical Fermenters to be connected at one time. When connecting more than one fermenter, repeat the connection steps (see page 8) for each additional fermenter that needs to be connected by matching the remaining connections labelled from 2-4. -
Page 13: Temperature Control
1. Set the desired fermenting temperature on the Grainfather Conical Fermenter’s controller. 2. Press the number button on the Glycol Chiller that corresponds to the connections that will be in use. 3. The fermenter will now signal to the Glycol Chiller if it needs any additional glycol. - Page 14 NOTES...
- Page 16 www.grainfather.com...
Need help?
Do you have a question about the Glycol Chiller and is the answer not in the manual?
Questions and answers