Grainfather GLYCOL CHILLER Manual
Hide thumbs
Also See for GLYCOL CHILLER:
- Instructions manual (16 pages) ,
- Instructions manual (16 pages)
Table of Contents
Advertisement
Advertisement
Table of Contents

Related Manuals for Grainfather GLYCOL CHILLER


Summary of Contents for Grainfather GLYCOL CHILLER
- Page 1 GLYCOL CHILLER INSTRUCTIONS...
-
Page 2: Table Of Contents
CONTENTS Key features ....................p.1 Product contents ..................p.1 Safety information ..................p.2 Maintenance ....................p.2 How it works ....................p.5 Set up and preparation ................p.5 Mixing and filling glycol ................p.5 Preparing cooling connections ..............p.6 Connecting the chiller to a fermenter ............p.6 Operating and using the chiller.............. -
Page 3: Key Features
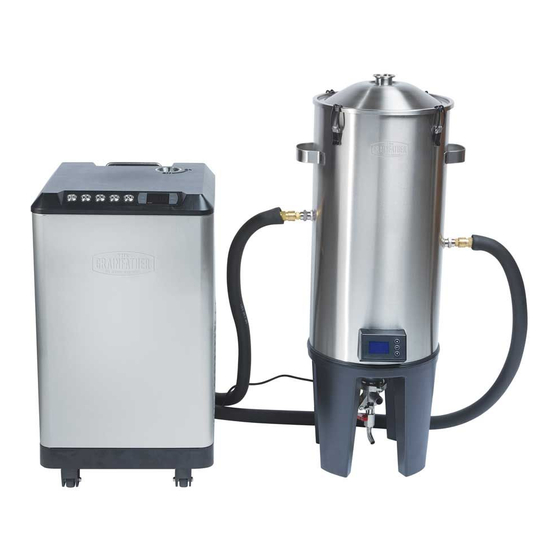
INCLUDES A 1x Glycol Chiller B 1x wall outlet power cord (with plug based on country of sale) C 2 x couplers (with self-sealing hose connections) D 2 x 2 m (6.5 ft) hoses... -
Page 4: Safety Information
3. DO NOT clean the stainless steel or plastic casing with a wire brush or steel wool. Z988 4. Use water or washing liquid that does not contain alkali or chlorine. 5. DO NOT spray water onto ventilation louvers. PRODUCT NAME: GLYCOL CHILLER Rated: 300W - 3.0A max 220-240V ~ 50Hz... - Page 6 With the ability to individually control the temperature of up to four Grainfather Conical Fermenters, each with their own fermenting schedules, the Grainfather Glycol Chiller is the perfect addition to your brewery to ensure superior results.
-
Page 7: How It Works
NOTE: Please ensure when mixing you use a clean vessel free from any foreign matter. As contaminants have the potential to cause blockages. 1. Open the cap on the top of the glycol chiller. Using a funnel add the glycol mixture to the tank. 2. Replace and tighten the cap. -
Page 8: Preparing Cooling Connections
CONNECTING THE CHILLER TO A FERMENTER On the back panel of the Glycol Chiller are the connections for the hoses. You can connect up to four fermenters to the chiller. The output connections from the chiller are silver in colour and the return connections are gold. -
Page 9: Operating And Using The Chiller
OPERATING AND USING THE CHILLER 1. Plug the power cord into the back of the Glycol Chiller and the other end into a wall socket. 2. Turn the power to the chiller on by pressing the power button on the front panel, the button will light up red. -
Page 10: Setting Fermenter Temperature
1. Set the glycol temperature 8°C below the fermenter with the lowest desired temperature. For example: fermenter 1 is set to 18°C (64°F) and fermenter 2 is set to 4°C (39°F). The glycol chiller will need to be set to -4°C (25°F). -
Page 11: Troubleshooting
TROUBLESHOOTING PROBLEM CAUSE TROUBLESHOOTING Unable to start normally Detach from wall power socket and Wall outlet error plug-in again Press power switch and the indicating Failed to press power switch lamp will start shining Power switch failure Contact your after-sales services The temperature set by the Failed to cool or cooling Reset the... - Page 12 www.grainfather.com...
Need help?
Do you have a question about the GLYCOL CHILLER and is the answer not in the manual?
Questions and answers