Table of Contents
Advertisement
Quick Links
L I G H T I N G
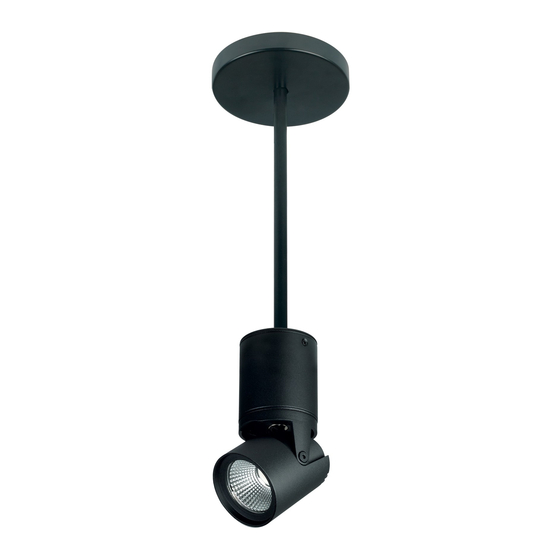
LCALDJ2 SURFACE (CEILING MOUNT)
CATALOG # :
Important: Please read and understand all instructions
completely before installing this fixture.
WARNING: Fixture installation (and use) and all electrical connections must be in accordance with
local and National Electrical Codes (N.E.C.) rules, regulations and standards. If you are unfamiliar
with installing fixture(s), accessories and/or electrical wiring have a qualified licensed electrician
install this fixture for you. Fixture should be installed by a qualified electrician.
WARNING: RISK OF SHOCK. House electric current can cause painful shock or serious injury.
WARNING: Always disconnect power before fixture installation, wiring, or maintenance.
WARNING: Before starting the wire connections, disconnect the power by turning off the circuit breaker
or removing the fuse at the fuse panel. Turning the power off using the light switch is not sufficient to
prevent electrical shock.
This luminaire must be connected with supply wire/conductors rated at 90°C. Most dwellings built
before 1985 have supply wire rated at 60°C; consult a qualified electrician before installing.
WARNING: Before service insure fixture is cool to touch.
WARNING: Check fixture for input voltage before connecting power to fixture.
WARNING: RISK OF SHOCK. Fixture is suitable for dry locations (unless otherwise stated on fixture,
Liton's web site or other installations). Also for use with covered ceiling mount.
Fixture must be installed on a circuit protected by Ground Fault Circuit Interrupter (GFCI).
MOUNTING PLATE
LCALDJ2 HOUSING
ASSEMBLY (1)
4" OCTAGONAL J-BOX
(BY OTHERS)
MOUNTING PLATE ASSY
(With LED Driver)
8-32 FLAT HEAD SCREWS (2)
(BY OTHERS)
M3 X 6mm LONG
FLAT HEAD SCREWS (2)
LCALDJ2 HOUSING
ASSEMBLY
AFTER INSTALLATION
TILT AND ROTATE
FIXTURE HEAD TO
PROPER
ORIENTATION
TILTS 85° MAX.
TURN TRIM TILL TABS ALIGN ON TRIM
A
TAB
B
C
TAB
D
5461 W. Jefferson Blvd. Los Angeles, CA 90016
M3 X 6mm LONG
FLAT HEAD SCREWS
(2)
ASSEMBLY (MPA)
(With LED Driver)
(1)
FIG. 1
Fixture Installation (CEILING MOUNT ONLY)
1. As needed remove Mounting Plate Assembly (MPA) from Housing Assy (FIG 1) by removing the two (2) M3 screws on the side of the
3-1/2"
fixture.
2. Mounting plate Assembly fits onto a 4" octagonal junction box (J-BOX) or other J-Boxes that have a 3-1/2" hole/screw spacing (see
above dimensions). Other j-boxes may also fit. Make sure J-BOX threaded holes will fit MPA holes.
3. Install wiring in 4" octagonal J-BOX (or other j-box) in ceiling, as needed.
4. Connect the power supply wiring from J-BOX to fixture wiring from LED driver in j-box. See "Wiring" instructions below.
5. Secure Mounting Plate Assembly (with LED driver) on j-box (by others), LED driver fits in 4" octagonal j-box, with appropriate
TABS
hardware (by others) (FIG 1). Keep wires from Housing Assembly to Mounting Plate Assembly attached. Do NOT pull on wires from
Housing Assembly to LED driver.
6. Align the two (2) tabs on the Mounting plate to the slots in the top of the Housing Assembly (FIG. 1).
7. Tighten M3 screw with #1 screw driver in housing until set screw is flush with outside of housing. Do not over tighten screws.
(FIXTURE
Changing Reflector (FIG. 4)
HEAD)
1. Remove fixture from mounting surface. Point fixture (A) downward and then lightly press and turn Trim (D) counterclockwise to
unscrew and remove Trim (D) with Glass (C) and Reflector (B) from fixture housing (A).
2. Twist Reflector (B) until tab aligns with Trim (D). Push up and remove Reflector (B) and Glass (C) (as needed) from Trim (D).
3. Replace Reflector (B) with a new Reflector and reverse procedure in steps 1 and 2 above to install trim snug (finger tight) in
ROTATES 325° MAX.
housing. Do not over tighten trim in houisng.
RELAMPING:
FIG. 2
AND REFLECTOR
NOTE: Check fixture for input voltage before connecting power to fixture. Connect wiring in j-box. For dimming information (wiring
diagrams, chart, etc.) see LCALDJ2 website page.
TABS NOT
1. Connect ground wire (green or bare copper/aluminum) from the supply circuit to the ground wire (green or bare copper) / screw /
ALIGNED
connector from the fixture.
2. Connect the neutral (common) wire from the power supply circuit to the neutral wire from the fixture.
3. Connect the main voltage supply wire (line/lead) from the power supply to the line (lead) wire from the fixture.
4. Secure connection using UL Listed wire nuts/connectors and then with UL Listed Electrical tape (by others), as required, appropriate
TABS ALIGNED
for the connection.
• P. 800-515-4880 • F. 800-972-4880 • www.liton.com
SAVE THESE INSTRUCTIONS
Keep these instructions in a safe place for future use/reference.
WARNING: Do not install any fixture or assembly (etc.) closer than 6" from any curtain,
or similar combustible material.
Fixture must be installed on a circuit protected by Ground Fault Circuit Interrupter
(GFCI).
RELAMPING:
Return fixture to Liton for servicing/replacing LED and LED drivers, as required.
Install LED fixture(s)/LED driver(s) only on their own circuit. Do not mix any other
products (Incandescent, Compact Fluorescent, H.I.D. products/fixtures, etc...) with LED
fixture(s)/LED driver(s) on a single circuit.
Do not use any other electrical equipment (example: surge protector photocell, etc.) that
is not (rated) for use with LED fixture(s)/LED driver(s) on the same circuit as LED
fixture(s)/LED driver(s).
Install remote surge protector(s) (by others, goes on the circuit with nothing between the
surge protector and the LED fixture(s)/LED driver(s)), if the fixture is not already
installed with a surge protector, to help remove power surges that may harm LED
fixture(s), appropriate for the installation. Periodically check and make sure that your
remote surge protector(s) are in good working order.
Components Dimensions
3-1/2"
Ø4-3/4"
(2)
COUNTERSINK
HOLES
(FOR (2)
#8 FLAT HEAD
SCREWS, BY
OTHERS)
MOUNTING PLATE ASSEMBLY (MPA)
Return fixture to Liton for servicing/replacing LED and LED drivers.
Product specifications subject to change without notice.
Page 1 of 5
• #1 and #2 Phillips Head
Screwdriver
• Wire Connectors
• Hardware (screws, nuts, etc.)
• DO NOT USE POWER TOOLS.
ONLY USE HAND TOOLS.
(HOLES FOR
WIRE EXIT)
WARNING: Always disconnect power before fixture
installation, wiring, or maintenance.
01182019
Advertisement
Table of Contents

Related Manuals for Liton LCALDJ2

Summary of Contents for Liton LCALDJ2
- Page 1 WARNING: RISK OF SHOCK. Fixture is suitable for dry locations (unless otherwise stated on fixture, fixture(s), appropriate for the installation. Periodically check and make sure that your Liton's web site or other installations). Also for use with covered ceiling mount. remote surge protector(s) are in good working order.
- Page 2 WARNING: RISK OF SHOCK. Fixture is suitable for dry locations (unless otherwise stated on fixture, fixture(s), appropriate for the installation. Periodically check and make sure that your Liton's web site or other installations). Also for use with covered ceiling mount. remote surge protector(s) are in good working order.
- Page 3 4. Locate the Track Polarity line and the Ground Connector on the and LPTM4 Track Mount (see above left and FIG. 2 FIG. 3 and FIG. 3). 5. Pull down on the Track Mount locking lever and insert the Adapter Contacts in the Liton Single or Dual Circuit Track slots (see FIG. 3). Ground Connector (GND) Polarity Line (Track) 6.
- Page 4 LED fixture(s)/LED driver(s)), if the fixture is not already Liton's web site or other installations. Also for use with covered ceiling mount. installed with a surge protector, to help remove power surges that may harm LED WARNING: Do not install any fixture or assembly (etc.) closer than 6"...
- Page 5 LED fixture(s)/LED driver(s)), if the fixture is not already Liton's web site or other installations. Also for use with covered ceiling mount. installed with a surge protector, to help remove power surges that may harm LED WARNING: Do not install any fixture or assembly (etc.) closer than 6"...
Need help?
Do you have a question about the LCALDJ2 and is the answer not in the manual?
Questions and answers