Table of Contents
Advertisement
Available languages
Available languages
Quick Links
Advertisement
Chapters
Table of Contents

Related Manuals for Fulgor Milano FWC 8746 U TC X


Summary of Contents for Fulgor Milano FWC 8746 U TC X
- Page 1 CANTINE VINI WINE CELLARS FWC 8746 U TC X FWC 8841 TC X...
-
Page 3: Table Of Contents
INDICE PAGINA 1 - INFORMAZIONI SICUREZZA IMPORTANTI Conformità Risparmio Energetico Servizio 2 - ELIMINARE I VECCHI ELETTRODOMESTICI DESCRIZIONE DELL’ELETTRODOMESTICO E INSTALLAZIONE 4 - INSTALLAZIONE DEGLI ACCESSORI Aprire E Pulire La Cantinetta Per Vini Regolazione Dell’altezza E Allineamento Della Cantinetta Per Vini Montaggio Della Maniglia Bloccare E Sbloccare Il Portello (Opzione) Temperatura Di Funzionamento... - Page 4 • Si prega di rimuovere interamente la confezione, gli Prima di utilizzare la cantinetta per vini, si prega di legge- adesivi e le pellicole dalla superficie del prodotto, re attentamente questo manuale di istruzioni per avere una e pulirla con un panno umido con un detergente non prestazione ottimale.
-
Page 5: Informazioni Di Sicurezza Importanti
INFORMAZIONI DI SICUREZZA IMPORTANTI Le cantinette per vini contengono un gas refrigerante (R600a: • Non posizionare oggetti e/o contenitori riempiti con isobutano) e un gas isolante (ciclopentano), altamente acqua in cima all’elettrodomestico. compatibili con l’ambiente, tuttavia sono infiammabili. • Non effettuare riparazioni sulla presente cantinetta Raccomandiamo di seguire le norme qui elencate in modo per vini. -
Page 6: Conformità
ELIMINARE I VECCHI ELETTRODOMESTICI CONFORMITÀ Riportando il marchio sul presente prodotto, dichiariamo a nostra responsabilità, la conformità con tutti i requisiti ambientali, sanitari e di sicurezza europei dichiarati nella normativa per questi prodotti. RISPARMIO ENERGETICO -- Assicurare sempre una buona ventilazione. Non coprire la griglia o lo sfogo di ventilazione. -
Page 7: Descrizione Dell'elettrodomestico Einstallazione
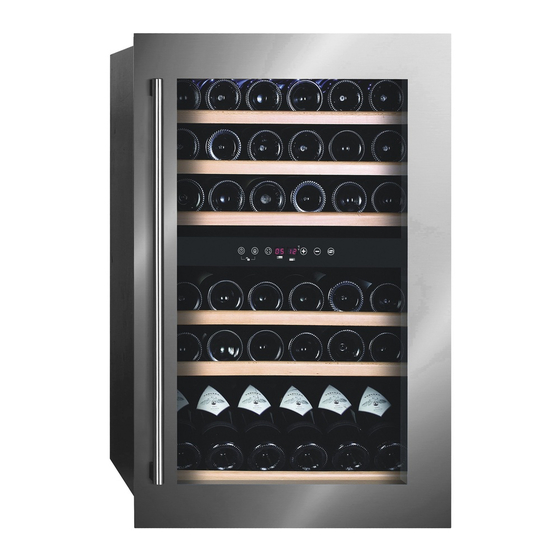
MAUNALE D’ISTRUZIONI DESCRIZIONE DELL’ELETTRODOMESTICO E INSTALLAZIONE 3 - DESCRIZIONE DELL’ELETTRODOMESTICO E INSTALLAZIONE Le seguenti immagini mostrano solo la descrizione della cantinetta. Le dimensioni e la quantità di ripiani può variare tra i modelli della stessa serie. Le seguenti immagini mostrano solo la descrizione della cantinetta. Le dimensioni e la quantità di ripiani può variare tra i modelli della stessa serie. - Page 8 3 - DESCRIZIONE DELL’ELETTRODOMESTICO E INSTALLAZIONE MAUNALE D’ISTRUZIONI VISTA FRONTALE DELLA CANTINETTA PER VINI Vista frontale della cantinetta per vini...
- Page 9 Piedino frontale Griglia regolabile a 145L-Altezza: 81,3 cm Piedino Cantinetta 145L-Altezza: 81,3 cm frontale regolabile CANTINETTA mod. FWC 8746 U TC X • Altezza regolabile: Single Zone Dual Zone Single & Dual Zone Bottiglie • 813-833mm Altezza regolabile: Bottiglie...
-
Page 10: Installazione Degli Accessori
• Utilizzare un panno morbido con acqua tiepida per pulire con la parte inferiore del pi la superficie interna. o Accertar Ruotare il p Per mod. FWC 8746 U TC X Inclinare la - Ruotare il piedino nella posizione ideale per mettere la cantinetta a l In qualsiasi cantinetta a livello. -
Page 11: Montaggio Della Maniglia
5 - FUNZIONAMENTO DELLA CANTINETTA PER VINI MAUNALE D’ISTRUZIONI IMPORTANTE: Se l'elettrodomestico non è a livello, il portello o la chiusura del portello potrebbero risentirne. Montaggio della maniglia TEMPERATURA DI FUNZIONAMENTO IMPORTANTE: Non spostare l’elettrodomestico una volta regolata l’altezza dei piedini. Montaggio della maniglia ... -
Page 12: Pannello Di Controllo
5 - FUNZIONAMENTO DELLA CANTINETTA PER VINI lasciare il portello semiaperto nel vano per evitare Tipi di vino Temp. consigliate possibili condense, muffe e formazione di odori. Vini rossi 15 - 18ºC (59ºF-64ºF) • Temperature consigliate raffreddamento/ conservazione dei vini. Vini bianchi/secchi 9 - 14ºC (48ºF-57ºF) Vini rosati... -
Page 13: Accensione/Spegnimento
5 - FUNZIONAMENTO DELLA CANTINETTA PER VINI ACCENSIONE/SPEGNIMENTO IMPOSTAZIONE DELLA TEMPERATURA ILLUMINAZIONE INTERNA • I range di temperatura preimpostati sono E: 5-12 ºC (41- 54 ºF) per la parte superiore e 12-22 ºC (54-72 ºF) per • In modalità sbloccata, premere il simbolo di illuminazione la parte inferiore. -
Page 14: Funzione Indicatore Di Luce
5 - FUNZIONAMENTO DELLA CANTINETTA PER VINI FUNZIONE INDICATORE DI LUCE - L’indicatore 1 lampeggerà ogni 2 secondi quando l’unità è collegata; - L’indicatore 1 sarà acceso quando il compressore comincia a funzionare; - L’indicatore 2 lampeggerà ogni 3 secondi quando la funzione di riscaldamento della parte inferiore comincia a funzionare;... -
Page 15: Cambio Del Filtro Di Carbone (Opzione)
6 - PULIZIA E MANUTENZIONE ● P ULIRE LA CANTINETTA PER VINI ● R IMUOVERE I RIPIANI • Spegnere l’alimentazione elettrica, scollegare la canti- • Prima di rimuovere un Ripiano dalla cantinetta, è neces- netta e rimuovere tutti gli oggetti, inclusi i ripiani. sario rimuovere tutte le bottiglie dal ripiano;... -
Page 16: Scongelamento
6 - PULIZIA E MANUTENZIONE Cambio del filtro di carbone (Opzione) ● S postare la cantinetta per vini Una buona qualità dell’aria nell’ambiente è importante per Se si deve spostare la cantinetta per vini in un’altra posizione, l’invecchiamento del vino. Il Filtro di Carbone è molto utile è... -
Page 17: Risoluzione Di Problemi
7 - RISOLUZIONE DI PROBLEMI Nel caso in cui si sospetti che il dispositivo non funzioni in modo appropriato, seguire le seguenti istruzioni per provare a risolvere il problema in modo semplice, da soli, prima di chiamare l’assistenza. PROBLEMA POSSIBILE CAUSA DEL PROBLEMA / MISURE La cantinetta per vini non funziona Non è... -
Page 18: Cambio Apertura Portello
8 - CAMBIO APERTURA PORTELLO MAUNALE D’ISTRUZIONI CAMBIO APERTURA PORTELLO NOTA: NOTA: • Le seguenti operazioni sono disponibili solo per i modelli con controllo nella cantinetta e con cardini sulla destra installati. MAUNALE D’ISTRUZIONI ● Le seguenti operazioni sono disponibili solo per i modelli con controllo nella •... - Page 19 8 - CAMBIO APERTURA PORTELLO MAUNALE D’ISTRUZIONI 3. Girare la porta di 180° (al contrario); Girare la porta di 180° (al contrario); MAUNALE D’ISTRUZIONI Girare la porta di 180° (al contrario); Cardine superiore Cardine inferiore Cardine superiore Cardine inferiore Avvitare saldamente le 8 viti dal cardine superiore e inferiore, una alla volta; 4.
- Page 20 8 - CAMBIO APERTURA PORTELLO Cantinetta mod. FWC 8746 U TC X MAUNALE D’ISTRUZIONI Cantinetta 145L NOTA: NOTA: • Per cambiare l’apertura del portello dal cardine di destra a quello di sinistra, bisogna preparare 2 nuove componenti: un •...
- Page 21 8 - CAMBIO APERTURA PORTELLO 3. Svitare il cardine superiore destro e inferiore destro dalla cantinetta Tenerli al sicuro per rimontare il portello. MAUNALE D’ISTRUZIONI Svitare il cardine superiore destro e inferiore destro dalla cantinetta Tenerli al sicuro per rimontare il portello. Cardine superiore MAUNALE D’ISTRUZIONI Svitare il cardine superiore destro e inferiore destro dalla cantinetta Tenerli al sicuro per...
- Page 22 8 - CAMBIO APERTURA PORTELLO 5. Montare il cardine superiore sinistro e inferiore sinistro al lato sinistro della cantinetta. Assicurarsi di aver stretto le viti. Montare il cardine superiore sinistro e inferiore sinistro al lato sinistro della cantinetta. Assicurarsi di aver stretto le viti. Cardine superiore sinistro Cardine inferiore sinistro .22.
- Page 23 7. Inserire il perno nell’allocazione inferiore del portello. Inserire il perno nell’allocazione inferiore del portello. Inserire il perno nell’allocazione inferiore del portello. Perno Montare il portello al cardine sinistro stringendo il perno con 2 viti. Perno 8. Montare il portello al cardine sinistro stringendo il perno con 2 viti. Montare il portello al cardine sinistro stringendo il perno con 2 viti.
- Page 25 INDEX PAGE 1 - IMPORTANT SAFETY INFORMATION Conformity Energy saving Service 2 - SCRAPPING OLD APPLIANCES 3 - DESCRIPTION APPLIANCE INSTALLATION 4 - ACCESSORY INSTALLATION BEFORE OPERATING Unpacking and cleaning the wine cooler Adjusting the height and levelling off your wine cabinet Installing the handle Lock &...
- Page 26 • Please removed all packaging, stickers and films from the products Before using your Wine Coolers, please carefully read this surface and clean the product’s surfaces with a damp cloth and instruction manual in order to maximize its performance. mild deturgent before using for the first time. Store all documentation for subsequent use or for other ow- ners.This product is intended solely for household use or •...
-
Page 27: Important Safety Information
IMPORTANT SAFETY INFORMATION The Wine Coolers contains a refrigerant gas (R600a: • Do not perform repairs on this Wine Coolers. All isobutane)and insulating gas (cyclopentane), with high interventions must be performed solely by qualified compatibility with the environment, that are, however, personnel. -
Page 28: Conformity
SCRAPPING OLD APPLIANCES CONFORMITY By placing the marking on this product, we declare, on our own responsibility, compliance to all of European safety ,health and environmental requirements stated in the legislation for this product. ENERGY SAVING -- Always ensure good ventilation. Do not cover ventilation opening or grille. -
Page 29: Description Of Appliance And Installation
INSTRUCTION MANUAL DESCRIPTION OF APPLIANCE AND INSTALLATION 3 - DESCRIPTION OF APPLIANCE AND INSTALLATION The following pictures only show description of appliance. The dimension and shelf The following pictures only show description of appliance. The dimension and shelf quantity may differ among the models of quantity may diff er among the models of the same series. - Page 30 3 - DESCRIPTION OF APPLIANCE AND INSTALLATION INSTRUCTION MANUAL Front view of cabinet and Wine Cooler Front view of cabinet and Wine Cooler .06.
- Page 31 Piedino frontale regolabile a 145L-Altezza: 81,3 cm • „ 145L Control In Cabinet-Height:81.3cm Altezza regolabile: 813-833mm Control In Cabinet FWC 8746 U TC X • Altezza regolabile: 813-833mm Single Zone Dual Zone Single & Dual Zone Single Zone 46 bottles...
-
Page 32: Accessory Installation Before Operating
Ruotare il Davanti questa griglia non deve essere posizionato alcun oggetto, cantinetta a l For FWC 8746 U TC X cantinetta per vini potrebbe non funzionare in modo appropriato. IMPORTANT: The front louver at the base of the appliance is for o Ripetere q ventilation. -
Page 33: Installing The Handle
5 - OPERATING THE WINE COOLER MAUNALE D’ISTRUZIONI IMPORTANTE: Se l'elettrodomestico non è a livello, il portello o la chiusura del portello potrebbero risentirne. Installing The Handle WORKING CLIMATE IMPORTANTE: Non spostare l’elettrodomestico una volta regolata l’altezza dei piedini. Montaggio della maniglia ... -
Page 34: Control Panel
5 - OPERATING THE WINE COOLER • Should the wine cooler be left empty for long periods Wine Type Recommender Temp. it is suggested that the appliance is unplugged, and after careful cleaning, leave the door ajar to allow air Red Wines 15 - 18ºC (59ºF-64ºF) to circulate inside the cabinet in order to avoid possible... -
Page 35: Interior Lighting On/Off Control
5 - OPERATING THE WINE COOLER INTERIOR LIGHTING ON/OFF CONTROL TEMPERATURE SETTING • Under the unlocked condition, touch the lighting mark • The default temperature setting ranges are E: 5-12 ºC (41- to turn on (or turn off ) the interior cool LED lighting. 54 ºF) for the upper zone and 12-22 ºC (54-72 ºF) for the •... -
Page 36: Function Indicating Light
5 - OPERATING THE WINE COOLER FUNCTION INDICATING LIGHT - The Indicator 1 will flash every 2 seconds when the unit is plugged in; - The Indicator 1 will stay on when the compressor starts to work; - The Indicator 2 will flash every 3 seconds when the heating function of lower zone starts to work;... -
Page 37: Care And Maintenance
6 - CARE AND MAINTENANCE CLEANING THE WINE COOLER REMOVING THE SHELVES • Turn off the power, unplug the appliance, and remove all • Before removing a Shelf from the appliance, it is neces- items including shelves. sary to remove all the bottles on the Shelf ; •... -
Page 38: Carbon Filter Change (Option)
6 - CARE AND MAINTENANCE Carbon Filter Change (Option) Moving Your Wine Cooler A good ambient air quality is important for wine maturing. If you need to move your Wine Cooler to another location The Carbon Filter is very helpful to absorb odor and improve you should follow the steps outlined below. - Page 39 7 - TROUBLESHOOTING If you feel the appliance is not working properly, follow these instructions to try to see if you can solve the problem simply by yourself before calling for service. PROBLEM PROBLEM POSSIBLE CAUSE / MEASURE The wine cooler does not operate Not plugged in.
-
Page 40: Reverse The Door Swing
8 - REVERSE THE DOOR SWING INSTRUCTION MANUAL REVERSE THE DOOR SWING Remarks: Remarks: • The following operations are available for a model with control in cabinet only and with Right Door Hinge installed. ● The following operations are available for a model with control in cabinet only and INSTRUCTION MANUAL •... - Page 41 8 - REVERSE THE DOOR SWING 3.Turn the door over by 1800 (upside down); INSTRUCTION MANUAL Turn the door over by 180 (upside down); INSTRUCTION MANUAL Turn the door over by 180 (upside down); Upper Hinge Bottom Hinge Upper Hinge Bottom Hinge Screw the 8 screws of Upper Hinge and Bottom Hinge tightly one by one;...
- Page 42 8 - REVERSE THE DOOR SWING For FWC 8746 U TC X Control in Cabinet INSTRUCTION MANUAL Remarks: „ For 145L Control in Cabinet • To reverse the door from right hinge to left hinge, you need to get ready 2 new spare parts: an Upper Left Hinge, and a Bottom Left Hinge.
- Page 43 8 - REVERSE THE DOOR SWING 3. Unscrew the Upper Right Hinge and Bottom Right Hinge from the cabinet. Keep them well for door re-installation. INSTRUCTION MANUAL Unscrew the Upper Right Hinge and Bottom Right Hinge from the cabinet. Keep them well for door re-installation.
- Page 44 8 - REVERSE THE DOOR SWING 5. Install the Upper Left Hinge and Bottom Left Hinge to the left side of the cabinet. Make sure the screws are tightened. Install the Upper Left Hinge and Bottom Left Hinge to the left side of the cabinet. Make sure the screws are tightened.
- Page 45 8 - REVERSE THE DOOR SWING 7. Insert the Pivot Hinge into the bottom hinge hole of the door. Insert the Pivot Hinge into the bottom hinge hole of the door. Insert the Pivot Hinge into the bottom hinge hole of the door. Pivot Hinge Install the door to the left hinge side by tightening the Pivot Hinge with the 2 screws.
- Page 48 FULGOR MILANO ® Meneghetti S.p.a. Via Borgo Lunardon, 8 • 36027 Rosà (Vicenza) - Italy http://www.fulgor-milano.com • e-mail: info@fulgor-milano.com...
Need help?
Do you have a question about the FWC 8746 U TC X and is the answer not in the manual?
Questions and answers