
Related Manuals for Promotech LIZARD

Summary of Contents for Promotech LIZARD
- Page 1 OPERATOR’S MANUAL WELDING CARRIAGE ul. Elewatorska 23/1, 15-620 Białystok, Poland Phone: +48 85 678-34-00, Fax: +48 85 651-15-31 www.promotech.eu e-mail: office@promotech.eu...
-
Page 2: Table Of Contents
Contents 1. GENERAL INFORMATION ....................3 1.1. Application ......................... 3 1.2. Technical data......................3 1.3. Design ........................5 1.4. Equipment included ....................6 2. SAFETY PRECAUTIONS ....................7 3. STARTUP AND OPERATION ................... 9 3.1. Preparing ........................9 3.2. Connecting to welding circuits ...................10 3.3. -
Page 3: General Information
1. GENERAL INFORMATION 1.1. Application The LIZARD is a welding carriage designed to produce continuous or intermittent butt and fillet welds using MIG/MAG torches with the handle diameter of 16–22 mm (0.63– 0.87’’). The carriage is fixed by permanent magnets and can work in the following welding positions: PA/1F/1G, PB/2F, PC/2G, PD/4F, and PE/4G. - Page 4 LIZARD 447 mm (17.6’’) This document is protected by copyrights. Copying, using, or distributing without permission of PROMOTECH is prohibited.
-
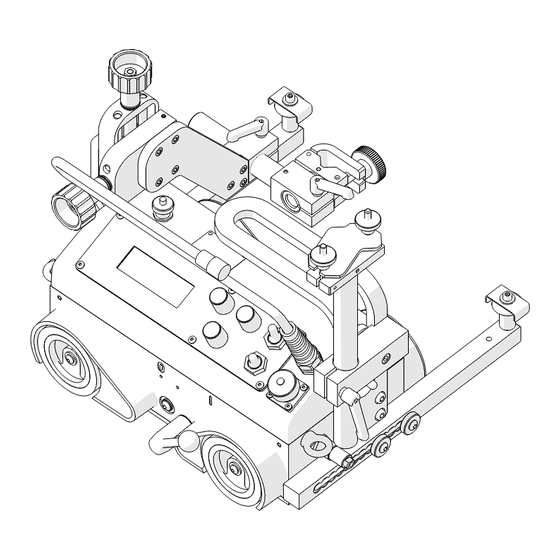
Page 5: Design
LIZARD 1.3. Design The LIZARD welding carriage consists of a chassis, a drive system, a controller, a cross slide, two guide arms, a cable anchor, and a torch holder. The drive system contains a gear-motor that drives four rubber wheels. -
Page 6: Equipment Included
3 m (10 ft) power cord 1 unit 6.5 m (21 ft) arc ignition cable 1 unit 4 mm hex wrench 1 unit Operator’s Manual 1 unit This document is protected by copyrights. Copying, using, or distributing without permission of PROMOTECH is prohibited. -
Page 7: Safety Precautions
21. Position the torch not more than 80 mm (3.15’’) outward from the left or right side of the carriage. This document is protected by copyrights. Copying, using, or distributing without permission of PROMOTECH is prohibited. - Page 8 31. Never leave the carriage unattended during operation. 32. Remove from the worksite and store in a secure and dry location when not in use. This document is protected by copyrights. Copying, using, or distributing without permission of PROMOTECH is prohibited.
-
Page 9: Startup And Operation
Next, insert the torch cable into the cable anchor, secure it with the knobs, and then fix the anchor in the required position using the lever. This document is protected by copyrights. Copying, using, or distributing without permission of PROMOTECH is prohibited. -
Page 10: Connecting To Welding Circuits
‘I’, and set the arc ignition switch to the position TEST, which should enable the arc for a while. This document is protected by copyrights. Copying, using, or distributing without permission of PROMOTECH is prohibited. -
Page 11: Positioning At The Worksite
When operating at heights, attach a safety line to the lug to prevent possible injury if the carriage loses the clamping. The safety line is not included in standard equipment. This document is protected by copyrights. Copying, using, or distributing without permission of PROMOTECH is prohibited. -
Page 12: Starting
Press and hold the knob F1 for about 3 seconds to enter into the configuration menu to set welding parameters. 3.5. Programming The LIZARD welding carriage allows defining up to 40 welding programs. After entering into the configuration menu, proceed as described in Fig. 7 to move among the parameters from Tab. 1. - Page 13 ENGLISH Language of the menu. POLISH SPANISH FRENCH PORTUGUESE TURKISH GERMAN RUSSIAN Tab. 1. Settings available in basic version of LIZARD This document is protected by copyrights. Copying, using, or distributing without permission of PROMOTECH is prohibited.
-
Page 14: Welding Procedure
Final point of the welding procedure Starting point of the first weld Fig. 8. Visualization of the welding procedure according to parameters from Tab. 1 This document is protected by copyrights. Copying, using, or distributing without permission of PROMOTECH is prohibited. -
Page 15: Operating
‘O’ to go into the main menu. After the work is finished, turn off the power using the power switch and unplug the carriage from the power source. This document is protected by copyrights. Copying, using, or distributing without permission of PROMOTECH is prohibited. -
Page 16: Using Oscillator (Accessory)
Fix the bracket 7 to the cross slide 10 using two M5x16 screws 9. Fix the oscillator plug 11 to the oscillation socket 12. Fix the low torch holder 13 to the oscillator arm 5. This document is protected by copyrights. Copying, using, or distributing without permission of PROMOTECH is prohibited. -
Page 17: Welding With Oscillation
LIZARD 3.8.2. Welding with oscillation If the oscillator is connected to the LIZARD welding carriage, several new settings will appear in the menu (Tab. 2). Welding with oscillation is performed in the standard manner, however, produced welds form a shape similar to the shape shown in Fig. 9 instead of the straight line from Fig. -
Page 18: Operating
LIZARD 3.8.3. Operating The LIZARD welding carriage with connected oscillator is operated similarly to operating without the oscillator. During welding with the oscillator, the menu indicated in Fig. 10 is shown on the display. Rotation of the knob F1 changes the oscillation amplitude by 1%. -
Page 19: Troubleshooting
2. Contact service center for indicates a malfunction of inspection and repair. the travel direction switch or travel direction identification circuit of the controller. This document is protected by copyrights. Copying, using, or distributing without permission of PROMOTECH is prohibited. -
Page 20: Maintenance
1. Check whether the knobs and the switches operate as intended. Replace if loose or damaged. 2. Inspect cables, cords, and hoses. Replace if damaged. 3. Tighten screws if loose. This document is protected by copyrights. Copying, using, or distributing without permission of PROMOTECH is prohibited. -
Page 21: Accessories
2 kg (4 lbs) To obtain the proper shape of oscillation, the axis of the oscillator’s output shaft must cross with the axis of the torch. This document is protected by copyrights. Copying, using, or distributing without permission of PROMOTECH is prohibited. - Page 22 LIZARD This document is protected by copyrights. Copying, using, or distributing without permission of PROMOTECH is prohibited.
-
Page 23: Mm Torch Clamp
4 mm hex wrench. Part number: ZCS-0476-06-01-00-0 5.4. 22–35 mm torch clamp Allows using a torch with the handle diameter of 22–35 mm (0.87–1.38’’). Part number: ZRZ-0466-19-00-00-0 This document is protected by copyrights. Copying, using, or distributing without permission of PROMOTECH is prohibited. -
Page 24: Short Rod
Part number: WLK-0466-04-10-00-0 5.7. Short rod torch holder with clamp Allows using a torch with the handle diameter of 16–22 mm (0.63–0.87’’). Part number: UCW-0476-20-00-00-0 This document is protected by copyrights. Copying, using, or distributing without permission of PROMOTECH is prohibited. -
Page 25: Short Rod Torch Holder With Clip
Part number: UCW-0476-06-00-00-0 5.10. Long rod torch holder with clamp Allows using a torch with the handle diameter of 16–22 mm (0.63–0.87’’). Part number: UCW-0466-04-00-00-0 This document is protected by copyrights. Copying, using, or distributing without permission of PROMOTECH is prohibited. -
Page 26: Long Rod Torch Holder With Clip
Fix the arm to the carriage using M5x16 screws. M5x10 Part number: PRD-0466-43-00-00-0 M5x16 This document is protected by copyrights. Copying, using, or distributing without permission of PROMOTECH is prohibited. -
Page 27: Edge Following Guide Arms
Allow guiding the carriage along outside edges. Install the guide arms after unscrewing the standard guide arms using the 4 mm hex wrench. Part number (2 units): PRW-0476-21-00-00-1 This document is protected by copyrights. Copying, using, or distributing without permission of PROMOTECH is prohibited. -
Page 28: Adjustable Guide Arms
Allow guiding the carriage along lap joints and templates. Install the guide arms after unscrewing the standard guide arms using the 4 mm hex wrench. Part number (2 units): PRW-0476-22-00-00-1 This document is protected by copyrights. Copying, using, or distributing without permission of PROMOTECH is prohibited. -
Page 29: Magnet Guide Arms
Allow guiding the carriage on ceilings. Install the guide arms after unscrewing the standard guide arms using the 4 mm hex wrench. Part number (2 units): PRW-0476-52-00-00-1 This document is protected by copyrights. Copying, using, or distributing without permission of PROMOTECH is prohibited. - Page 30 Allow guiding the carriage along low walls. Install the guide arms after unscrewing the standard guide arms using the 4 mm hex wrench. Part number (2 units): PRW-0476-54-00-00-1 This document is protected by copyrights. Copying, using, or distributing without permission of PROMOTECH is prohibited.
- Page 31 Allow guiding the carriage along walls with holes. Install the guide arms after unscrewing the standard guide arms using the 4 mm hex wrench. Part number (2 units): PRW-0476-55-00-00-1 This document is protected by copyrights. Copying, using, or distributing without permission of PROMOTECH is prohibited.
-
Page 32: Dual Torch Mount
Part number: PDT-0466-40-00-00-0 This document is protected by copyrights. Copying, using, or distributing without permission of PROMOTECH is prohibited. -
Page 33: Guiding Set
Butt joint Flexible rail (1 unit): PRW-0466-50-01-01-0 Magnet block set: BLO-0466-68-00-00-0 (includes: 10 magnet blocks and 22 screws M5x16) Guide arms (2 units): PRW-0476-50-01-00-1 This document is protected by copyrights. Copying, using, or distributing without permission of PROMOTECH is prohibited. - Page 34 LIZARD This document is protected by copyrights. Copying, using, or distributing without permission of PROMOTECH is prohibited.
-
Page 35: Guide Adjustment Tool
Lock the levers in this position, pull the further part of the guide off the workpiece (1), and begin moving the tool along the guide (2) to clamp the successive magnets to the workpiece. This document is protected by copyrights. Copying, using, or distributing without permission of PROMOTECH is prohibited. -
Page 36: Mm Cross Slide
0–76 mm (0–3’’). Part number: ZSP-0466-46-00-00-1 Install in place of the standard cross slide after unscrewing eight screws using the 4 mm hex wrench. This document is protected by copyrights. Copying, using, or distributing without permission of PROMOTECH is prohibited. -
Page 37: Wiring Diagram
LIZARD 6. WIRING DIAGRAM This document is protected by copyrights. Copying, using, or distributing without permission of PROMOTECH is prohibited. -
Page 38: Declaration Of Conformity
EN 60745-1 EN 60974-10 and satisfies safety regulations of the guidelines: 2004/108/EC, 2006/95/EC, 2006/42/EC. Białystok, 22 January 2015 ___________________________ Marek Siergiej Chair This document is protected by copyrights. Copying, using, or distributing without permission of PROMOTECH is prohibited. -
Page 39: Quality Certificate
(voltage 1000 V, frequency 50 Hz) Date .... Ω Resistance of the protective circuit ........Signature Quality control ..........Adjustments, inspections Quality control ..........This document is protected by copyrights. Copying, using, or distributing without permission of PROMOTECH is prohibited. -
Page 40: Warranty Card
WARRANTY CARD No..................in the name of Manufacturer warrants the LIZARD Welding Carriage to be free of defects in material and workmanship under normal use for a period of 12 months from the date of sale. This warranty does not cover wheels as well as damage or wear that arise from misuse, accident, tempering or any other causes not related to defects in workmanship or material.
Need help?
Do you have a question about the LIZARD and is the answer not in the manual?
Questions and answers